Nvidia Project Shield – Redefining Mobile Gaming

The quality of mobile gaming displayed an exponential growth in the past few years and now they are ready to be almost as good as console games. We already have high quality mobile gaming consoles from many manufactures.

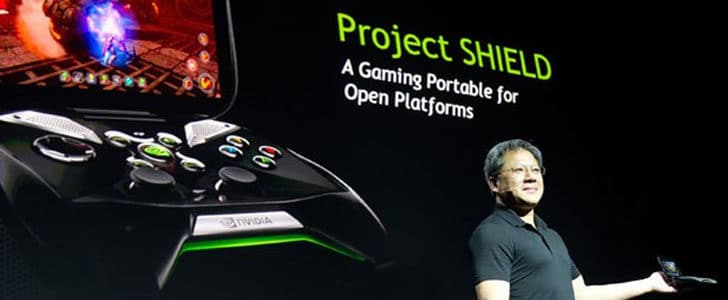
Nvidia entered this race with Project Shield, a high end Android based mobile gaming console introduced in CES 2013. It wraps up latest and greatest internals and displayed awesome performance in live demonstrations. Today we have Nvidia Project Shield under the NOG spotlight.
nvidia-project-shield-redefining-mobile-gaming-9817664

Insight for Project Shield

Design

Type: Flip

Controllers: Multi Touch Screen, Joysticks, shoulder mount triggers and dedicated buttons

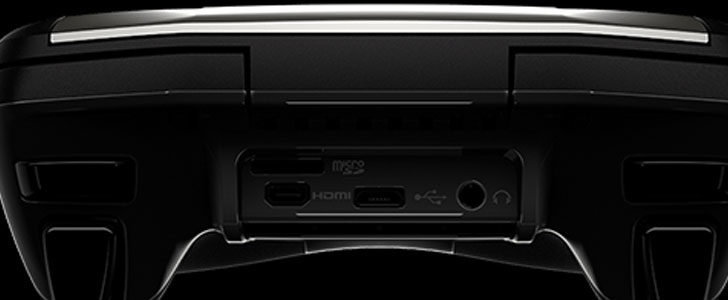
The design here is very different from a Smartphone or Tablet and very close to mobile gaming consoles like PSP. There is a flip screen, bass enhanced built in speakers and all the dedicated gaming controllers in place. In the back panel you can find connectivity ports and microSD slot.

nvidia-project-speakers-5842024

Display

Size: 5 inches

Technology: LCD

Resolution: 720 x 1280 px

Sharpness: 294 ppi

The display is in right size for mobile gaming. Display sharpness is also in its sweet point. But I’m not overly impressed with the display resolution and technology. A 1080p resolution and IPS or AMOLED display would be a great value addition.

Processor and Storage

Platform: Nvidia Tegra 4

CPU: Quad Core Cortex A15

GPU: 72 Core GeForce (Custom)

RAM: 2 GB

Internal Storage: 32 GB

Expandable Storage: Yes, microSD

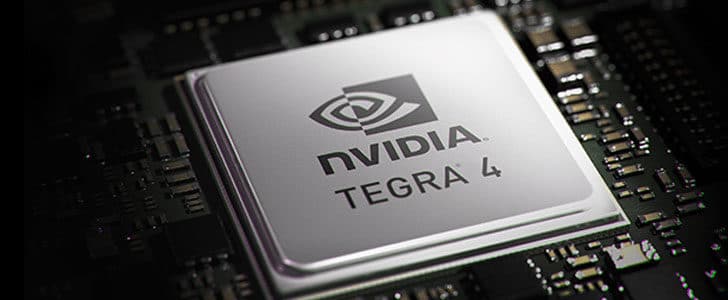
This is the first device to utilize latest Nvidia Tegra 4 platform and its power. Quad Core Cortex A15 CPU and 72 core Gefore GPU will make this device fly high in the sky for sure. The package comes with good amount of RAM and expandable internal storage too.
nvidia-project-tegra-4-3201737

Software

OS: Android 4.1 Jelly Bean

The operating system is Android, a wise move. It will give versatile performance to the device unlike other mobile gaming consoles. And it’s pure android, another wise move. So you wont have any performance issues like themed versions of Android.

Connectivity

Mobile Network: N/A

Wi-Fi: 802.11 n/g/b With 2×2 MIMO Antenna

Bluetooth: 3.0

USB: microUSB

HDMI: Yes up to 4K

This is not a mobile communication device. So you don’t need GSM/HSDPA or LTE. But it comes with lightening fast Wi-Fi for multiplayer games. Built in Bluetooth radio completes other things in between. MicroUSB port is there for PC connectivity.

In the CES demonstration this device worked superb with a 4K display connected via built in HDMI port. Once this project comes to retail market I’m pretty sure it will be a nice addition to your future living room with 4K TV.
nvidia-project-connectivity-6374103

This is not only a standalone device. You can connect this to your Gefore GTX powerd gaming station and play PC games. That’s why it’s comes with lighting fast Wi-Fy to reduce latency.

Battery Life

Type: Li-Ion

Capacity: 38 Wh

Battery Life: N/A

Cortex A15 CPU cores can perform a lot with much lesser power. And Nvidia 4-PLUS-1 architecture is also there. So this device expected to be energy efficient. With all these it has 33 Wh battery. So in real life you will be able to enjoy hard core gaming at least for 5 hours.

Wrapping Up

Project shield is not a complete product yet. But it has already created a new trend of Android powered mobile gaming consoles. Rumors say that Qualcomm is also working on building a Snapdragon 800 based gaming consol.

Once this comes to the market it will have lots of competitive advantage with Nvidia eco system. They already have Tegra Zone to download Android based games and Gefore GTX series desktop GPUs to work with project shield. After all it’s not only a gaming console. It can do most of the work as same as a Android Smartphone like web browsing, YouTubing, image viewing and social media.

No matter how hard these devices try to bridge the gap between console gaming and mobile gaming, there is lot more work to do toward it. So it might be challenging to get the hard core gamers attracted to these devices.

If Nvidia manages to release a polished device with great price they have a good chance of dominating mobile gaming with power of Android. The answer we are looking for is in the future. Will discuss further once this comes to market as a retail product.

Tags: #Nvidia

Web Performance and Security with CloudFlare

For the past few days I was talking about how to make your WordPress blog super speedy. It was a roadmap with many steps. The last step was how to integrate a Content Delivery Network to speed up the loading of static content. The solution I offered was CloudFlare. It’s webmaster-friendly and fully automated. However CloudFlare is not only a CDN, it’s much more. Today I’m trying to take a closer look in to Cloud Flare and show you what it can do.

Quick Catch-up

  • Roadmap to High Performance WordPress Blog [CDN]

web-performance-and-security-with-cloudflare-3958865

What is CloudFlare and How It Works?

Content Delivery Network

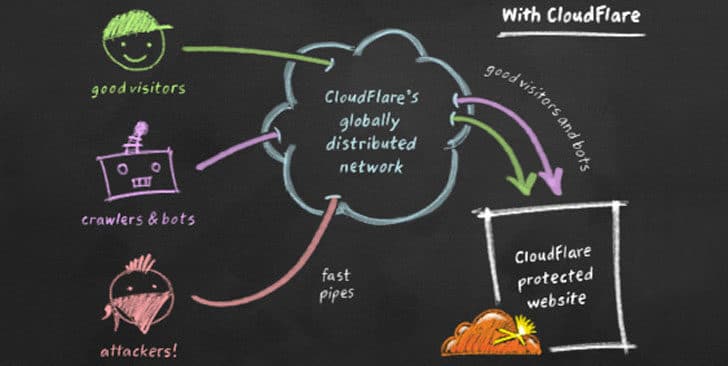
CloudFlare is globally spread hosting environment which is capable of delivering static web content. They have 22 data centers all over the world and providing unlimited storage facility for its users for free. However they won’t provide you web hosting facility to run server side scripts.

As a webmaster you can use CloudFlare to reduce the load to your main server. You can run dynamic web content with server side scripts linked with database as usual. Then you can distribute your static content all over the world with CloudFlare. So users will be loading large part of your website from nearest CloudFlare server and access your main server only to get dynamic web content.

The best thing here is you don’t have to change the structure of your website to work with CloudFlare. Only thing you have to do is change NS record in your domain control panel and let the traffic to go through CloudFlare engine. Rest of the things will be handled by CloudFlare. All you have to do is sit back and enjoy.

Since it’s keeping a copy of your whole website, in a case of server failure still your users will be able to see the last static version of your website. CloudFlare will automatically add a message indicating it’s a cached copy.

Web Optimization

CloudFlare is not only a CDN, it’s much more. Since it handle DNS, it show your visitors easiest possible way to get web content and improve the web page load time. When we were walking down the roadmap to high performance WordPress blog, you got to know about enabling browser caching. CloudFlare caches entire static content of your webpage automatically respecting their expiration time. Further it’s capable of caching content in parameterized URLs.

The web optimizer in CloudFlare can minify your HTML, CSS and JS. There is an experimental feature called rocket loader. It automatically combines entire external JS in your page and loads them asynchronously.

Security

CloudFlare maintain a database of known online threats. If any of those threats tries to access your webpage, it will block them automatically. In such case it will challenge the user with a captcha to verify whether he is a real visitor.

It takes security to next level by obfuscating email addresses, browser integrity check and image hotlink protection. Hotlink protection is a great idea to prevent embedding your content in 3rd party webpage.

web-performance-and-security-with-cloudflare-diagram-7513071

CloudFlare Settings Explained

I believe that you already configured your website with CloudFlare by following its registration. Basically all you have to do is change given NS records in your domain control panel. In addition you will have to add few other CNAME records to let FTP traffic to bypass CloudFlare.

Go to CloudFlare, login and then go to Websites. There you can see your websites listed. Click on the settings button and go to CloudFlare Settings.

In Settings overview page you could set your security and performance profile. Default settings will work for most of blogs. You can purge the whole CloudFlare cache, go to development mode, enable always online and find many more options there.

In Security Setting page you can customize profile, altering options such as challenge passage TTL and above discussed features. It’s letting you to customize the challenge page as well.

In the Performance Settings tab you can customize performance profile. Here you can alter caching level, minimum expiration time, minification etc. Try enabling rocket loader, but keep your eye open for any broken JS. It might give you trouble with Google Adsense.

Wrapping Up

CloudFlare is a must use service not only for blogs, but for all websites. You don’t have to change URLs of static content to work with CloudFlare like other CDN services. All you have to do is simply change NS records. CDN, web optimizer and security features are working fine and no glitches so far.

After I enabled CloudFlare more than 60% of bandwidth and more than 80% of hits were served by CloudFlare servers. It’s saving more than half of server recourses and loading pages even faster than before.

Try CloudFlare with your website, experience the performance improvement and never forget to share new things you came across with. If you face any difficulties when working with CloudFlare tweet me @MalindaOnline.

Tags: #Performance #Security #Web

Blog to Facebook and Twitter Solution – Dlvr.it

Few years ago, it was the era of search engines. Most of the internet content creators were mainly focused on SEO. But social media gained popularity in an exponential rate. Yesterday according to Alexa traffic ranking Facebook become the number 1 website. This is a major turning point in WWW.

As a blogger you must be paying very close attention to SEO already. But in future you might have to pay very close attention to your social engagements as well. You may have a Facebook fan page, Twitter profile and many other online representations. But you must make them updated with latest content of your Blog. There are many online services out there to get this done. Today I’m going to talk about simple, easy to use yet effective service to automate your blog post sharing on Facebook and Twitter.

blog-to-facebook-and-twitter-solution-dlvr-4460686

Getting Started with Dlvr.it

  • Go to Dlvr.it home page, enter email address and password to signup
  • Then it will take you on a step by step configuration process.
  • As the first step you have to enter your RSS feed URL and what should the first post to share on Facebook or Twitter.
  • Once you click next it will take you to next step. There you have to choose your destinations. Other than Facebook and Twitter, it supports LinkedIn, Thumblr, StatusNet and MySapce. Click on the icon to activate it.
  • Once you complete adding one destination, your registration process is complete. Then it will take you to dashboard.
  • In Dashboard you can find Deliveries, Stats, Post Widgets and settings.
  • In Deliveries you can configure routs and destinations, by adding or removing them.
  • Stats section will show you the engagement and outcome of your social sharing.
  • You can directly post some message in Post section.
  • You can create a widget and embed it in your website. You can auto generate code in Widget section.
  • Settings sections allow you to change password, change time zone and subscribe for Dlvr.it updates.

Dlvr.it is a very user friendly service, takes only few minutes to configure and works like magic. After the above simple configuration process all you have to do is focus on content creation in your blog. Once you publish a post, it will automatically go to social media destinations via created routes.

It’s not only about sharing content. You can see the performance of them in stats section. It gives very detailed report of clicks in different countries, posts, followers and many more. If you need more traffic, they offer a paid distribution service as well.

Tags: #Android #Blog #Facebook #Share #Twitter

How to Share Dropbox Files in Facebook Group?

If you have ever been a member of a Facebook group, you already know that it’s letting you share status, images, ask questions as well as share files. Just think you shared a file with a FB group and now you want to change the content. You have no option but to re upload the updated file. What if you are away from your computer and don’t have the file which you need to share?

The best solution for this kind of problem is cloud storage. Facebook has no plan to start their own cloud storage, but they have made a good friendship with the best personal cloud storage system, Dropbox. Now you can share Dropbox files to FB groups with just few clicks right in your browser.

how-to-share-dropbox-files-in-facebook-group-7780516

Getting Started With Dropbox File Sharing In a FB Group

In previous Add file window you had only one option. But now it has two options. ‘Upload file from your computer’ and ‘add file from Dropbox’.

  • Go to your group where you need to share a file and click on Add file.
  • It will expand the options. Select Choose file from your Dropbox.
  • Since you are doing this for the first you will have to grant required permission for Dropbox.
  • Then a pop up will appear and there you can see your Dropbox folder listing.
  • If you want to search for a file, there is a real-time search as well.
  • Finally choose the file you need and click select.
  • You file will be attached to the post and you can share it with the group may be with a message.

Now you will never have to face above discussed issues. If you want to edit the file, go to Dropbox, edit and save it. Entire updated file will be automatically synchronized in FB group. If you away from your computer, no problem, as long as you have internet you can share files in your Dropbox.

Facebook and Dropbox is a perfect combination to share files and it’s a great improvement in FB groups file sharing. They started rolling out this new feature couple of days ago. If you can’t see this options yet in your FB group, give it a few days.

Tags: #Dropbox #Facebook #Social Networks

How to Clean Up Social Media Permissions?

When you are signing in to many online applications you must be using facebook or twitter authentication. Once you do that those apps are getting a certain level of permission to access your data in those social profiles and they will be mentioning during the authentication process.

After years of online life you must have given a long list of apps to access your social media data. If you take a closer look you will figure out that there are apps you didn’t use in months. So it’s a good idea to unlink them from your social profiles. But, how to do it?

All those social networks are providing you an interface to manage linked applications. For that you have to go to each and every app and revoke unwanted permission. That might be pretty painful. Don’t worry! Here is a cool app to do it in an easy way.

how-to-clean-up-social-media-permissions-6974322

How to Use MyPermissions.Org?

  • Go to MyPermissions.org
  • There you can see set of icons for several online social networks and services.
  • Simply click on a icon and it will take you directly to permission settings in that social network or app.
  • If you are not signed in to that app you will be prompt to do that.
  • Then all you have to do is revoke unnecessary permissions.
  • You can do this for all your social profiles and apps.

It’s as simple as that. If you didn’t clean up permissions in your social profile recently, you will definitely be surprised once you see the list of permissions you have granted. It’s highly recommended to clean up those at least once a month.

Tags: #Security #Social Networks

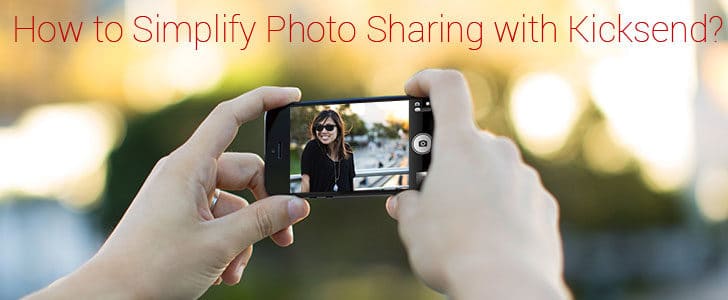
How to Simplify Photo Sharing with Kicksend?

There are several image sharing services you can find on the web. But most of those are not simple enough to be used by non-geeky, normal people. The major reason is they provide too many features to the user and it makes the operations very complicated.

When I was stumbling across the white fire grid, I came across with this image sharing service with tag line “A photo sharing app Mom will actually use”. I gave it a try and as they said it’s very simple with minimalistic set of features that can be used by anyone. Let’s go and get our hands on it.

how-to-simplify-photo-sharing-with-kicksend-4028391

Getting Started with Kicksend.com

  • Go to Kicksend.com and create an account by entering email, full name and password.
  • It will directly take you to the web app.
  • First you have to select photos. You can either drag and drop images to the box or click choose file, browse and select.
  • Once you select images a text box will appear for you to enter the album name. Enter it and click next.
  • There you can type email address which you want to send photo album just created and click send.
  • That’s all! Recipient can see the photo album by clicking on the link in email.
  • Image viewer will show you a list of thumbnails. By clicking on any you can see the full version. There you have an option to download, print and leave a comment.
  • In your account you can find all the sent albums organized as a timeline.

Always remember this is not a secured service. Anyone who has the link to your album or a photo can view it. There is no way for you to delete the uploaded images as well unless you delete the whole account.

If you like to take Kickstand experience with your mobile, you can you install mobile app on Android or iOS.

Tags: #Online Tools #Share

What is Apple Fusion Drive?

In past few years computer hardware were getting improved both horizontally and vertically. Processors were getting faster clocks as well as many cores while RAM was getting more GBs and improved data rate. But HDD was getting improved only horizontally.

Today we have couple of terabytes of HDDs, but their data transfer rate wasn’t improved much. This is a major performance bottle neck in computer hardware systems. Previously I was talking about importance of SSD to solve this problem.

But the price point of SSD is way too high compared to HDD. So the best solution I offer before is getting a SSD along with Terabyte HDD. But again it’s no easy job to decide which data should go in to SSD and which to HDD.

Apple, offer a very practical solution for this problem come with the name Fusion Drive. Today it’s under NOG spotlight.

what-is-apple-fusion-drive-6034859

Technology in Fusion Drive

Apple Fusions drive is available for Mac Mini as well as iMac computers. What its wrapping is 128GB SSD and 1TB or 3TB HDD which is the exact setup I proposed before. But what is the magic here?

The fusion drive is smart enough to automatically transfer frequently used data in to SSD and other to HDD. It’s taking that decision for you. So it’s combining lightning speed of SSD with humongous storage of HDD and dynamic file management to give you an awesome experience.

Fusion drive will obviously move OS and software for faster boot up and load time. In addition it will identify your interests, what are the files you use more frequently and then move those also to SSD as space permits.

How to Get a Fusion Drive?

When you are ordering a Mac Mini or iMac you have the option to configure it. For that go to product page, click buy now and select specific product you need. Then it will take you to configuration page. Under hard driver you can find the option to add fusion drive.

Once you order a Mac Mini or iMac with fusion drive it comes pre-configured. Off the shelf you can start using it.

Tags: #Apple #Storage

Asus PadFone Infinity – Smartphone and Tablet with Raw Power

Asus has a big name for transforming mobile device. They have proven it with best selling Transformer series Android tablets and several notebooks with unique features. One of their amazing product line is PadFone. The original PadFone could transform in to tablet then to a notebook as well. Then in PadFone 2 they narrow down the focus only to Phone and Tablet.

The big news! Asus has done it again. We have PadFone infinity under the spotlight. Let’s go!

asus-padfone-infinity-smartphone-and-tablet-with-raw-power-6337584

Insight for Asus PadFone Infinity

Design

Dimensions: Phone: 143.5 x 72.8 x 8.9 mm // PadFone Station: 264.6 x 181.6 x 10.7mm

Weight: Phone : 141 g // PadFone Station: 530 g

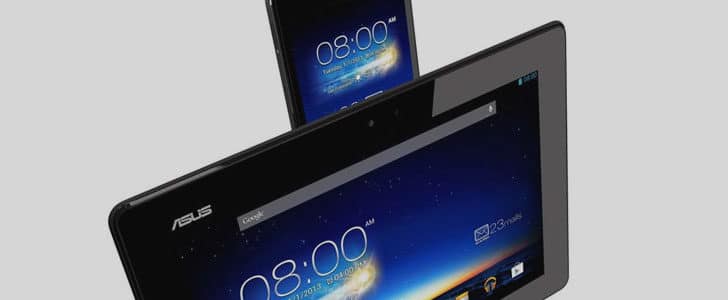
The package comes with Phone and PadFone station. Once you dock the phone in to station, display will switch dynamically and you get a tablet. The construction quality has improved and the device comes with Aluminum uni-body design like any other high end pricey Smartphone.

Power button and volume rocker is in right edge and other connectors are placed on top and bottom edge.

Display

Size: 5.0 // 10.1 inches

Protection: Corning Gorilla Glass

Technology: Super IPS+

Resolution: 1080×1920 px

Sharpness: 441 ppi

The phone display has improved to 1080p resolution to compete side by side with any other high end Smartphone available. Tablet also has same spec with larger display. This is a major value addition to previous PadFone.

asus-padfone-infinity-display-1734875

Processor and Storage

Platform: Qualcomm Snapdragon 600

CPU: 1.7 GHz // Quad Core // Krait 300

GPU: Adreno 320

RAM: 2 GB LPDDR3

Internal Storage: 32/64 GB // 50 GB Asus web storage

Expandable Storage: No

The name Snapdragon 600 says it all. We have seen it’s power in HTC One already. Lack of expandable storage would be a major deal breaker though you have 50 GB of cloud storage.

Software

OS: Android 4.2 Jelly Bean

UI: Asus Customized

Off the box it has Android Jelly Bean awesomeness and it’s buttery smooth UI. In addition Asus has customized it lightly to enable dynamic display switching and embed few other Asus apps.

Camera

Primary: 13 MP // 1080p@30fps // 720p@60fps // 8fps burst mode

Front Facing: 2 MP // 1080p@30fps

Camera spec is pretty much standard. But you have 8 fps burst mode. This is something big for a mobile camera. Actually it’s a DSLR feature. That’s not all! You can record 720p videos at 60 FPS. In other words you can record true slow motion with this.

asus-padfone-infinity-camera-3233465

Connectivity

Mobile Network: 2G // HSDPA // LTE

Wi-Fi: Wi-Fi 802.11 a/ac/b/g/n,

GPS: A-GPS // GLONASS

NFC: Yes

Bluetooth: 4.0

USB: microUSB 2.0

Connectivity technologies are standards and you need only one SIM card for both phone and tablet. Wi-Fi ac is here and it seems lots of manufactures are adopting so fast.

Battery

Type: Li-Po

Capacity: 2400 // 5000 mAh

Battery Life: 9 h (HD video playback)

Battery power is a very unique feature here. You have one battery in phone and another in docking station. So obviously you can enjoy longer battery life here. We have no much data about real life statistics. But you will be able to playback HD videos for around 9 hours with PadFone station.

Wrapping Up

This is a definitely a significant improvement to previous PadFone. There are lots of value additions such as 1080p display, uni-body design, 8 fps burst mode, 60fps video etc. With Snapdragon 600 and Android Jelly Bean this will stand strong in tight competition for sure.

The original PadFone supported a keyboard dock like transformer series. So far I could not find anything about such, but if Asus is going to release one it will be a Blast!

Tags: #Asus #Qualcomm #Smartphone #Tablet

Better Graphics in Android ICS with GPU Rendering

You already know that with Android 4.1 Jelly Bean they have declared a war against lagginess and the outcome is pretty impressive. Frame rate of the UI transition has increased in 60 FPS with VSync with Triple Buffering. This is more valuable than feature improvement, for long term survival of Android among competitors.

Below video is recorded with RED camera with 300 FPS to show you the difference between UI transition in ICS and JB.

Quick Catch-up

  • Story of Project Butter in Android Jelly Bean

Android Jelly Bean official update is not yet released and probably it will take couple of weeks or months. If you have manufacture themed version of Android it will take even longer. This would depend on your carrier as well.

In the meantime here is a quick tip for you to improve graphical performance in your Android ICS handset till JB comes out officially. However this will apply only for applications, not for home screen and other core OS functions.

Enable Force GPU Rendering

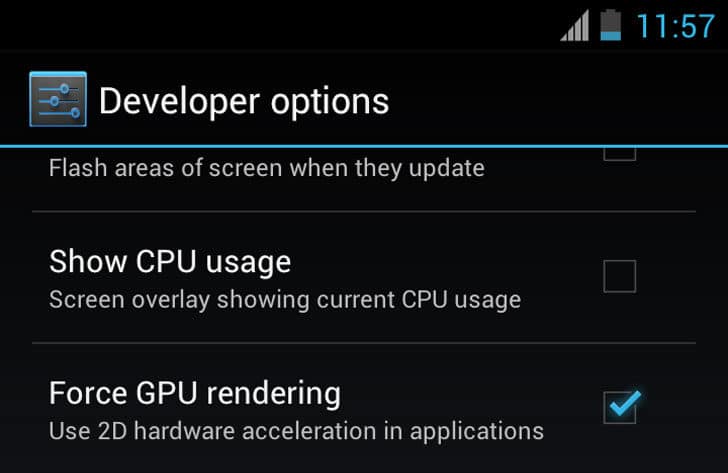
  • Go to Settings -> Developer Options
  • There you can see geeky options for android developer
  • Check Force GPU rendering

force-gpu-rendering-3776810

Leave settings, try to open few applications and see whether there is any difference. For some applications you will notice some improvement in UI and transitions. If you feel like things got worse after enabling this, simply uncheck the option.

What is Force GPU Rendering?

GPU stand for Graphic Processing Unit which is a separate processing unit. The objective here is let the CPU to do general OS related processing while GPU is doing specific graphic related processing. If you are an Android developer you know that Software development Kit (SDK) is letting you to specify whether your app should use GPU if available.

Force GPU rendering is always using GPU to render application graphics regardless of above mention developer options. Even if developer disable GPU rendering for a specific app, still it will use it if you have enable Force GPU rendering and freed CPU to do other important work.

I know most of the general user never even touch developer options, but this is something worth trying.

Tags: #Android #Ice Cream Sandwich

Next Generation Traffic Management

Transportation is one of the success defining factors in human civilization. Every year billions of dollars invested having the objective of inventing better and convenient transportation methods. However human civilization is still relying on fossil fuel which is very limited resource and previously I was talking about the shape of world without fossil fuel.

Quick Catch-up

  • World Without Fossil Fuel

Even though we invent an alternative fuel it will not solve the whole problem of transportation. We have to re think the organization of traffic as well.

next-generation-traffic-management-1418555

Currently all the general vehicles are running on roads. With the increasing number of vehicles, we have to expand the surface of whole highway system. In this rate, in near future, we have to allocate whole surface of New York City to motor traffic and live on top of roads.

Layered Traffic

The only way to solve this problem “Layered traffic”. In other words have layers of roads. This is already there in most of the highway system up to a certain level. Especially in tunnels, there is a separate layer for public transportation and emergency service and another layer for general traffic.

Yes, we can have multiple layers of traffic in some places but not everywhere. If you try to expand this system in to entire road network there will be lots of practical issues. Further, there are a limitation in layers that you can have practically.

Personal Arial Vehicles

The nest best suggestion to solve the previous problem of layered traffic is Arial vehicle. Arial vehicles are mainly used to transport people between geographically apart destinations, but not as a urban transpiration medium. And technology in Arial vehicle are not sophisticated enough to use them domestically.

However, I have seen few conceptual designs of personal jet packs and some of them are in lab testing as well. So there is a hope for use to utilize Arial space to solve the problem of traffic. However, those jet pack designs need lots of polishing up and as it appears they are using highly inflammable fuel powered burners which is not safe at all for personal usage.

Thinking Out of the Box

I’m not ready to accept the fact that Arial vehicle must have inflammable fuel and burners or propellers though it’s the most common application today. I had few ideas in my mind which is going beyond the traditional frame and not even using traditional fuel sources such as fossil fuel and even hydrogen.

Previously I was talking about the possibility of using Gravitational field for future transportation. This is very pure form of energy and will be have rapid acceleration without crushing the passengers

Quick Catch-up

  • Gravitational Field For Future Transportation

If future scantiest try to figure out more details and behavior of Gravitational field we will be able to easily utilize it to go for layered traffic management. Unlike in most of the previous suggestion this will be able to have many layers of traffic in Arial space with minimum separation.

If you dig deep in to historical facts, they give us hints about Arial vehicles which are using gravitational fields. Nazca lines in Peru could be a possible exchange for ancient Arial vehicles. Sri Lankan history is having vague facts explaining an Arial vehicle named “Vimana” which believed to be gravitational vehicle.

If we can bring back those technologies it will be the ideal solution for increasing problem of motor traffic by making possible Layered traffic management.

Tags: #Traffic