Apple iPad Mini – A New Generation of iPad

Couple of months ago, if you wanted to buy a 7” tablet, you best choice would have been Amazon Kindle Fire. After introducing Google Nexus 7 with latest Android Jelly Bean everything went up side down. It became the fastest selling 7” tablet and currently they are out of stock for 16 GB mode. Apple, the all time King in Tablet market is also going to compete in 7” tablet market with their Apple iPad Mini.

Quick Catch-up

For last few weeks I was keeping my eye open for fast spreading rumors about iPad mini from different sources. At the same time I was collecting information from Apple customers and what they really need from iPad Mini. Here I’m trying to brief expected features of iPad mini mainly based on feedback of existing Apple customers.

apple-ipad-mini-a-new-generation-of-ipad-4601252

Expected Device Configuration of Apple iPad Mini

Processor and Storage

iPad Mini won’t require advanced A5X chipset since it won’t be having high resolution retina display. But its specification will be very much similar to iPad 2. It will have Apple A5 chipset with 1 GHz Dual Core Cortex A9 processor.

Storage will be 8 GB / 16 GB and there is a high chance for them to add a 32 GB model as well. There won’t be expandable storage as usual. When it comes to RAM it will be 512 MB. iPad 2 worked great with this RAM and it will be helpful to keep the price down as well.

Operating System

Apples iOS 6 is already out there as a beta version. By the time they introduce iPad Mini, it will be available as final release. There is no reason for Apple to not to include iOS 6 in iPad Mini. Usually iOS upgrade comes to the entire device in the same day unlike Android.

Display

This is one of the most rumored features in iPad Mini. It will be 7.85 inch IPS panel with resolution 768 X 1024 which will give you 163 ppi of pixel density.

Connectivity and Interfaces

As connectivity features it will comes with Wi-Fi, Bluetooth and Apple’s proprietary dock connector. There is a lesser chance for them to release a 3G version to keep the price low as possible. There won’t be in-built GPS unit as well.

Camera

This is a tricky point. Of course there will be a front facing camera for video calling and chatting. Most of the people are using cameras in Smartphone, but very few people are using camera in Tablets. So there is a high chance that iPad Mini will come only with front facing camera and it will be pretty much similar to iPad’s one.

Possible Market Impact and Release Date

Most of the 7 inch tablets became very popular among users and their sales were off the roof. They are highly portable and battery consumption is also better than 10 inch tabs. Amazon kindle and Nexus 7 are the most popular in this market. Apple is manufacturing tablets, but they don’t have a tablet to compete in this market and price range.

apple-ipad-mini-market-6580996

Apple already has the technology to manufacture tablets and they just have to make it smaller. And they are the best in bigger tablets and they have a good chance in 7 inch market as well. Top of all there is a loyal fan base for Apple who buys whatever they produce.

The main factor they have to control is price. Apple can easily compete with Kindle Fire and Nexus 7 in user experience aspect, but if the prices are high there won’t be any survival in the market. Therefore Apple should keep the price of iPad Mini around $250 or may be lesser. If all goes well, they will be able to dominate significant part of 7 inch tablet market as well.

Most of the un-official source says that iPad Mini will come to market in late September or early October along with Next iPhone. I’m looking forward to see another great device from Apple.

Tags: #Apple #iPad #Tablet

How to Manage Copy/Paste in Chrome?

When you are browsing on WWW, you have to copy/paste many things. It works the same way in many of operating systems. You can use the right click menu or the shortcut keys. But what if you have to copy many things and paste those in many different places.

Now you have to face a serious problem. Once you copy something it’s there in memory. Once you copy another it gets overwritten. So you have to run between places and follow many copy/paste sequences to get your work done.

Ex: You are copy/pasting your personal details. You can’t keep all of those in memory. You have to it one by one.

In order to solve this problem what we need is an advanced clipboard management system. Clipboard is the place where your copied data get stored. I found a great solution for this problem, you may have already guessed from where. Yes! From Chrome web store. Let’s go and take a closer look.

how-to-manage-copypaste-in-chrome-2813808

Getting Started With Browser Clipboard

  • Go to chrome web store and add Browser Clipboard to Chrome.
  • It will give you a new icon in tool bar as usual.

chrome-clipboard-manager-icon-6086821

  • Let’s take a look at options. Right click on the icon and go to options.
  • There you can select the position of clipboard toggle and it’s behavior. Default would work for most of the surfers.

chrome-clipboard-manager-options-1854853

  • Now go to any web page, select the content you need to copy and right click on it.
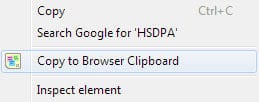
  • There you can see copy to browser clipboard option. Once you click on that clipboard toggle will appear.

chrome-clipboard-manager-right-click-menu-8610087

  • If you are a fan of one click solutions, select the content and start dragging it. Browser clipboard will automatically appear and drop the content there.

chrome-clipboard-manager-clipboard-toggle-1086826

  • You can manage content in clipboard by permanently pinning or removing.
  • When you want to paste some content from browser clipboard all you have to do is drag and drop it in to the location you need. It’s as simple as that!
  • Hardware: Intel Core i5 2nd Gen // 4GB DDR2
  • OS: Windows 7 Home Premium // 64 Bit
  • Browser: Google Chrome Version 23.0.1271.91 m

Now you can store multiple data in your browser clipboard, manage them and paste those in different locations at different times. Now go back to my previous example of copy/pasting personal details. You must have already figured out that with this extension it’s just few clicks.

Try this great Chrome extension out and let me know new things you learnt about it, how you feel about it as a comment below. Stay in touch with NOG by subscribing to our email list.

Tags: #Chrome

How to Manage Sessions in Chrome?

When you are using Google Chrome for web browsing, you might need to open different set of tabs at different times. Example, in early morning you open all the online newspapers you love to read news. In lunch break you open all the social networks you are using and connect with your friends.

Just think, in such case you will have to manually open all those tabs whenever you need them. True, you can keep all of them open and Chrome remembers them. But it will definitely slow it down if you are dealing with large number of tabs.

I was looking for a solution for this problem for some time. The actual solution I was looking for is a session management system for Chrome. I remember it was there in Opera browser, so no reason for Chrome to not to have such. Finally I found the solution in Chrome Web Store. Let’s go and take a closer look.

how-to-manage-sessions-in-chrome-9093024

Getting Started With Session Manger

  • Go to Chrome web store and add Session Manager to chrome.
  • It will add an icon to tool bar.

session-manger-icon-1834858

  • It’s always better to take a look at options before you start using it. Right click on it and open option.
  • There you can set shortcut to the way you want to open session and how to save sessions.
  • Now go back to chrome and open the tabs you want to save as a session.
  • Click on session manage icon, enter a name and click save to store that session in your list.

session-manger-list-6040958

  • You are free to add any number of sessions.
  • When you want to open them back, click on the icon, select the session and click open.
  • Use shortcut keys you set in option to decide how you want to open them.
  • In the same popup you can manage the list by adding new tabs and removing session.

Advanced Tips

  • Go to address bar in Chrome (omni box) and type “session” and hit space bar.

session-manger-omni-box-3677166

  • There you can type the name of session which you want to open.
  • Once you hit enter, the session will be restored.
  • Hardware: Intel Core i5 2nd Gen // 4GB DDR2
  • OS: Windows 7 Home Premium // 64 Bit
  • Browser: Google Chrome Version 23.0.1271.91 m

Now don’t have to go through any trouble when you want to open different sets of tabs in different time. After you save them as sessions, they are just one click away.

Try this great Chrome extension out and share how you feel about it as a comment below.

Tags: #Chrome

How To Auto Scroll Web Pages To The Section You Are Searching For?

Google, no doubt, is one of the best things happened to WWW. Today it has become an essential for day to day life. You must be searching many things on Google every day. It’s giving you best results at the top, letting you to search right from your browser, filter out search results, support voice commands and many more.

True, it’s a perfect search engine and all the others are way behind. But I always wanted to have one more feature in Google. When I’m searching for a keyword, it’s showing me results and I visit the pages I like. If it’s a lengthy page, again I have to search to figure out which part to read. Google never helped me there. So I had to use search function in browser, again not a very polished solution.

I found a solution for this problem and it’s a Chrome extension developed by Google itself. Let’s take a closer look and see how it’s solving our problem.

how-to-auto-scroll-web-pages-to-the-section-you-are-searching-for-1729269

Getting started with Google Quick Scroll

  • Go to Chrome Website and add Google Quick Scroll in to Chrome.
  • It won’t add any icon to toolbar. So go to Tools -> Extension to go to options page.
  • In options you can see a quick tutorial, sample queries to try it out and privacy options.
  • Click on a sample query to see how it’s working.
  • It will take you to the relevant search query. Click on first result.
  • Now you can see how it works. The popup in right bottom corner is showing you few links related to your search query. Click on more matches to access the full list.
  • By clicking on them you can auto scroll the page to relevant section. Problem solved!
  • Hardware: Intel Core i5 2nd Gen // 4GB DDR2
  • OS: Windows 7 Home Premium // 64 Bit
  • Browser: Google Chrome Version 23.0.1271.91 m

Google has been very careful about when to display this popup. It’s not coming up in every page you access through Google search results. It’s coming up only if it’s highly necessary.

Try this great tool to save your valuable time when you are searching with Google. Never forget to let us know how you feel about this as a comment below.

Tags: #Chrome #Google

How to Share or Embed Selected Part of YouTube Video?

YouTube has become one of the largest knowledge sources and millions and billions of people are uploading and viewing videos there. It was the initiator of Video Social Networking trend as well. So it has made possible for you to give thumbs up, share as well as embedding video in another web page.

But what if you want to embed only a part of YouTube video in another web page? maybe in your own blog post. What if you want to share a part of YouTube video with one of your friends? The answer you are looking for is not in the box. YouTube doesn’t have that sort of functionality built-in even though you can create a link to jump to given time of video.

So the solution here would come as a 3rd party web application. In my search I came across with a very easy-to-use web application which provides the answer entirely to the above question. Let’s go and see how it’s working.

how-to-share-or-embed-selected-part-of-youtube-video-9421533

Getting Started with TubeChop.Com

  • Go to TubeChop.Com.
  • There you can see a text box to enter keyword to search or direct URL to video. Proceed as you wish.

tubechop-search-box-5541622

  • If you enter the direct URL it will take you to the video editor straight away.
  • If you search for a keyword, click on the video which you need to chop.
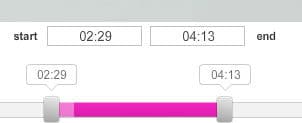
  • There you can manually set start and end. Use the sliders to set it.

tubechop-start-end-7011130

  • It will show you the time duration of chopped video.
  • Finally you can write something about the chopped video and click on Chop it.

tubechop-chop-it-7063001

  • It will take you to the landing page for the chopped video.
  • You can find the share URL and embed code there along with a link to original video.
  • Down there you can find connecting section powered by Disqus.

Now you can share a part of a video with anyone and even embed it in your blog post. Problem solved and it needed only few clicks!

So far I didn’t notice any performance issue or glitches in functionality. If you come to know any, share with us as a comment below.

Subscribe to our email list and stay connected.

Tags: #Social Networks #YouTube

GNotes – Notebook App for Android

Before the era of Smartphone we had a notebook in our pocket and it helped to remember things and organize yourself. But now it has gone digital and comes as an app for your Smartphone or tablet. Probably Notebook is one of the very first apps to install when you get a Smartphone.

But when you take a look at Google Play or even App store, selecting a notebook app is a tough decision. There are many of them with different unique features. I was struggling hard to find a good notebook app for my Galaxy Nexus. Finally I came across with amazingly simple app called GNote. By looking at name you may think it’s from Google. But it’s not so, yet, it has a relationship with one of the most popular Google services. Let’s go and take a closer look.

gnotes-notebook-app-for-android-3746714

Getting Started with GNote

  • Go to Google Play and install GNotes on your Android Phone
  • In the initial run it will ask you to connect a Google account and all your notes will be synced in to Gmail. Now that’s why they call this GNotes.
  • Once you open the app you will notice that it has amazingly simply UI.
  • From the left column you can add new notebooks and from right top corner you can add new notes.

gnotes-add-new-note-3519678

  • When you create a new note, again it’s very simple, giving you minimalistic, yet important features.

gnotes-editing-toolbar-7815846

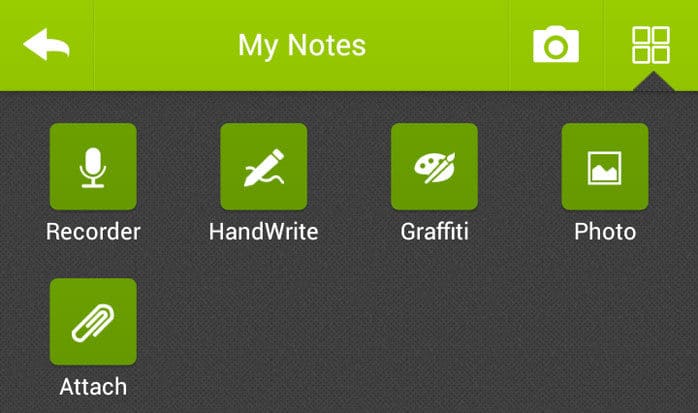
  • In the top tool bar you can add an image from camera, record audio, add handwriting, attachment etc.

gnotes-attachment-types-7172109

  • The handwriting is working super cool here. Once you complete writing a word it get zoomed out and go to top of the page which makes it very easy to use.
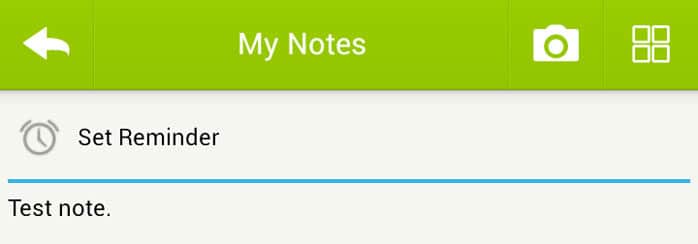
  • Drag a note down and there you can set a reminder.

gnotes-set-reminder-2497024

  • You can access all the notes you are creating in your Gmail labeled with Notes.
  • Hardware: Samsung Galaxy Nexus
  • OS: Android Jelly Bean 4.2.1

I have tried many Notebook applications, but this is the simplest one I came across with so far. All the features are working great. Only thing I missed here is, I have no way to edit notes online. They appear in Gmail, but not editable. If you choose to use GNote account, this problem would be solved up to a certain level.

Try this application in your Android phone and give me your feedback as a comment below. Subscribe to our email list and stay connected.

Tags: #Android #Gmail

How to Take Your Whiteboard Online?

People are using whiteboards for many purposes such as teaching, learning processes, brainstorming, draw mind maps etc. This is digital age. So you might face some problems with traditional whiteboard. What if you want to share what you just drew with a friend? What if you want someone else, who is in another location, to contribute to what you are drawing?

For the first question, you may take a picture of what you drew with your Smartphone and email it. But it’s not a polished solution. Still you have no answer to the second question.

There is an online tool which could solve all these problems through an online application. It’s truly an online whiteboard. You can share what you drew and allow collaborative editing as well. Let’s go and take a closer look.

how-to-take-your-white-board-online-5690180

Getting Started with “A Web Whiteboard” (AWW)

  • Go to AWWApp.Com and click on start drawing.
  • It will take you to Web Whiteboard.
  • In the left hand side you can find tool box.
  • There you have few simple options such as colors, pencils and text.
  • Pick a color, pencil and simply start drawing and adding text.
  • If something goes wrong you have an eraser as well.
  • You can find clear all option in menu.
  • Once you are done with the drawing you can save it as an image or post link in social media. You have all those options in menu.

How to Enable Collaborative Editing in Web Whiteboard?

  • This is one of my favorite features here. Go to menu and click on invite.
  • It will show you a URL. Send it to the person who you want to draw with.
  • All he has to do it is open the link in browser. It will give him the same Web Whiteboard interface.
  • It’s simple. What you are drawing will be reflected in your friend’s white board as well as the other way round. It’s like you both are using the same white board.
  • Hardware: Intel Core i5 2nd Gen // 4GB DDR2
  • OS: Windows 7 Home Premium // 64 Bit
  • Browser: Google Chrome Version 23.0.1271.91 m

This is an amazingly simple solution and gives you the most required, yet minimum options. So learning curve is much lesser than other online collaborative editing tools. No installation required. All you have to do is open your browser and start drawing. This app works great with tablets, than in desktop browser. There you can use touch controllers to draw which is much easier than mouse.

This app is optimized as a Rich Internet Application too. So transform this web app in to a desktop app with chrome application shortcuts. Then you will be able to enjoy an even better experience with Web Whiteboard.

Try this great online tool and let me know what you feel about this as a comment below.

Tags: #Online Tools #Rich Internet Applications

How to Send a Webpage from Chrome to Mobile?

Chrome is providing you amazing syncing facility and you must be already saving lots of time specially when you are using it on Android phone as well as on desktop. If you want to send the page you are browsing on Chrome desktop to Android phone, you can easily use bookmark syncing.

But if you are looking for one click solution, previously I was talking about Chrome to Phone system which is solving this problem. But there you have to install an Android app as well as a chrome extension. Today I’m going to introduce you a simple solution which does the same thing and more. Lets go and take a look.

how-to-send-a-webpage-from-chrome-to-mobile-3345448

Getting Started with Chrome to Mobile

On Mobile Device

  • Install latest version of Chrome on any supported mobile device. (I guess you already have)
  • Go to settings -> Sign in to Chrome
  • In basics -> tap on your account and make sure Chrome to mobile is checked in. That’s it!

chrome-to-mobile-mobile-settings-7055175

On Chrome Desktop

  • Go to Chrome web store and add Chrome to Mobile.
  • It will add a new icon in to your Address bar.

chrome-to-mobile-addressbar-icon-1516673

  • If you use several mobile devices which have Chrome installed on it, they will be listed there.
  • Select the required device and click Send.

chrome-to-mobile-menu-5459700

  • The page will be automatically opened in Chrome browser in selected device.
  • If you want to send an offline copy check in the option. It’s as simple as that.
  • DesktopHardware: Intel Core i5 2nd Gen // 4GB DDR2
  • Desktop OS: Windows 7 Home Premium // 64 Bit
  • Desktop Browser: Google Chrome Version 23.0.1271.91 m
  • Mobile Device: Samsung Galaxy Nexus
  • Mobile OS: Android Jelly Bean 4.2.1
  • Mobile Browser: Google Chrome Version 18.0.1025469

Unlike previous Chrome-to-Phone this system is embedded right in to chrome browser. You don’t have to install any apps on your mobile device. Only external thing you need here is Chrome to Mobile extension. If you want to add or remove devices from the Chrome to Mobile click here and go to Cloud Print dashboard. There you can remove and edit devices.

This is a very simple user-friendly setup which will definitely save you lots of time. If you don’t have a fixed station and browsing web on the go with your mobile devices, this is a must-have tool to enjoy an uninterrupted web experience. This works great with iOS too as long as you have installed Chrome browser.

Try this out and let me know how you feel about this as a comment below. Subscribe to our email delivery to stay in touch.

Tags: #Android #Chrome #Desktop #iOS #Smartphone #Tablet

TweetDeck – Your Social World

TweetDeck is a desktop and iPhone mobile application which is helps the user to manage his online life in Twitter, Facebook, My Space and Linkedln. Using this application you can access and control all your online social community accounts in all the above mentioned networks, even with multiple user accounts.

Once you install Tweetdeck you can add your entire online social network accounts in to that. In the main interface you can have many columns. Each column display selected updates from given community network. When you press the Settings button at the top right corner in the main interface you can access general settings and control the general behavior of the software.

Tip: Set Minimize button should and Close button should to Hide to notification area. When you set this TweetDeck will be always there in system tray though close it. If you really want to close right click on the system tray icon and exit.

Next section is about Twitter. It configures how many Twitter API request should send by the TweetDeck. This better to be below 100% or you will reach API requests limit means no updates after that. In Notification area you can select the notification style, enable or disable them and Sound if you need. But the sound can be annoying some times, choose it as appropriate. In the Colors/Fonts, I recommend you to choose international font if you going to use some external Unicode fonts. In the account section you can add user accounts you have as many as you need.

After this configuration done you can select what are the things you need to be displayed on the main window. For that you can click on Add column button at the left top corner. In there you can select different update streams in all your accounts in all networks. In Addition to that you can update status, comment of photos, tweet and many more in this application. When you take your mouse over a Profile picture of someone it will display various things you can do including reply, write on wall etc. The most beautiful and my favorite feature in this is you can update your status in Facebook and at the same time in Twitter as well. If you have many accounts you can do the same with just one click. This saves lot of time for me. And Tweetdeck having advance and very user-friendly imageviewer.

Download the application and have fun. There is a special version of TweetDeck for iPhone as well.  Share your comment about new stuff you discover in there.

References

Tags: #Facebook #Social Networks #Twitter

How To a Create 3D Model of Your Home?

When you are building a new home the hardest job is visualizing the final outcome before you build it. The architect is preparing lots of technical drawing, but still they might not be enough for you to picture it in your mind.

Even when you try to rearrange interior in your home, you might have to come up with several arrangements till you get what exactly is needed, which consumes lots of time and effort.

The best ways to solve these problems are to create a 3D model of your home and interior. If you ask an architect to do it he will charge a huge amount of money to get it done. So we have to go for a DIY solution.

Creating a 3D model of a home might sound like a heavy techy thing. But’s not really so if you have the right tools. There is a little piece of software called “Sweet Home 3D” to easily and quickly create a 3D model of your home to save all those trouble.

how-to-create-3d-model-of-your-dream-house-2521779

Getting Started with Sweet Home 3D

  • Go to SweetHome3D.com, download the software and install it.
  • The software is very light weight. It will open in seconds.
  • In right top panel you can draw the 2D version of home.
  • You can find walls, windows and other items in left top panel.
  • In main tool bar you can add walls, floor, measurements and text.
  • Drag and drop item to 2D view and place anywhere you need them.
  • Double click on item to change its properties.
  • When you are drawing the 2D version of home, 3D model will be auto generated.
  • You can zoom in and pan around in 3D model.
  • In left bottom panel you can find a list of item used.
  • Once you are happy with the design you can take a photo or create video with the options in main tool bar.

You don’t have to be a 3D artist or tech savvy person to handle this tool and create a detailed 3D model of your home. All the operations are simple and quickly accessible.

If you need to add more 3D items go to Furniture -> Import Furniture -> Find models. It will take you to SweetHome3D website and there you can download tons of 3D models to make your home highly detailed.

Try this application and tell me the new things you find with it in the comment section below.

Tags: #Tools