If you have your own blog I’m pretty sure that you have your own social media accounts too where you publish links to your blog posts. Of course that will give a good exposure to your content among people. Not only blogs, if you have a web site for your organization, it’s a good practice to have a RSS feed for updates related to your service or products. Again to get a social exposure you can post them in social media.
However if you have more frequent updates in your website it could be difficult to allocate time to post links on different social media accounts. If you have a number of social media accounts, the situation will get worse.
Even if you don’t have your own blog, sometimes you might like to post someone else’s updates on your social media accounts. Probably you are already doing that manually. When you are doing manually you can easily filter out the content you are going to publish but it will consume lots of time.

What if you have a solution where you can automatically publish updates in a RSS feed to all your social media accounts? And what if that service comes with keyword filtering facility which allows you to select updates that need to publish? Of course that will save lots of time you spend on social media, sharing different content.
That solution you are looking for is TwitterFeed.
Create an Account
TwitterFeed is a free service where you can connect all your RSS feeds and configure it to post updates in different social media accounts in a convenient and customizable manner. As the first step you need to create an account for yourself.
- Go to TwitterFeed website
- Click on the Sign Up link in header
- Enter your email address which will act as your Username and then enter the Password and confirm it
- Click on the Create Account and you are done!
Once you log in it will take you to the dashboard. Since you just created the account there won’t be any feeds listed. But you will be able to see the button Create New Feed.
Configuration
Create Feed
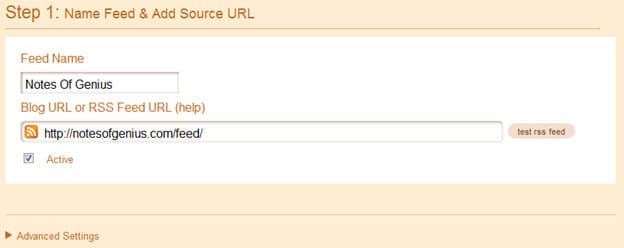
Once you click on the Create New Feed button it will take you to the below page where you can enter the details of your RSS feed.

- Enter a Feed Name as an identifier
- Enter the correct RSS feed address or your Blog URL
- If you enter your blog URL, TwitterFeed with automatically fetch the RSS address
- Click on Test RSS Feed
- If your RSS feed is working good it will give you the message “Feed Parsed OK”. If not you have to check whether your RSS feed address is correct or its working good
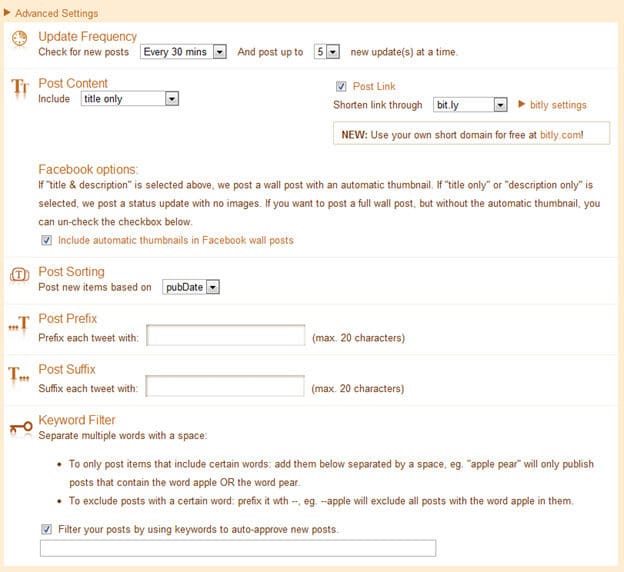
These basic details would be enough to setup a RSS feed for any social network. But to utilize the maximum power of TwitterFeed I recommend you to open the section Advanced Settings. It will give you the below page.

There you can see lots of configuration options. Let’s take a closer look in to each.
- You should set Update Frequency considering the update frequency of the original source. If you have more frequently updating source and you set low updating frequency in TwitterFeed it will take longer time to publish them in Social media accounts.
- There you have to select how many posts you need to publish at a time. This again depends on the original source and your requirement.
- Then you can select the content options. Generally RSS feeds are coming with Title and Description. You can use any kind of combination to your social sharing.
- If you want the original links also to be published check-in Post Link. If this goes to twitter don’t forget to use a shortened URL.
- If sharing goes to Facebook better to check-in Include automatic thumbnails in facebook wall posts.
- To append any fixed text to the begging of content or after content use Post Prefix or Post Suffix respectively.
- You may be a person who is sharing someone else’s RSS feed. In that case you can filter out the content that needs to be re-shared using a keyword list. To enable it check-in Filter your posts by using keywords to auto-approve new posts. Then you can enter the list of Keywords. There you can find some useful instructions to use keywords effectively.
Now you are done with configuring RSS feed. It’s time to proceed to step 2 to configure publishing services.
Publishing Service
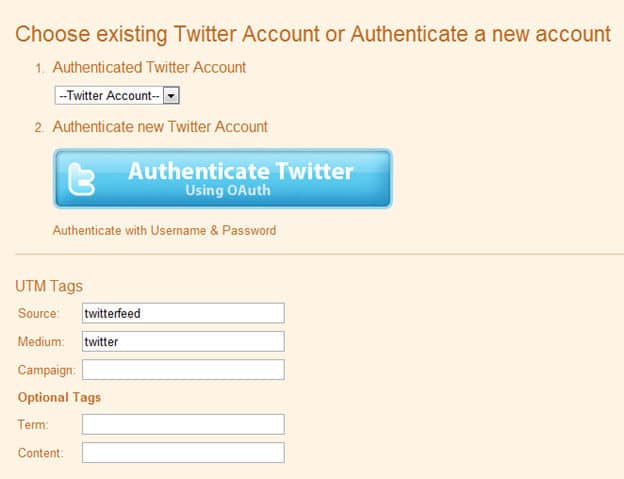
Once you go to step 2, configure publishing services, you will be able to see a list of social media including Facebook, Twitter and LinkedIn. Below is the page you will get when you try to add a twitter account.

- Connect the previously created RSS feed with twitter by clicking on Authenticate twitter button. In order to proceed with this you will have to login to the desired twitter account.
- If you already have the twitter account authenticated, you can simply select it from the drop down menu.
- In the next section, UTM tags give you the facility to track your campaigns. The entered details will appear in your Website Analytical Report. It’s working great with Google Analytics.
- Following the same procedure you can add many social media accounts for same feed.
- If you have Facebook pages, they also work well with this.
- Finally click ‘Create Service’ and you are done! Your feed is live and all the updates will be automatically published in selected social media accounts.
Advanced Tips
- If you want to manually check for updates in a RSS feed, go to dashboard and click Check Now in front of the feed.
- If you use Bit.ly as the URL shorten service, it will keep records on number of clicks you got for each URL and they will be displayed in the Dashboard. In order to activate Bit,ly service you have to register with bit.ly API. (Detailed tutorial coming soon!)
- If there are several accounts linked to one feed, there will be separate indicators for each account.
- Using the dashboard you can view or edit the feeds anytime.
That all about TwitterFeed! It’s a totally free service that provides highly reliable service for a long time. Of course this will save loads of your time you spent on sharing content on social media. Furthermore, frequent automatic updates will attract lots of attention to your accounts as well. Once you configure everything, all of this will happen without even knowing. Enjoy the service and share your experience with us.
Tags: #Blog #Facebook #Twitter
