In past few weeks Cloud Storage War reached its peak. Lots of services came in to picture with lots of attractive offers. Most of the services increased their free storage allowance and drastically reduced the pricing for extra storage.
Google, the internet giant also joined the cloud Storage war with their long awaited Google Drive. Their service is pretty much similar to the most popular Cloud storage service “DropBox”. If you are already a DropBox user you will find this quite familiar.

Quick Catch-up
However, Google Drive is offering lots of flexible features through it’s web interface rather than conventional locally installed file syncing client.
Here we are trying to take a closer look in to overall functionality of Google Drive.
Create an Account
Creating an Account with Google Drive is easy as any other Google service. If you don’t have a Google account, create it by visiting Google Home page. Then you are few steps away from Google Drive.
After creating a Google account, visit Google Drive by clicking Here. Then it will take you through the configuration step by step and finally take you to a familiar interface like Gmail.
Left hand side you will be able to see general online file folders and top navigation bar is giving you relevant control depending on selected items. If you switch to Grid View it would almost look like a local file folder.
If you were using Google Docs, you will see that those documents are also integrated with Google Drive. You can edit them same as before, right there with online interface. You can create a new supported document by clicking on the Create Button.
If you need to upload your files to Google Drive you can do it with the Upload button next to create button. But there is a Better way, read the next section.
Install and Configure File Sync Client
Uploading Files with web interface is not safe as well as not efficient. Therefore, same as DropBox, Google Drive is also giving you a File Sync client. You can download it from Here.
It’s an online installation same as Google Chrome. Once entire installation files get downloaded it will automatically get installed.
Once the installation is done it will ask you to sign in and this support 2 Step Verification, so you don’t have to create application specific password.
Quick Catch-up
- Google 2 Step Verification
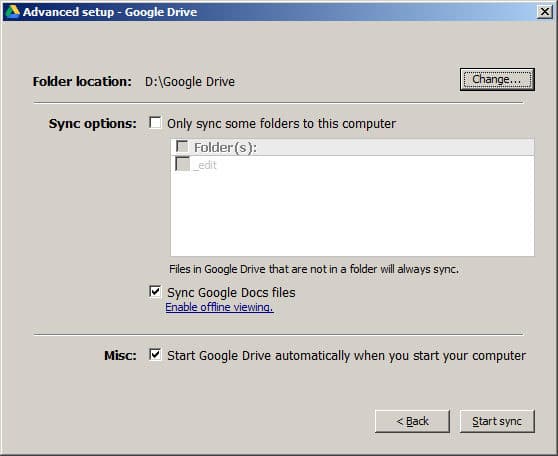
After sign in it will take you through getting started steps. In step 2 make sure you go to advanced setup and change the folder location to some other disk partition.

After this configuration, it will automatically start with windows. Whenever you want to add files to Google Drive all you have to do is Drag and Drop files or folders in to Google Drive folder. They will get synchronized automatically behind the screen. Synched files will be marked with green tick.
Google Drive file syncing client does not provide sharing functionality locally. For that you must visit the web interface. I’ll see you soon in another article about Privacy and Sharing in Google Drive.
Tags: #Cloud Storage #Google
