Microsoft Surface Tablet – New Age of Tablets

The computing experience we had on the desktop is gradually going mobile for last few years. When the time of desktop computing, the retail market leader was Microsoft and there is no doubt. Still they hold the crown and seem they are going to extend them self to mobile computing world as well.

Few months ago Microsoft introduced consumer preview of next version of their famous, dominant desktop OS. It will come to market as Windows 8 with major changes to its core and UI. If you have used Windows phone mobile OS you know how Metro UI looks like. They have extended the same thing to desktop OS as well, having the objective of delivering great touch screen experience going beyond conventional mouse and keyboard.

Quick Catch-up

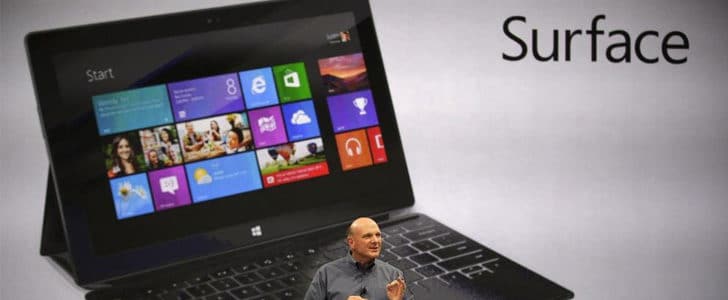
This is a major turning point in Windows roadmap, like DOS to Windows transition. For that they introduced mouse to deal with graphical UI. Now they are doing it again and came up with prefect platform to run next generation of Windows. It’s named a Microsoft Surface and it’s under Notes Of Genius spotlight today.

Microsoft Surface is looks like any other tablet with large touch screen, but it’s carefully engineered to work with Windows 8. If you have tried Windows 8 on a desktop PC with a mouse and keyboard, you already know it’s not the best way to deal with Metro UI. You must have touch screen to get maximum out of it. That is the whole objective of designing Microsoft surface.
microsoft-surface-tablet-4125224

Device Configuration

Microsoft Surface

  • OS : Windows 8 RT
  • CPU : NvidiaTegra
  • RAM : TBA
  • Storage : 32 / 64 GB , microSD port
  • Display Size : 10.6 Inch
  • Display Resolution : 1366 x 768 px
  • Connectivity: USB 2.0, micro HD
  • Thickness : 9.3 mm
  • Weight : 676g
  • Battery : 31.5 W/h

Microsoft Surface Pro

  • OS : Windows 8 Pro
  • CPU : Intel Ivy Bridge CORE i5
  • RAM : TBA
  • Storage : 32 / 64 / 128 GB, microSDXC
  • Display Size : 10.6 inch
  • Display Resolution : 1920 x 1080 px
  • Connectivity: USB 3.0, micro HD
  • Thickness : 13.5 mm
  • Weight : 903 g
  • Battery : 42 W/h

Specification of Microsoft Surface is promising and it will be able to give good competition to other tablets in the market. The best part here is with Surface Pro you can run usual desktop application like in a desktop. There are very few tablets which can do the same.

Build quality is nothing like any other tablet. Body is made with magnesium alloy like professional DSLR cameras. Hence durability will be significantly high. There is a cover which reminds me the smart cover is iPad. But cover in Surface could do more. There is an inbuilt keyboard as well.

Microsoft surface will be a tight competition to all the other tablets devices in the market such as iPad and Transformer. With the power of Windows platform and uniqueness in Metro UI probably this will be the next big thing in mobile computing.

Tags: #Microsoft #Nvidia #Tablet

How to Add Automatic Table of Content in Microsoft Word?

When you are writing a report or any kind of formal document you must include a table of content. The traditional way to include such is type it manually after to finalizing the content of the document. But by any chance if you change the content after you finalize the table of content, you will have to go through the whole document and correct the page numbers again.

Other than that, this kind of manually created table of content could always be vulnerable for human errors. And of course this consume lots of time since you have to go through the entire document and grab headings and relevant page numbers.

To save your time, same as in Automatic Referencing, the mostly used document editor comes in to picture which is Microsoft Word.

Steps to Follow

  • In order to make automatic table of content work, all headings and sub headings in your document must be properly styled using Home -> Styles
  • Before you start writing the document, decide how you want your level 1 headings.
  • Write a sample level 1 heading and style it the way you want it.
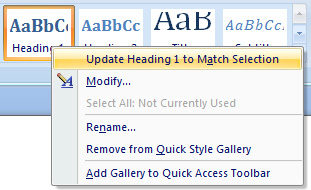
  • Then select it and assign the styling to “Heading 1” in Home -> Style -> heading 1 -> Right Click -> Update Heading to Match Selection

heading-style-9239053

  • After that whenever you need level 1 heading, all you have to do is select the heading and click on Heading 1 style. It will automatically get the pre assigned style.
  • You can do the same for level 2 and 3 headings as required.
  • Complete the document applying prepared heading 1, 2 and 3 styles.
  • Then go to the page where you need “Table of content” probably the page that comes after cover page.
  • Go to References -> Table of contents ->Select the table style you need from the drop down menu
  • This will automatically generate the table of content
  • The assigned heading 1, 2 and 3 will be properly organized in table
  • Relevant page number will be automatically generated.
  • Whenever you need to update the table of content, all you have to do is right click on the table -> Update Field. In here you can select the entire table if heading text also has changed. If it’s only change in page numbers, you can simply update only the page numbers.
  • See this file for an example.
  • Hardware: Intel Core i5 2nd Gen // 4GB DDR2
  • OS: Windows 7 Home Premium // 64 Bit
  • Microsoft Office: 2007

Tips

Application of heading styles is really important in here. That’s how automatic table identify what are the items that need to be included in the table and their page numbers. On the other hand this will further reduce the time that you will have to consume to style the text since you can apply it by just one click.

You can always change the heading styles by right clicking on them and going to Modify.

I hope this automatic table of content will save heaps of time you will consume to prepare formal documents. The main advantaged here is you can update the table of content after changing the document content with in a matter of seconds.

If you come to know any other important things about Automatic table of content in Microsoft Word, you are most welcome to share it with us.

Tags: #Microsoft

3 Important Microsoft Excel Operations

Microsft Excel is a very popular application that comes with Microsoft Office package. The package comes for Win and Mac platforms both. This application belongs to the spread sheet category and cater all your book keeping requirement effectively.

I’m pretty sure that Microsoft Excel is there in your computer. It has become a standard option for a personal computer. Sometimes you might have used Excel for some record keeping, calculation and sorting. But power of Microsoft Excel goes way beyond that.

3-important-microsoft-excel-operations-3826971

Here I’m trying to point you out few of important operations that you can do with Microsoft Excel.

If-else

If-else is nothing new to any programmer. But if you are not having programming background you might have the question “What is that?” If-else is letting you to model the way to make a selection in real world.

Ex: If it’s a rainy day, you bring your rain coat with you. If it’s a sunny day, you keep it at home.

Microsoft Excel support most of the logical operations, so why not If-else. Below example show you how to apply if else in Microsoft Excel.

In here status update is automated using If-else.

=IF(Logical test, “value If true”, “value If false”)

Click here to download the example.

Average

Calculation of average is important when taking most of the decisions, especially in financial context. Excel is giving you once click solution to calculate average for any amount of data you have.

Ex:

= AVERAGE(number1, number2, …)

You can drag and select the entire set of data instead of inserting numbers one by one.

Click here to download the example.

Goal Seek

This is hardly ever used operation in Microsoft Excel among general users, but this could come in handy when you have to think back, in other word reverse engineer.

Ex: You decided to save $5000 in this year and you have a target to increase the amount by another $1000 year by year. If you continue that way in 10 years you can save total of $95, 000. But you need to save $100, 000. Then what should be the starting amount?

Here you have to apply Goal seek, a What-If analysis technique.

  • Click on B12.
  • Go to Data ->What-if Analysis -> Goal seek.
  • If will give you below window.
  • Set 100, 000 as to value and select B2 for By changing cell
  • Once you click OK it will automatically re arrange the data to seek your goal which is $100, 000.
  • In order to make this working accurately, you must have correctly written formula in your Excel sheet.

There is more and more about the power of Microsoft Excel. Keep in touch, there will be a series of articles.

Tags: #Microsoft

Nvidia Project Shield – Redefining Mobile Gaming

The quality of mobile gaming displayed an exponential growth in the past few years and now they are ready to be almost as good as console games. We already have high quality mobile gaming consoles from many manufactures.

Nvidia entered this race with Project Shield, a high end Android based mobile gaming console introduced in CES 2013. It wraps up latest and greatest internals and displayed awesome performance in live demonstrations. Today we have Nvidia Project Shield under the NOG spotlight.

nvidia-project-shield-redefining-mobile-gaming-9817664

Insight for Project Shield

Design

Type: Flip

Controllers: Multi Touch Screen, Joysticks, shoulder mount triggers and dedicated buttons

The design here is very different from a Smartphone or Tablet and very close to mobile gaming consoles like PSP. There is a flip screen, bass enhanced built in speakers and all the dedicated gaming controllers in place. In the back panel you can find connectivity ports and microSD slot.

nvidia-project-speakers-5842024

Display

Size: 5 inches

Technology: LCD

Resolution: 720 x 1280 px

Sharpness: 294 ppi

The display is in right size for mobile gaming. Display sharpness is also in its sweet point. But I’m not overly impressed with the display resolution and technology. A 1080p resolution and IPS or AMOLED display would be a great value addition.

Processor and Storage

Platform: Nvidia Tegra 4

CPU: Quad Core Cortex A15

GPU: 72 Core GeForce (Custom)

RAM: 2 GB

Internal Storage: 32 GB

Expandable Storage: Yes, microSD

This is the first device to utilize latest Nvidia Tegra 4 platform and its power. Quad Core Cortex A15 CPU and 72 core Gefore GPU will make this device fly high in the sky for sure. The package comes with good amount of RAM and expandable internal storage too.

nvidia-project-tegra-4-3201737

Software

OS: Android 4.1 Jelly Bean

The operating system is Android, a wise move. It will give versatile performance to the device unlike other mobile gaming consoles. And it’s pure android, another wise move. So you wont have any performance issues like themed versions of Android.

Connectivity

Mobile Network: N/A

Wi-Fi: 802.11 n/g/b With 2×2 MIMO Antenna

Bluetooth: 3.0

USB: microUSB

HDMI: Yes up to 4K

This is not a mobile communication device. So you don’t need GSM/HSDPA or LTE. But it comes with lightening fast Wi-Fi for multiplayer games. Built in Bluetooth radio completes other things in between. MicroUSB port is there for PC connectivity.

In the CES demonstration this device worked superb with a 4K display connected via built in HDMI port. Once this project comes to retail market I’m pretty sure it will be a nice addition to your future living room with 4K TV.

nvidia-project-connectivity-6374103

This is not only a standalone device. You can connect this to your Gefore GTX powerd gaming station and play PC games. That’s why it’s comes with lighting fast Wi-Fy to reduce latency.

Battery Life

Type: Li-Ion

Capacity: 38 Wh

Battery Life: N/A

Cortex A15 CPU cores can perform a lot with much lesser power. And Nvidia 4-PLUS-1 architecture is also there. So this device expected to be energy efficient. With all these it has 33 Wh battery. So in real life you will be able to enjoy hard core gaming at least for 5 hours.

Wrapping Up

Project shield is not a complete product yet. But it has already created a new trend of Android powered mobile gaming consoles. Rumors say that Qualcomm is also working on building a Snapdragon 800 based gaming consol.

Once this comes to the market it will have lots of competitive advantage with Nvidia eco system. They already have Tegra Zone to download Android based games and Gefore GTX series desktop GPUs to work with project shield. After all it’s not only a gaming console. It can do most of the work as same as a Android Smartphone like web browsing, YouTubing, image viewing and social media.

No matter how hard these devices try to bridge the gap between console gaming and mobile gaming, there is lot more work to do toward it. So it might be challenging to get the hard core gamers attracted to these devices.

If Nvidia manages to release a polished device with great price they have a good chance of dominating mobile gaming with power of Android. The answer we are looking for is in the future. Will discuss further once this comes to market as a retail product.

Tags: #Nvidia

Web Performance and Security with CloudFlare

For the past few days I was talking about how to make your WordPress blog super speedy. It was a roadmap with many steps. The last step was how to integrate a Content Delivery Network to speed up the loading of static content. The solution I offered was CloudFlare. It’s webmaster-friendly and fully automated. However CloudFlare is not only a CDN, it’s much more. Today I’m trying to take a closer look in to Cloud Flare and show you what it can do.

Quick Catch-up

  • Roadmap to High Performance WordPress Blog [CDN]

web-performance-and-security-with-cloudflare-3958865

What is CloudFlare and How It Works?

Content Delivery Network

CloudFlare is globally spread hosting environment which is capable of delivering static web content. They have 22 data centers all over the world and providing unlimited storage facility for its users for free. However they won’t provide you web hosting facility to run server side scripts.

As a webmaster you can use CloudFlare to reduce the load to your main server. You can run dynamic web content with server side scripts linked with database as usual. Then you can distribute your static content all over the world with CloudFlare. So users will be loading large part of your website from nearest CloudFlare server and access your main server only to get dynamic web content.

The best thing here is you don’t have to change the structure of your website to work with CloudFlare. Only thing you have to do is change NS record in your domain control panel and let the traffic to go through CloudFlare engine. Rest of the things will be handled by CloudFlare. All you have to do is sit back and enjoy.

Since it’s keeping a copy of your whole website, in a case of server failure still your users will be able to see the last static version of your website. CloudFlare will automatically add a message indicating it’s a cached copy.

Web Optimization

CloudFlare is not only a CDN, it’s much more. Since it handle DNS, it show your visitors easiest possible way to get web content and improve the web page load time. When we were walking down the roadmap to high performance WordPress blog, you got to know about enabling browser caching. CloudFlare caches entire static content of your webpage automatically respecting their expiration time. Further it’s capable of caching content in parameterized URLs.

The web optimizer in CloudFlare can minify your HTML, CSS and JS. There is an experimental feature called rocket loader. It automatically combines entire external JS in your page and loads them asynchronously.

Security

CloudFlare maintain a database of known online threats. If any of those threats tries to access your webpage, it will block them automatically. In such case it will challenge the user with a captcha to verify whether he is a real visitor.

It takes security to next level by obfuscating email addresses, browser integrity check and image hotlink protection. Hotlink protection is a great idea to prevent embedding your content in 3rd party webpage.

web-performance-and-security-with-cloudflare-diagram-7513071

CloudFlare Settings Explained

I believe that you already configured your website with CloudFlare by following its registration. Basically all you have to do is change given NS records in your domain control panel. In addition you will have to add few other CNAME records to let FTP traffic to bypass CloudFlare.

Go to CloudFlare, login and then go to Websites. There you can see your websites listed. Click on the settings button and go to CloudFlare Settings.

In Settings overview page you could set your security and performance profile. Default settings will work for most of blogs. You can purge the whole CloudFlare cache, go to development mode, enable always online and find many more options there.

In Security Setting page you can customize profile, altering options such as challenge passage TTL and above discussed features. It’s letting you to customize the challenge page as well.

In the Performance Settings tab you can customize performance profile. Here you can alter caching level, minimum expiration time, minification etc. Try enabling rocket loader, but keep your eye open for any broken JS. It might give you trouble with Google Adsense.

Wrapping Up

CloudFlare is a must use service not only for blogs, but for all websites. You don’t have to change URLs of static content to work with CloudFlare like other CDN services. All you have to do is simply change NS records. CDN, web optimizer and security features are working fine and no glitches so far.

After I enabled CloudFlare more than 60% of bandwidth and more than 80% of hits were served by CloudFlare servers. It’s saving more than half of server recourses and loading pages even faster than before.

Try CloudFlare with your website, experience the performance improvement and never forget to share new things you came across with. If you face any difficulties when working with CloudFlare tweet me @MalindaOnline.

Tags: #Performance #Security #Web

Blog to Facebook and Twitter Solution – Dlvr.it

Few years ago, it was the era of search engines. Most of the internet content creators were mainly focused on SEO. But social media gained popularity in an exponential rate. Yesterday according to Alexa traffic ranking Facebook become the number 1 website. This is a major turning point in WWW.

As a blogger you must be paying very close attention to SEO already. But in future you might have to pay very close attention to your social engagements as well. You may have a Facebook fan page, Twitter profile and many other online representations. But you must make them updated with latest content of your Blog. There are many online services out there to get this done. Today I’m going to talk about simple, easy to use yet effective service to automate your blog post sharing on Facebook and Twitter.

blog-to-facebook-and-twitter-solution-dlvr-4460686

Getting Started with Dlvr.it

  • Go to Dlvr.it home page, enter email address and password to signup
  • Then it will take you on a step by step configuration process.
  • As the first step you have to enter your RSS feed URL and what should the first post to share on Facebook or Twitter.
  • Once you click next it will take you to next step. There you have to choose your destinations. Other than Facebook and Twitter, it supports LinkedIn, Thumblr, StatusNet and MySapce. Click on the icon to activate it.
  • Once you complete adding one destination, your registration process is complete. Then it will take you to dashboard.
  • In Dashboard you can find Deliveries, Stats, Post Widgets and settings.
  • In Deliveries you can configure routs and destinations, by adding or removing them.
  • Stats section will show you the engagement and outcome of your social sharing.
  • You can directly post some message in Post section.
  • You can create a widget and embed it in your website. You can auto generate code in Widget section.
  • Settings sections allow you to change password, change time zone and subscribe for Dlvr.it updates.

Dlvr.it is a very user friendly service, takes only few minutes to configure and works like magic. After the above simple configuration process all you have to do is focus on content creation in your blog. Once you publish a post, it will automatically go to social media destinations via created routes.

It’s not only about sharing content. You can see the performance of them in stats section. It gives very detailed report of clicks in different countries, posts, followers and many more. If you need more traffic, they offer a paid distribution service as well.

Tags: #Android #Blog #Facebook #Share #Twitter

How to Share Dropbox Files in Facebook Group?

If you have ever been a member of a Facebook group, you already know that it’s letting you share status, images, ask questions as well as share files. Just think you shared a file with a FB group and now you want to change the content. You have no option but to re upload the updated file. What if you are away from your computer and don’t have the file which you need to share?

The best solution for this kind of problem is cloud storage. Facebook has no plan to start their own cloud storage, but they have made a good friendship with the best personal cloud storage system, Dropbox. Now you can share Dropbox files to FB groups with just few clicks right in your browser.

how-to-share-dropbox-files-in-facebook-group-7780516

Getting Started With Dropbox File Sharing In a FB Group

In previous Add file window you had only one option. But now it has two options. ‘Upload file from your computer’ and ‘add file from Dropbox’.

  • Go to your group where you need to share a file and click on Add file.
  • It will expand the options. Select Choose file from your Dropbox.
  • Since you are doing this for the first you will have to grant required permission for Dropbox.
  • Then a pop up will appear and there you can see your Dropbox folder listing.
  • If you want to search for a file, there is a real-time search as well.
  • Finally choose the file you need and click select.
  • You file will be attached to the post and you can share it with the group may be with a message.

Now you will never have to face above discussed issues. If you want to edit the file, go to Dropbox, edit and save it. Entire updated file will be automatically synchronized in FB group. If you away from your computer, no problem, as long as you have internet you can share files in your Dropbox.

Facebook and Dropbox is a perfect combination to share files and it’s a great improvement in FB groups file sharing. They started rolling out this new feature couple of days ago. If you can’t see this options yet in your FB group, give it a few days.

Tags: #Dropbox #Facebook #Social Networks

How to Clean Up Social Media Permissions?

When you are signing in to many online applications you must be using facebook or twitter authentication. Once you do that those apps are getting a certain level of permission to access your data in those social profiles and they will be mentioning during the authentication process.

After years of online life you must have given a long list of apps to access your social media data. If you take a closer look you will figure out that there are apps you didn’t use in months. So it’s a good idea to unlink them from your social profiles. But, how to do it?

All those social networks are providing you an interface to manage linked applications. For that you have to go to each and every app and revoke unwanted permission. That might be pretty painful. Don’t worry! Here is a cool app to do it in an easy way.

how-to-clean-up-social-media-permissions-6974322

How to Use MyPermissions.Org?

  • Go to MyPermissions.org
  • There you can see set of icons for several online social networks and services.
  • Simply click on a icon and it will take you directly to permission settings in that social network or app.
  • If you are not signed in to that app you will be prompt to do that.
  • Then all you have to do is revoke unnecessary permissions.
  • You can do this for all your social profiles and apps.

It’s as simple as that. If you didn’t clean up permissions in your social profile recently, you will definitely be surprised once you see the list of permissions you have granted. It’s highly recommended to clean up those at least once a month.

Tags: #Security #Social Networks

How to Simplify Photo Sharing with Kicksend?

There are several image sharing services you can find on the web. But most of those are not simple enough to be used by non-geeky, normal people. The major reason is they provide too many features to the user and it makes the operations very complicated.

When I was stumbling across the white fire grid, I came across with this image sharing service with tag line “A photo sharing app Mom will actually use”. I gave it a try and as they said it’s very simple with minimalistic set of features that can be used by anyone. Let’s go and get our hands on it.

how-to-simplify-photo-sharing-with-kicksend-4028391

Getting Started with Kicksend.com

  • Go to Kicksend.com and create an account by entering email, full name and password.
  • It will directly take you to the web app.
  • First you have to select photos. You can either drag and drop images to the box or click choose file, browse and select.
  • Once you select images a text box will appear for you to enter the album name. Enter it and click next.
  • There you can type email address which you want to send photo album just created and click send.
  • That’s all! Recipient can see the photo album by clicking on the link in email.
  • Image viewer will show you a list of thumbnails. By clicking on any you can see the full version. There you have an option to download, print and leave a comment.
  • In your account you can find all the sent albums organized as a timeline.

Always remember this is not a secured service. Anyone who has the link to your album or a photo can view it. There is no way for you to delete the uploaded images as well unless you delete the whole account.

If you like to take Kickstand experience with your mobile, you can you install mobile app on Android or iOS.

Tags: #Online Tools #Share

What is Apple Fusion Drive?

In past few years computer hardware were getting improved both horizontally and vertically. Processors were getting faster clocks as well as many cores while RAM was getting more GBs and improved data rate. But HDD was getting improved only horizontally.

Today we have couple of terabytes of HDDs, but their data transfer rate wasn’t improved much. This is a major performance bottle neck in computer hardware systems. Previously I was talking about importance of SSD to solve this problem.

But the price point of SSD is way too high compared to HDD. So the best solution I offer before is getting a SSD along with Terabyte HDD. But again it’s no easy job to decide which data should go in to SSD and which to HDD.

Apple, offer a very practical solution for this problem come with the name Fusion Drive. Today it’s under NOG spotlight.

what-is-apple-fusion-drive-6034859

Technology in Fusion Drive

Apple Fusions drive is available for Mac Mini as well as iMac computers. What its wrapping is 128GB SSD and 1TB or 3TB HDD which is the exact setup I proposed before. But what is the magic here?

The fusion drive is smart enough to automatically transfer frequently used data in to SSD and other to HDD. It’s taking that decision for you. So it’s combining lightning speed of SSD with humongous storage of HDD and dynamic file management to give you an awesome experience.

Fusion drive will obviously move OS and software for faster boot up and load time. In addition it will identify your interests, what are the files you use more frequently and then move those also to SSD as space permits.

How to Get a Fusion Drive?

When you are ordering a Mac Mini or iMac you have the option to configure it. For that go to product page, click buy now and select specific product you need. Then it will take you to configuration page. Under hard driver you can find the option to add fusion drive.

Once you order a Mac Mini or iMac with fusion drive it comes pre-configured. Off the shelf you can start using it.

Tags: #Apple #Storage