Adobe Photoshop CS4 Extended is an industry leading, powerful graphics editing & designing software for pixel based images. Having developed by Adobe Systems, the software was initially released in 1990. After the 7th version, the product was renamed as “CS – Creative Suite”. The latest version is “CS4 Extended” which was released in April, 2009. CS4 & CS4 Extended versions came with various features such as, content-aware scaling, fluid canvas rotation, auto-blending, enhanced raw image processing, better printing capabilities and many more. But the most significant feature is the support it provides for working with 3D objects. In addition, these two versions are the first to introduce 64bit processing support, which results in better memory usage than in 32bit versions. The next version, CS5 is scheduled to be released in April 2010 for Photoshop as well as for the other Adobe CS software such as Flash, Dreamweaver, Premier Pro, etc. As revealed by Adobe, this new version of Photoshop is equipped with great features such as content-aware filling, image re-composition & completion, patch-match, etc. In this tutorial Photoshop CS4 Extended version for Microsoft Windows will be explained. However, if you’re unable to use this version due to any reason, you can use an older CS version including the 7th one. Although you may not be able to do all the things that can be done with the newer versions, you can still use the most of the recent versions to get your work done. And even if you are not a PS* fan, you’ll still find this to be useful, since similar kind of products are intended come with similar features up to some extent.
*Both terms “Photoshop” & “Ps” will be used interchangeably throughout the article.
Getting Started
What do you want to do?
First of all, you must find the answer to this question because how effectively you can use PS will be decided depending on your requirement. More specifically, you should clarify whether you need PS to work with or not. For an example, if you have to work with a lot of shapes, lines, illustrations & such things (which are called vector graphics), then you may use Adobe Illustrator, CorelDraw or Inkscape etc. rather than Photoshop. (Inkscape is a good open source alternative for vector graphics.) This is because those applications are designed specifically to work with vector graphics whereas Photoshop is not so. Photoshop is basically appropriate to design & edit pixel based images.
Does it suit my work?
Think of the range of the work you need to get done. If you just want to do relatively simple things, you can use Microsoft Paint or an open source alternative such as GIMP rather than going for PS. Because, you must consider whether you would use a simple &/or easily reachable software or a highly expensive product (though powerful) such as Photoshop to create a simple birthday card (at the time I’m writing this, the retail price of Photoshop CS4 Extended version is US$999).
It’s just a tool
This is a very important thing that you must keep in mind, when working with Photoshop (this is applicable to any technology you would use, indeed). Though it’s a nice piece of software, in the end the output will depend on your talent. Hence, you must try to put some degree of creativity in to your work.
Installation
Currently, Photoshop supports only Microsoft Windows & Apple Mac OS X platforms. Following are some of the minimum requirements for the installation of PhotoshopCS4 Extended version on the windows platform, as recommended by Adobe.
- Microsoft Windows XP with Service Pack 2 (Service Pack 3 recommended) or later
- 1.8GHz or faster processor
- 512MB of Ram (1GB recommended)
- 1GB free hard-disk space for the installation & additional space required during the installation.
- 1024×768 (1280×800 recommended) display with 16-bit video card
If your computer has a multi-core processor, you will feel better. From my personal experience, it’s better to have at least 1GB of memory, if you’re going to work with a lot of effects & higher resolutions. For the program files (including the additional software), it takes only about half of the required disk space. The rest is taken up during the installation process. It will be better if you have a larger monitor (at least 17”), since there is enough space & higher resolution that will be helpful to improve the quality.
Preparation
Before start working in Photoshop, we may do two things.
- Identify the workspace
- Setting up the preferences
Identify the workspace
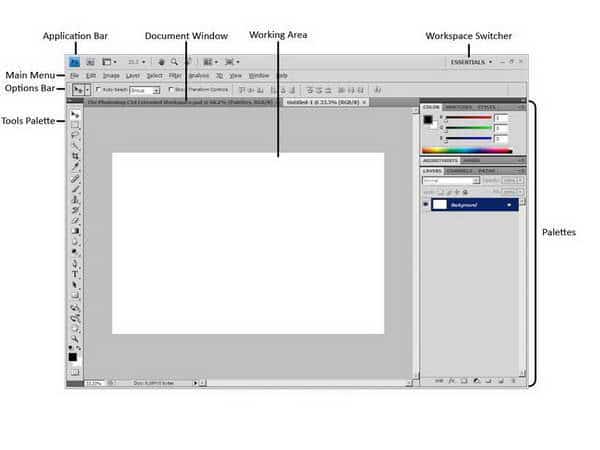
After the installation, open the application and you will see a similar interface as shown above. Here is a little introduction to the environment, in which you’re going to work.
*If you have uninstalled CS4 Extended version before, you might see that, there is an option in the un-installation process as “Remove Application Preferences”. Before uninstalling, if you had customized the PS preferences, workspace & other settings, & if you didn’t check that option to remove the preferences at the un-installation, you might get a little different workspace than the default view shown above.
Application Bar
Though it has a new look, it contains some of the already known, common features. Therefore it makes reaching those tools from a single location easier.
Workspace Switcher
This is a new useful feature. It automatically & very quickly modifies the workspace according to the user’s choice. This includes options such as, “Basic, Advanced 3D, Video, Web” & more. As the name implies, when the user selects one of those options, the PS workspace is automatically changes according to the selected option. Mostly, these modifications are done regarding the palettes (by default, placed at the right). For an example, if you choose “Typography”, the workspace will be modified by showing up the palettes such as Character, Paragraph & Styles, which allow you to do modification to the text in your documents such as change the font attributes, setup the alignments & apply various effects. If you have worked with any older version of PS, probably you might have faced the problem of reaching the necessary palettes & other tools to get your work done. For example, if we had to paint something & the Brush palette is closed or not popped up, then in the old way, we will have to choose it from the Window menu or take it in to the front to be visible. Since this new enhanced feature offers us almost all the necessary tools that are needed to do a specific task, we don’t have to repeatedly go looking for it & get bored. Also, there is an option at the end of this menu as “Save Workspace”. This allows us to save the workspace we customized as desired. This may increase the ease of using the software further. Choose different options & observe the changes happen in the environment & their features. The default workspace is “Essential”. So for now, you may leave it as it is.
Main Menu
As you might have seen in most application software, PS has a main menu bar which includes menus for almost all the tools we need to work with. As usual, there are shortcut keys to most of them.
Options Bar
As you can see in the above screen shot, the option bar is placed by default below the main menu bar. As the name implies, this area includes the options related to the tool you have currently selected. Choose several tools from the tools palette. You may notice that, some options are unique & some options are common for several tools.
Tools Palette
This includes various tools to work in PS which we use very often at work. There are single tools & grouped tools. You can identify the grouped tools by a little triangle at the lower right corner of those tools. To see & choose the hidden tools of the grouped tools, right click on the tool. Then you’ll be able to view the related sub tools.
Other Palettes
Except the Tools palette, the rest of the palettes are usually placed or to be placed at the right side. While we use the tools in the tools palette to do various tasks such as drawing, painting, cutting & typing, the rest of the palettes include a lot of options to make adjustments to those work.
The Document Window
His window consists of the working area with some other features such as the zoom level, document size etc. at the bottom. We can have our opened documents docked in one window in a tabbed manner or undock them as we desire.
Setting up the Preferences
Here, we’re going to look in to some configurations in PS CS4 Extended, & modify them as necessary. Setting up the configuration to meet our needs will make it easier efficient to use the software once we’ve started working.
First, open Photoshop & choose Edit > Preferences > General from the main menu (Ctrl + K). Now, you must have got the dialogue window as below.
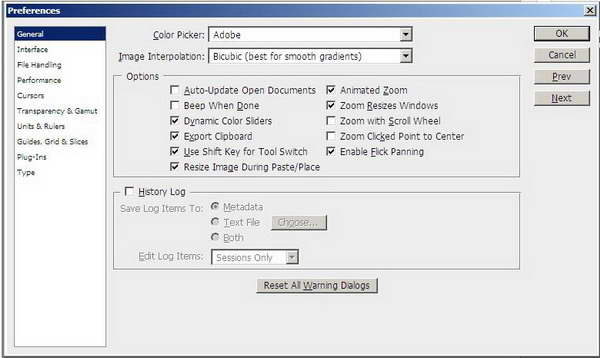
Preferences Dialogue Window – General Tab
I feel it’s better to introduce some options displayed here, which might be useful to you so that you can adjust them as you need. Here are some options appear in the “General tab”.
Auto-Update Open Documents
Assume that, you need to work on the same image in both PS & some other application (GIMP for an example) at the same time. When you did some changes to the image in GIMP & saved them, you may have to close & re-open the same image in PS to see those changes. But, if you enable this option, you won’t need to do so. Meaning, when you saved some changes to the image in GIMP, you just have to come back (focus) to PS. You’ll see that, the changes you made in GIMP are updated in the same image without having to re-open. So, this is a really useful option, if you have to work on the same image in two places at the same time. By default, this option is disabled (not checked) in PS CS4 Extended version.
Zoom with Scroll Wheel
Check this option if you need to zoom using the scroll wheel of the mouse. I think this is the easiest to way to do so. If you enable this option, you won’t be able to scroll the window up & down using the scroll wheel as it is in the normal way. Hence to do it, you must hold down the Alt key while you’re scrolling using the wheel. If you want to get an even zoom ratio, you may also hold down the Shit key (as well as Alt) while you’re zooming in or out using the scroll wheel. But, if you use the zoom tool in the tools palette, you will always get an even value for zooming. This option is also disabled by default.
Zoom Clicked Point to Center
Not checked by default. When this option is checked, whenever you click on some location of an image to zoom, that point becomes the center of the view. This is useful when you have to zoom in to a large value because, without this option you might have to scroll to the required location since it might be not appeared in the viewable area.
History Log
Assume that, you did a really good work but you forgot how you did it when you want to do it again. If it’s a simple work, then you may find it out easily. But, it’s not that easy when it comes to a lot of drawings, text, effects, etc. as you’ll have to spend a lot of time & effort to find how you did it. This option is very useful in a context like that. Check the option, & then you’ll be allowed to choose one of three options. If you just want to store the editing details for your own purpose, just select the option called “Text File”. If you’re selecting that option for the first time, you will be asked for a location to save the file. Under the History Log, there is another option called “Edit Log Items”. By default the “Sessions Only” option is selected. It just stores the details of opening & closing of PS & each file with date, time details. If you select the second option called “Concise”, the session details & the data appearing in the “History palette” will be saved. The last option “Detailed” allows saving all of the previously mentioned details as well as the details appearing in the “Actions palette”. This option is useful to you, if you need to track the complete history.
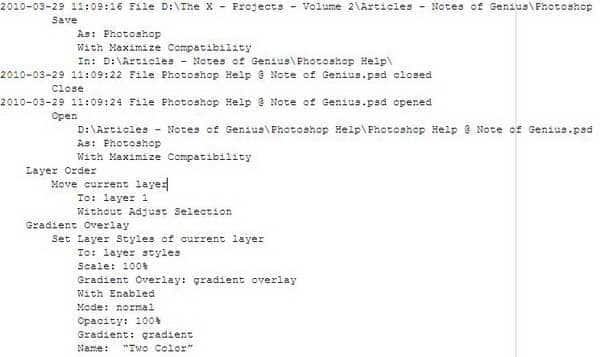
A History Log File (With Detailed tracking)
Now, select the Performance tab from the left side and the Preference options will be displayed. There are some important configurations that directly reflect the effect at work.
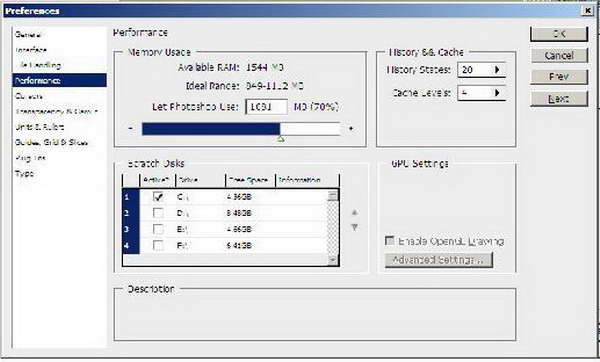
Preferences Dialog Window – Performance Tab
Memory Usage
Here you can see the available free RAM capacity from the total RAM capacity installed in your computer. “Ideal Range” is the suggested RAM capacity to assign to Photoshop by itself. Percentagewise it is usually around 70%. You can assign the suggested value of RAM or a value decided by yourself using the “Let Photoshop Use” text box or by dragging the slider. This is a critical setting. It’s better, if you assign at least 50% of the available RAM. When you’re working with a lot of images &/or with higher resolutions you will be required more memory. Anyway, it’s not a good idea to assign the entire available RAM to PS.
History & Cache
“History States” is to specify a number of history states to appear in the History palette, that can be used later to go back to some points of your working. “Cache Levels” helps to speed up the redraw of images with higher resolutions. The default value is 4. To disable caching, select the value 1. However, don’t disable this option. A value less than 4 is suited to work with lot of layers but with a small number of pixels. A higher value is good to work with large documents, but with fewer layers.
Scratch Disks
Works like the virtual memory of an operating system. When there is no enough RAM memory to work, it will free some memory from the specified drive/s &/or from the partition/s. PS detects the internal disk partitions & list them here as you can specify them. Usually the disk partition, on which the operating system is installed, is selected as the primary scratch disk by PS automatically. You might not able deactivate it from the list, but you can assign another partition as you desire. Adobe recommends implementing the scratch disks in a different drive/partition than the one, where the operating system uses the free disk space as its virtual memory. This is because if the operating system’s virtual memory uses the free disk space, where both virtual memory & the PS scratch disk are at one place, then if there is no sufficient free disk space to be allocated by the PS scratch disks, it will affect the performance PS critically. If you get the error message from PS as “The scratch disk is full”, then you will have to free some disk space by deleting PS temporary files. You may find them named in a format as “~PST####.tmp”, where “####” is a number. If you don’t want to free the disk space manually, you can use “Windows Disk Cleanup” or similar tool to do so.
GPU Settings
CS4 & CS4 Extended versions include this feature. GPU means the “Graphics Processing Unit” of the graphics display card installed in your computer. GPU improves the screen redraw instead of using the main processor of the computer for that. “Screen redraw” means, redisplay something on the screen. This is required when some modifications are made to the current drawing of the screen. The support of GPU for OpenGL (v 2.0), 126MB of RAM & Shader Model 3.0. Otherwise, this option might have disabled. This feature is useful to work smoothly while zooming, rotating & working with 3D objects in CS4 Extended version, etc. These preferences might be very useful to anyone, who is going to work with Photoshop CS4 Extended version. Except Other than these, you can find more options in the preferences. You can check them out by yourself if you want. This article focuses only on some configurations, which are critical to the performance.
So, this is your time. Check these out & you’ll be ready to get started. Whenever you want to set the default settings (such as preferences, workspace, etc) hold down the Ctrl, Alt & Shift keys as soon as you open the PS. This must be done before the initialization process at the startup. If you did it correctly, you will be asked to delete the current Photoshop settings file. Click “Yes”. Then the software will opened with default settings configured.
References
- (2010, April). Retrieved from adobe.com: http://www.adobe.com
- Adobe Photoshop CS4 – What’s New, Adobe Systems. (2008). Adobe Systems.
- Adobe Photoshop CS4 Extended Workspace. (2008). Adobe Systems.
- Dan Moughamian, Wiley Publishing. (2009). Adobe Photoshop CS4 Bible, Stacy Cates.
- Morris, T. (2008). Adobe Photoshop CS4 Keyboard Shortcuts
Bookmark


