You are using Gmail at home but when you go to office or university are you still using it? Most of the people would say NO, I’m using Microsoft Outlook or some other installed mail client, But why? Of course in a professional environment it’s not only about receiving email and reply to them.
There you need advanced configurations like automated reply, signatures, tasks and event reminders. Can’t you have the same features in Gmail? Of course you can but most of the non-techy people are not aware of those.

Here comes the step by step guide to configure Gmail as a professional email service.
Professional Features
Vacation Responder
This is essential for any professional. It’s too bad to not to reply to emails even when you are out of town for a vacation. The best thing that you can do is set an auto responder. Here is how to do it in Gmail.
- Go to Settings -> General -> Vacation responder
- There you will be able to see below options.

- Here set the radio button to vacation responder on.
- Then select the data range, fill the subject and message.
- If you don’t want this responder go to all the people check Only send a response to people in my contacts.
- Click save changes, it’s easy as that.
- Now Gmail will automatically reply to the people who are sending you emails when you out of town.
Signature
It’s very important to make your email credible and authenticated. In a paper mails you always sign at the end. It’s not possible in digital world, but you can add some signature text or an image of your signature.
Most of the emails clients are having option to auto add signature at the end of each and every email you are sending. Being the best online email service of course Gmail also having it.
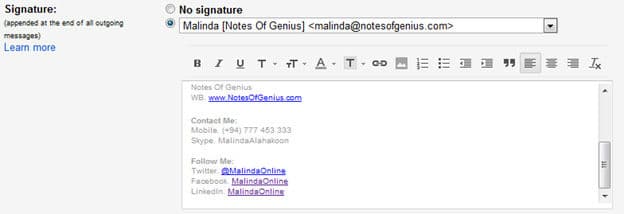
- Go to Settings -> General -> Signature.
- It will take you to below options panel.

- If you have many email account connected with Gmail, you can assign separate signatures for each account.
- In that case you will be able to see drop down menu with all the email accounts connected.
- In the text editor, design your signature.
- You can add image of your signature as well.
- Finally click save changes.
- Now Gmail will automatically add your signature to end of every email.
- When you are sending email as different account, Gmail will auto add different signatures as configured.
Auto Forwarding
Depending on your professional requirement you might need to forward all your emails to some other address as well. Most of the people do this for back up purpose. With Gmail you can easily set up auto-forward emails to another address.
- Go to settings -> Forwarding and POP/IMAP -> Forwarding
- Click on the button add forwarding address

- Enter the address and click next.
- Gmail will send a confirmation email with a verification code to forwarding address.
- After forwarding process complete you will be able to see the forwarding in settings page.

- Enter the code there and you are done.
- Now all your emails will be forwarded to given address.
- If you need to forward selected emails to another address, use Filters.
- In filter, after defining the search criteria set the action as forward it.
Now you can see that most of the extended service that provided by popular mail clients are also there in Gmail as well. In addition to those you can manage your task and event right here in Gmail with the support of Google calendar. Important Gmail tips about that coming up soon.
Tags: #Gmail #Google
