Shape of Forthcoming iPad 2

iPad was introduced to the global market back in 2010 April and It became a super hit electronic gadget within few days. It changed the people’s general idea about mobile device with many outstanding features. It came with a 7” display which is distinguishing it from a mobile smart phone. Other than that it came with increased resolution in display, 1 GHz processing power and wireless internet connectivity with advanced multimedia capabilities that redefine the idea of ‘Tablet’ PC. Most of the consumers were using it to read books surf internet etc on the go. By the end of year 2010 there was a rumor spreading that iPad 2 is also coming to the market in the 1st quarter of year 2011. There was much different paradoxical news and I thought of analyze available unofficial news and predicting the shape of forthcoming iPad 2.

shape-of-forthcoming-ipad-2-4855300

What’s Going to be New in iPad 2

Processor

Most if the news stating that new iPad 2 will be equipped with multi core cortex A9 processor. However there is argument about processing speed. Most of the information sources saying that it’s going to doubled the speed as previous iPad which will make it 2GHz. For me its seems realistic since there are already smart phones with that kind of amazing processing power, Apple will never wanted to be the 2nd in the market. After all, in order to handle the high resolution images and video it will have to have that kind of processor. Else users will feel delayed response and it will spoil the magic in apple products. In order to deliver maximum graphical experience there will be upgraded dedicated GPU as well. When it comes to memory it is expected to be 512 MB, but personally I expected it to be little bit more around 768 MB since 512 MB is general average in current market.

Display

In iPhone 4 the most attracted feature was its retina display. Most of the people expect to iPad 2 to have same kind of retina display. However, it will consume great amount of power and it will be critical since iPad is having 7” display. And if it will be a retina display, resolution has to be around 2048×1536 which is exceptionally high. It’s way bigger than 1080p high definition video resolution.  For me it seems like unrealistic and not practical in few aspects like power consumption and required processing power. I’d say it will come with a display having resolution 1280 X 960 with wide screen aspect ratio though the previous iPad was having 4:3 ratios.  Further, apple engineers will put extra effort to make the display more energy efficient and on success it will add an extra value to iPad 2 in future competitive markets. Then comes a most common complain for most of the tablet devices which is ‘The display reflects sun light when working outdoor’. I hope iPad 2 will give us a solid solution o this issue on its arrival.

Operating System

iPad 2 will be having the latest iOS 4.3 and it’s already released for developers. As a special feature it equipped with ‘Multi-touch gestures’ which will probably attract iPad users. Unlike before now iOS have multitasking so users will be able to enjoy many applications running background at the same time. Further, Apple app store is continued to expand exponential, so there will be millions of great application for forthcoming iPad 2. The application will be using upgraded hardware capabilities of iPad 2 like probable front camera to come up with cool applications.

Multimedia

Most of the people expect the iPad 2 to have improved speakers for music listening without head phones. Same as in latest HTC phones it will come in 2 stereo speakers in both the end of phone which can create surround effect in audio playback. However some people argue that there is no pint of having good external speakers why most of the users are using head phones and they have serious point too. The most discussed feature in iPad 2 is its front camera. Sometimes ago iPhone didn’t have front camera and it was a hot topic everywhere. As long as iPad is also evolving to be a wireless communication device, yes we can expect it to have front camera for video conferencing. And as always there will be a 5 MP rear camera with a flash. Some rumors saying that it will be having a ‘Video out’ which will come in handy since another rumor saying that it will be capable of recording 720p videos. Personally I’m pretty sure about 720p video recording since most of the latest smart phones are already having it, yet can’t say for sure about video out.

Connectivity

In the previous version if iPad there were 2 versions which is having GSM/CDMA connectivity and other did not. However, new iPad 2 will be having GSM and CDMA connectivity as a default option. Further it will be capable or extend its operations to 4G connectivity technologies. And there is another rumor that it will be having USB port which seems pretty realistic. I guess if apple engineers are planning for USB port, it will be USB 3.0. Additionally as always there will be Bluetooth connectivity and Wi-Fi. Even previous selected version of iPad having GPS receiver and we can expect is as a default feature in iPad 2.

Storage

For some reason entire iOS devices doesn’t support external SD memory cards. When it comes to iPad, it’s limiting its capabilities especially in multimedia playback. Most if the uses store many number of movies in it and watch them on the run. This will require easily expandable memory storage and it required to be hot swappable as well. It’s not clear why the engineers in Apple ignoring the perfect options which is SD memory cards. Further, increasing the internal memory won’t solve the issue ‘Hot swap ability’ though it will solve the problem of storage up to some extent. I hope there will be a solid solution to these problems in new iPad 2 and probably it will be external SD card slot.

Usage Possibilities

Multimedia Applications

iPad was very popular for it multimedia capabilities and it will continue with the arrival of iPad 2 also. With the increased processing power, RAM, GPU and display it will deliver never better multimedia experience to the users. If the screen will be wide screen and device will come with SD card slot iPad will be THE portable multimedia device for next few years. Additionally, there will be games which are using its hardware capabilities like multi point touch screen and accelerometer. Even now there are many games out there and with iPad 2 they will use its increased screen resolution and multi touch gestures also. As always people will be using to iPad to read books and surf internet on the go.

Capita Market Applications

Other than multimedia usage, I have noticed that iPad was getting popular in financial world. Most of the day trades in stock markets were using iPad to analyze trends in stocks and momentum of market. The 7” high resolution screen, multi point touch screen and internet connectivity gave a solid plat from to run trading software and advance charting software. Most of the trading software provides also have came up with iPad versions of their software after identifying this possibility. With the improved high resolution display, high speed connectivity and operating system support iPad 2 will continue to getting popular in capital market.

Further Evolution

Tablet PC trend will continue and iPad will always play a significant role in there. We can expect more extensibility and compatibility in future iPads. Most of the hardware vendors looking forward for open standards and we can see the trend in smart phone world. However, Apple was trying to develop own hardware specific culture with iMac, iPod, iPhone and iPad. I expect them to join the open standard and come up with iPad like tablet portable communication devices which will be compatible with cross vendor platforms.

Additionally, they were having less extensibility in hardware. Generally, in a PC if hard disk is not enough we can plug bigger one and if RAM in not enough we can do the same. But with iPad and also iPhone users are not that free to extend the device the way they want. Specifically, we can’t even a plug a SD card to iPad to extend the storage and make it hot swappable. I hope apple will take steps to let us to extend hardware capability as far as they can in future releases of their devices.

References

  • Brownlee, J. (2011, January 10). Kevin Rose’s iPad 2 Predictions Are Unlikely, Here’s Why. Retrieved February 02, 2011, from www.cultofmac.com: http://www.cultofmac.com/digg-co-founder-kevin-rose-retina-display-ipad-2-in-next-few-weeks/76344
  • Coldewey, D. (2011, January 17). iPad 2 Rumor Roundup. Retrieved February 02, 2011, from www.crunchgear.com: http://www.crunchgear.com/2011/01/17/every-ipad-2-rumor-roundup-and-evaluation/
  • Marshall, G. (2011, January 20). iPad 2 rumours: what you need to know. Retrieved February 02, 2011, from www.techradar.com: http://www.techradar.com/news/computing/apple/ipad-2-rumours-what-you-need-to-know-900232
  • Yarow, J. (2011, January 19). iPad 2 Not Likely To Get Super High Resolution Retina Display (AAPL). Retrieved February 02, 2011, from www.sfgate.com: http://www.sfgate.com/cgi-bin/article.cgi?f=/g/a/2011/01/19/businessinsider-ipad-2-no-retina-display-2011-1.DTL

Tags: #Apple #iPad

Website Monitoring with JustPing

Couple of days ago Notes Of Genius introduced you a website named DownForEveryoneOrJustMe.com where you can find availability of website. This comes in handy when you try to trouble shoot your internet connections when some sites are not working.

Using this you would figure out the site is down just for you or is it common for everyone. Further, you came to know it’s using pinging to get the status of the website.

website-monitoring-with-justping-7512855

Quick Catch-up

  •  How To Know When A Website Is Down?

Today I’m going to introduce a tool which does the same thing but provide you more detailed and accurate report. It comes with the name JustPing.

The information provided by JustPing could be used to troubleshoot your web server and availability of service for different geographical locations rather than just finding whether it’s up or not.

How to Use JustPing?

  • Go to JustPing home page.
  • There you can find a text box to enter a domain name of a website or IP address of the server.
  • After entering above details accurately, press Ping!
  • Then you will be able to see a long list of location where pings get initiated and their details updating real-time.
  • It will take some time to complete the pinging from all 50 locations.
  • Now you can get a clear idea about the availability of given website around the world.

justping-report-7141220

JustPing is providing you a report which containing percentage of packet losses, min, max and average pinging time as well as the destination IP address from more than 50 locations around the globe.

You can use this information to find whether a given website is available for all those 50 locations. This report gives you further information to find out the quality of connection to server from different locations in the world as well.

Tags: #Performance #Web

Adobe Camera RAW Tutorial

Adobe Photoshop is a very popular tool among professional graphic designers. It is capable of produce raster graphics with lots of comprehensive user-friendly tools. With the modern advancement of photography, especially with digital cameras most of the photographers are using adobe Photoshop to edit their photographs by color correcting, cropping and with many other techniques. In the context of photography identify conditions and configuration of the camera in the shooting time is essential parameters when it comes to editing. Normally Adobe Photoshop doesn’t identify the camera configuration, only the image data. If you want to solve this problem and edit your images accurately considering camera configuration you need a plug-in. The plug-in you need is Adobe Camera RAW which also comes built-in with Adobe Photoshop CS5. If you are using previous version of Photoshop you will have to download and install the plug-in before you go from here. With the aid of this plug-in you can edit your digital images which are in RAW formats accurately and non-destructively.

adobe-camera-raw-tutorial-3009704

What are RAW Files?

Normally point and shoot type digital cameras produces JPEG files which can be open in any personal computer. But when the camera converts its images sensor data in to JPEG file, it has to reduce significant amount of data to fit in to its compression. Further if camera applies any color correction to JPEG file, it’s irreversible. It’s ok to use day to day photography, but not good enough to get a professional quality result. Professionals need what the image sensor actually captures without any data loss or correction. At the same time they need the camera configuration also to be saved with the file for accurate editing. Therefore most of the professional and semi-professional cameras allow shooting in RAW formats.

RAW file is the collection of data which captured by the image sensor in the camera, without any data loss. This is also called as pixel dump. Some cameras provide feature to use uncompress, lossless compressed and compressed raw files. In above three types first two are containing total amount of data captured by the image sensor and compressed format reduce details of image according to the configuration. Other than the pixel dump, a RAW file will contain lots of information about the shooting conditions including the type of camera, type of lens, focal length, ISO, aperture, shutter speed. If camera is configure to automatically apply any color correction to image like white balancing, selective color or saturation that information also will be attached to the RAW file as parameters in a non-destructive way.

Most of the camera manufactures have their own RAW file formats specially designed to cater the specific features and functionalities of each camera types. Below list contain some of the camera manufactures and their RAW file types.

  • Nikon: .NEF
  • Canon: .CRW
  • Kodak: .CDK
  • Epson: .ERF
  • Olympus: .ORF
  • Pentax: .PRF
  • Samsung: .SRW

.DNG also called a Digital negative format could be identified as a universal RAW format those there are no international agreement saying everyone should comply with that. So when you shoot in different cameras you will still get different file formats. In Camera RAW there will be separate profiles to handle camera types and their different lenses.

Getting Started

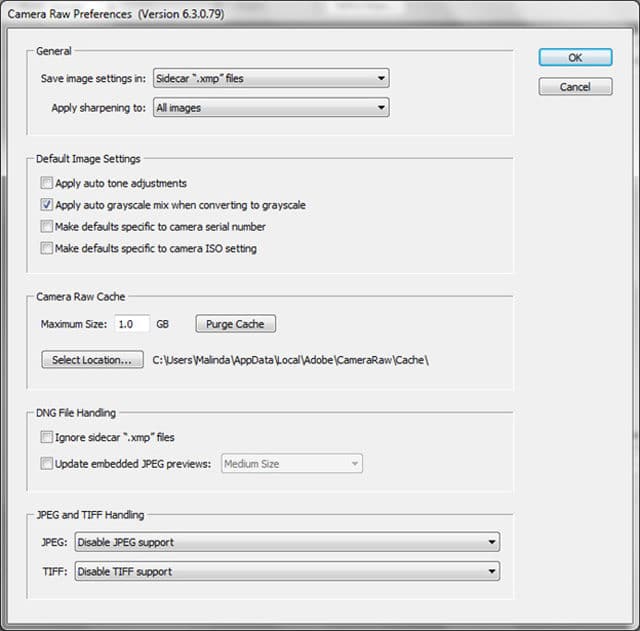
Once you figure out that you need to use Camera RAW and install it successfully, you have to do some configuration in Photoshop to make it work well. To do that configuration you should follow the below path in Photoshop menu

Edit -> Preferences -> Camera RAW

This will give you below window.

adobe-camera-raw-preferences-6487029

Adobe Camera RAW – Preferences

Generally you need not to do any changes in here. In general section you can change the ‘save images settings in’ to camera raw database. In that case the entire configuration will be saved in centralized database. With this setting ‘sidecar .xmp files’ it will create a configuration file where the original image is, which could be the best configuration. Camera RAW allows you to edit JPEG and TIFF files as well. If you need Camera RAW to be open when you open such a file you can change the setting in the section ‘JPED and TIFF handing’.

Main Window

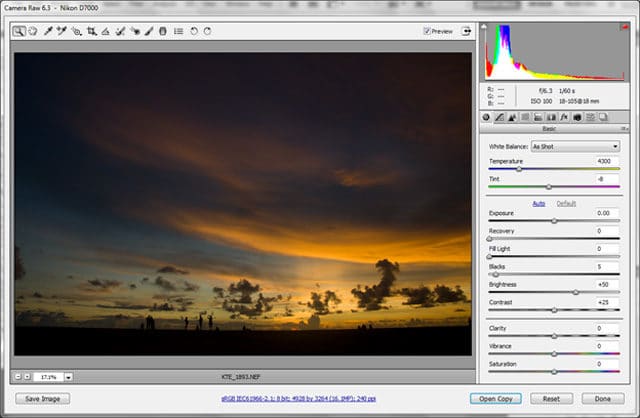
After you install and configure the Camera RAW plug-in you can open RAW file in Photoshop, you may drag and drop the file in to Photoshop window. Once you do that it will open the below window.

adobe-camera-raw-main-window-1943186

Adobe Camera RAW – Main Window

This is the Camera RAW main window. At the top of the window it provides you basic image manipulation tools like white balance, crop, straighten, spot removal, red eye reduction etc. If you tick ‘Preview’ it will reflect the changes that you will be doing to the image real-time. There is a button to make the window full screen too.

Right below the manipulation tools, you can see the preview of the image inserted. You can select the amount of zoom below the image. I prefer ‘Fit in view’. There is a button for you to save the edited RAW image as a JPEG or any other common image format. The blue color link will take you to work flow options which contain color space and other details.

In the right hand side you have variety of controllers to edit your image. At the top you can see the color histogram separated in to color channels. It will reflect the changes you will do with the controller real time. In the histogram there are two arrow heads in both ends. You can use them to identify detail loss in black areas and detail loss in white areas due to over expose. Below the histogram you can see the shooting configuration of the image automatically identified by Camera RAW by reading Meta data in RAW file.

Below that there is a tabbed pane where you can access the image editing controllers. The detailed explanation of each part will be there in the next section.

Image Editing Tools

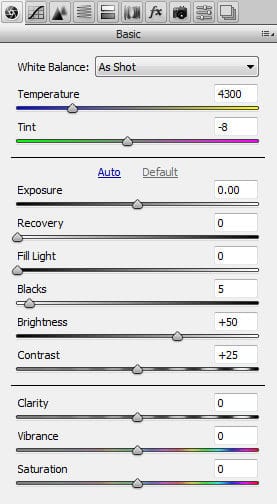
adobe-camera-raw-basic-2459978

Adobe Camera RAW – Basic

The first section ‘Basics’ allow you to do an accurate light correction to your image. First 2 sliders are for white balancing. If you have set your camera to auto white balancing, those configuration will be reflected with the values of slides, yet totally reversible. Then you can change the Exposure which controls the amount of whites as you need. You can use Recovery slider to re gain the details of over exposed areas up to certain level. If you feel like your image background is too dark using Fill light slider you can increase it. Blacks slider controls the black area and it’s commonly used to remove the haze in images. Brightness and contrast works the usual way. If you need to blur or sharpen your photo, you can use the Clarity slider for that. Finally you can enhance the color levels of photo using Vibrance and Saturation.

If you have done a good job with the camera, this basic controller would be enough for you come up with exceptional photograph.

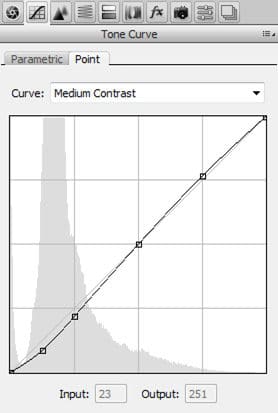
adobe-camera-raw-tone-curve-5935203

Adobe Camera RAW – Tone Curve

In this section you can alter the color curve and change the light of the photo. Parametric curve could be changed using different sliders and Point curve could be change using any number of points that you can introduce to the curve using mouse click on it. If you are using parametric curve it will be same as Exposure, Recovery, Fill light and Blacks in the ‘Basic’ section. If you are using point curve you have fine control over different rage of light with much flexibility.

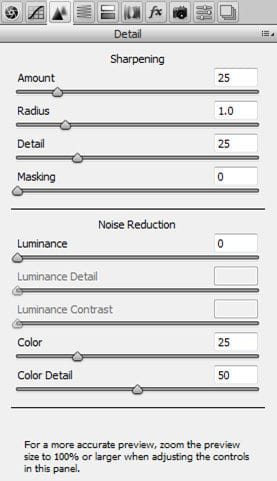
adobe-camera-raw-detail-8503155

Adobe Camera RAW – Detail

Using this section you can manipulate you image to make to little bit blur or sharp. In order to get this done you can use the sliders in the Sharpening section. After controlling, radius, detail and Masking levels you can blend the effect with the image with the amount slider.

If your digital camera is producing noisy images, especially in low light conditions, using Noise reduction section you can remove noise in to certain level. Mainly there are two options, luminance and color. In order to see the actual change will happen to the image you have to set the preview size to 100% and this message is displayed there in the window.

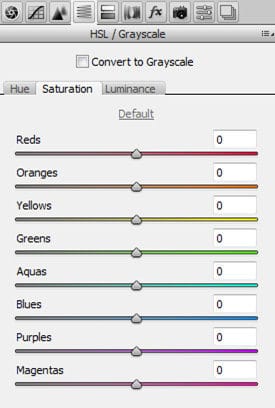
adobe-camera-raw-hsl-grascale-3008540

Adobe Camera RAW – HSL/Grascale

If you need to change the characteristic of each color channel you can do that in this section. There are you three main section, hue, saturation and Luminance. You can change the each attribute for each color channel using the given slider.

There can be creative usage in this section. You may de saturate one color, or de saturates all the colors, except one to make out standing photographs.

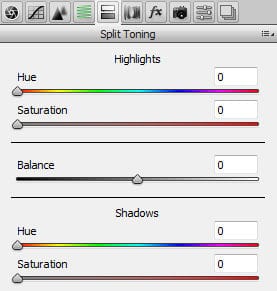
adobe-camera-raw-split-toning-2547804

Adobe Camera RAW – Split Toning

This section allows you to change the hue and saturation separately in highlights and shadows. To define the difference between shadow and highlight you can use the balance slider. I have rarely used this section, yet there can be creative usage depending on your photograph.

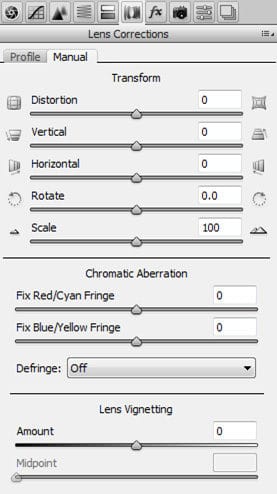
adobe-camera-raw-lens-correction-8561170

Adobe Camera RAW – Lens Correction

This is a very important section in Camera RAW. Sometimes, when you are shooting with different lenses, they cause problems to your photograph. If your lens profile is there in Camera RAW, it will automatically fix those errors that come from the lens. If camera RAW doesn’t have your lens profile you can always use the manual controllers.

Transform section deal with the different tilting of images in all direction. Distortion slider could be use to control the effect of fish eye lenses and sometime you may use to make a image looks like fish eye using that.

If you have different unusual color chrome around the edges of your images, you can use chromatic aberration to correct those.

Lens vignetting is very important especially when you dealing with high power telephoto lenses. They might make the corners of your images slightly darker. You can correct those errors using amount and midpoint sliders.

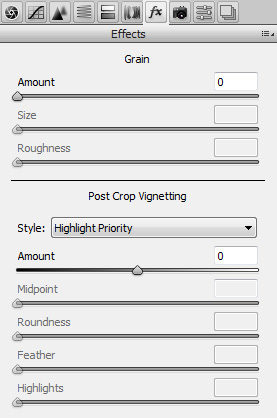
adobe-camera-raw-effects-2191682

Adobe Camera RAW – Effects

In this section you can introduce grain to you photograph to give it a old look and feel. At the same time you can add different effects to corners of the photo using post crop vignetting. I have rarely used this section as well. Never feel like using it for my photographs.

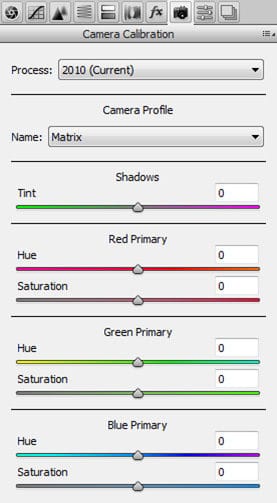
adobe-camera-raw-camera-collaboration-1503197

Adobe Camera RAW – Camera Collaboration

This section fine tunes the color interpretation of Camera RAW for different types of cameras. However, most of the cases default configuration will work. If default configuration is not good enough you can calibrate your camera manually using this panel. If you required manual calibration you can use color calibration chart. Here you can find specific instruction to calibrate your camera with camera RAW.

Special Tips

Configure Camera to Shoot RAW

Most of the latest digital SLR cameras support RAW file formats, yet they have their own proprietary version as I mentioned below. When you shoot with the camera you should capture the image with maximum possible quality. As the first step you should change the file format in your camera to RAW. Then the camera will offer you options as below.

  • Uncompressed RAW
  • Lossless compress RAW
  • Compressed RAW

Down the list quality will get reduced. However out of first two options both will hold the same quality, so you may go for 2nd option to save the space. If your camera offers bit depth to select go for the highest. Additionally your camera may offer you to save a JPEG file also as a preview.

Handle RAW file in Windows Platform

Once you copy pasted your RAW file in to windows PC you have no way to open it in any application before you drag and drop in to Camera RAW in PS. This will give you problem of previewing and take lots of time to get the actually image you needed. As a solution, above mentioned JPEG preview could be use, which will be placed next to the RAW file, yet it consumes more storage space. The best solution I came up for this is install a RAW file encoder in to your Windows PC, then it will be able to handle RAW files same as any common image format. There are several RAW encoders and none comes for free. Depending on your requirement you may purchase one.

Finalizing

After you have done with your editing in Camera RAW you have two options. You can open the image in Photoshop to continue with further manipulation. For that you can just click on ‘Open Image’ button. If you have many images, first you can select the desired images and click ‘open images’. By pressing ‘delete’ you can remove the unwanted images.

If you are happy with the edit you can simply save the RAW file in ant common file format By clicking on ‘Save image button’ without going in to Photoshop.

Tags: #Adobe

Connect RSS to Social Media via TwitterFeed

If you have your own blog I’m pretty sure that you have your own social media accounts too where you publish links to your blog posts. Of course that will give a good exposure to your content among people. Not only blogs, if you have a web site for your organization, it’s a good practice to have a RSS feed for updates related to your service or products. Again to get a social exposure you can post them in social media.

However if you have more frequent updates in your website it could be difficult to allocate time to post links on different social media accounts. If you have a number of social media accounts, the situation will get worse.

Even if you don’t have your own blog, sometimes you might like to post someone else’s updates on your social media accounts. Probably you are already doing that manually. When you are doing manually you can easily filter out the content you are going to publish but it will consume lots of time.

connect-rss-to-social-media-via-twitterfeed-7791968

What if you have a solution where you can automatically publish updates in a RSS feed to all your social media accounts? And what if that service comes with keyword filtering facility which allows you to select updates that need to publish? Of course that will save lots of time you spend on social media, sharing different content.

That solution you are looking for is TwitterFeed.

Create an Account

TwitterFeed is a free service where you can connect all your RSS feeds and configure it to post updates in different social media accounts in a convenient and customizable manner. As the first step you need to create an account for yourself.

  • Go to TwitterFeed website
  • Click on the Sign Up link in header
  • Enter your email address which will act as your Username and then enter the Password and confirm it
  • Click on the Create Account and you are done!

Once you log in it will take you to the dashboard. Since you just created the account there won’t be any feeds listed. But you will be able to see the button Create New Feed.

Configuration

Create Feed

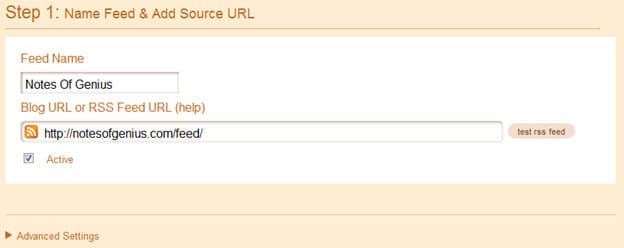
Once you click on the Create New Feed button it will take you to the below page where you can enter the details of your RSS feed.

source-url-4636312

  • Enter a Feed Name as an identifier
  • Enter the correct RSS feed address or your Blog URL
  • If you enter your blog URL, TwitterFeed with automatically fetch the RSS address
  • Click on Test RSS Feed
  • If your RSS feed is working good it will give you the message “Feed Parsed OK”. If not you have to check whether your RSS feed address is correct or its working good

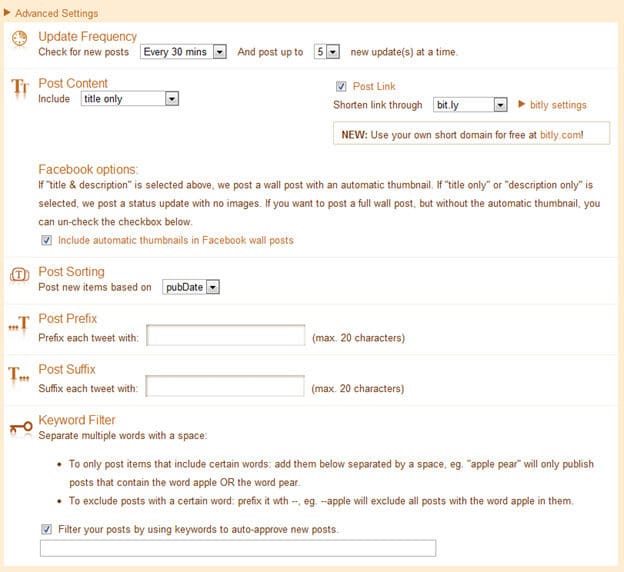
These basic details would be enough to setup a RSS feed for any social network. But to utilize the maximum power of TwitterFeed I recommend you to open the section Advanced Settings. It will give you the below page.

advanced-settings-6743163

There you can see lots of configuration options. Let’s take a closer look in to each.

  • You should set Update Frequency considering the update frequency of the original source. If you have more frequently updating source and you set low updating frequency in TwitterFeed it will take longer time to publish them in Social media accounts.
  • There you have to select how many posts you need to publish at a time. This again depends on the original source and your requirement.
  • Then you can select the content options. Generally RSS feeds are coming with Title and Description. You can use any kind of combination to your social sharing.
  • If you want the original links also to be published check-in Post Link. If this goes to twitter don’t forget to use a shortened URL.
  • If sharing goes to Facebook better to check-in Include automatic thumbnails in facebook wall posts.
  • To append any fixed text to the begging of content or after content use Post Prefix or Post Suffix respectively.
  • You may be a person who is sharing someone else’s RSS feed. In that case you can filter out the content that needs to be re-shared using a keyword list. To enable it check-in Filter your posts by using keywords to auto-approve new posts. Then you can enter the list of Keywords. There you can find some useful instructions to use keywords effectively.

Now you are done with configuring RSS feed. It’s time to proceed to step 2 to configure publishing services.

Publishing Service

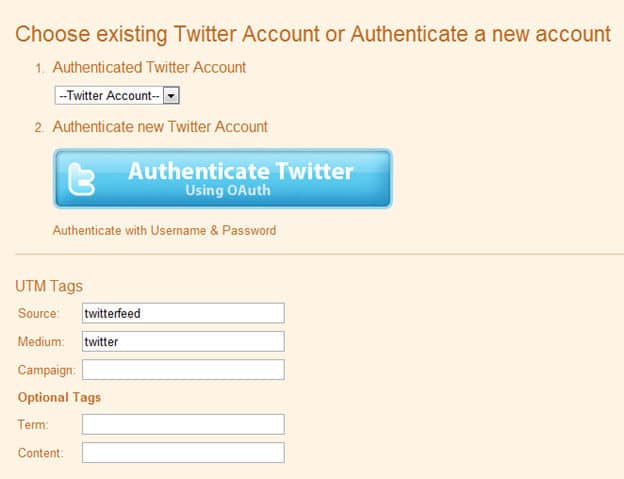
Once you go to step 2, configure publishing services, you will be able to see a list of social media including Facebook, Twitter and LinkedIn. Below is the page you will get when you try to add a twitter account.

authenticate-twitter-9636751

  • Connect the previously created RSS feed with twitter by clicking on Authenticate twitter button. In order to proceed with this you will have to login to the desired twitter account.
  • If you already have the twitter account authenticated, you can simply select it from the drop down menu.
  • In the next section, UTM tags give you the facility to track your campaigns. The entered details will appear in your Website Analytical Report. It’s working great with Google Analytics.
  • Following the same procedure you can add many social media accounts for same feed.
  • If you have Facebook pages, they also work well with this.
  • Finally click ‘Create Service’ and you are done! Your feed is live and all the updates will be automatically published in selected social media accounts.

Advanced Tips

  • If you want to manually check for updates in a RSS feed, go to dashboard and click Check Now in front of the feed.
  • If you use Bit.ly as the URL shorten service, it will keep records on number of clicks you got for each URL and they will be displayed in the Dashboard. In order to activate Bit,ly service you have to register with bit.ly API. (Detailed tutorial coming soon!)
  • If there are several accounts linked to one feed, there will be separate indicators for each account.
  • Using the dashboard you can view or edit the feeds anytime.

That all about TwitterFeed! It’s a totally free service that provides highly reliable service for a long time. Of course this will save loads of your time you spent on sharing content on social media. Furthermore, frequent automatic updates will attract lots of attention to your accounts as well. Once you configure everything, all of this will happen without even knowing. Enjoy the service and share your experience with us.

Tags: #Blog #Facebook #Twitter

How to Launch an Application on Windows Startup?

When I was talking about Mozilla Prism and Google Chrome Application Shortcuts, I was always saying that you can make these applications run automatically on Windows start up. I gave you some brief instructions about how to get it done. This article is a result of the request made by lot of Notes of Genius readers to publish an in detailed tutorial about how to auto-run applications on start up.

The technique that I’m going to talk about in this article is very simple and easy to configure. This will work with any application that you have installed in your PC as well as any Rich Internet Application you are running through Mozilla Prism or Chrome application shortcuts.

Steps to Follow

  • As the first step you should create a shortcut to the application and place it in a known place such as desktop
  • You can find the desired application by searching for it on Start menu
  • Once you find it there, the easiest way to create  shortcut is Right click on the program -> Send to -> Desktop (Create shortcut)
  • After that you will be able to see the newly created shortcut in the desktop
  • Then go to Start menu -> All programs -> Start Up
  • This folder may already contain few shortcuts
  • If you place a shortcut in this folder, it will automatically launch on windows start up
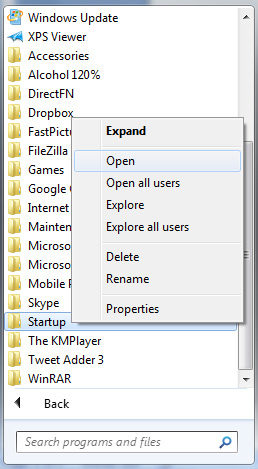
  • The easiest way to open this folder in windows explorer is Start menu -> All programs -> Start up -> Right click -> Open

startup-folder-4422545

  • Then it will open in Windows explorer, the file browser
  • Now you are just one step behind. Move your previously created shortcut to this folder. You may drag and drop or Cut and Paste.
  • Then you are done! Next time you boot your computer, on windows start up this application will be launched automatically.
  • You can add any application shortcut in this folder the same way.

Advanced Tips

  • This is not the only way for you to launch an application on windows start up. You may have observed there are some applications which run on start up but not there in “Startup” folder such as Skype.
  • They are using Windows Registry to get it launched on startup.
  • Launching too many applications on startup will increase the boot time of your computer.
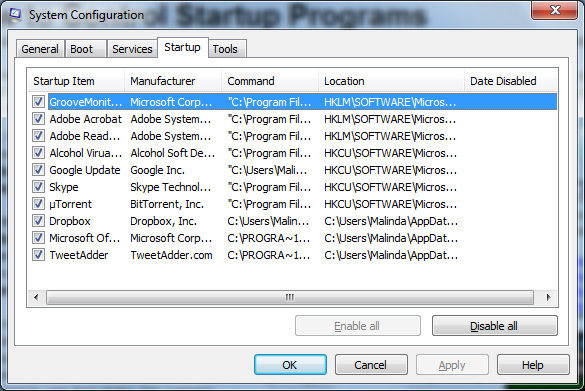
  • If you want to manage entire start up applications go to Start menu -> Type “msconfig
  • It will give you below window and in there you can control all the startup applications.

system-configuration-5340015

  • If there is a program you want to opt out from windows startup remove the tick, click OK and reboot the computer

Keep your Windows startup folder clean and remove all the unwanted programs using System configuration as mentioned above. This will help you to launch only highly required applications on start up in a highly performance optimized way.

Tags: #Windows

Asus Transformer 700 Infinity

Couple of week ago Asus introduced their Asus Transformer Pad 300 and it became the center of attraction in the Android world. It has solved the major problems which were there in previous Eee Pad Transformer prime, mainly Wi-fi and GPS signal issues.

The best part is Asus devices are giving you the pure android experience, unlink heavily themed Samsung devices. Therefore Asus devices are having relatively smooth operation and minimum touch lag. Transformer pad came with 1.2 GHz quad core CPU and they have no plans to stop there.

asus-transformer-700-infinity-7550397

Quick Catch-up

  •  Asus Transformer Pad 300 – Budget and Features Balance Point in a Tablet

The big brother of Transformer Pad 300 is coming with the name Transformer Pad 700 infinity with full HD display and quad core CPU. Today it’s under spot light of Notes Of Genius.

Hardware Configuration

Processor and Storage

Processor is one the major plus point in this device and I have never seen such a powerful CPU coming with any other tablet in the market. It’s powered with 1.6 GHz Quad Core Cortex-A9 processor. This is nearly powerful as a home use Desktop. This is running on famous Nvidia Tegra 3 chipset along with GeForce GPU.

When it comes to storage the device is having 1GB of DDR3 RAM and 32/64GB internal storage. If you feel like you need more storage, you are not restricted. You can easily expand it with microSD slot up to 32GB.

Operating System

Transformer Infinity is coming Android 4.0.3 also known as Ice Cream Sandwich. The best part here is same as with Transformer Pad 300, this device is also giving you pure android experience. Asus have only included few built in applications and widgets.

Display

This is the world’s very first Quad Core tablet which comes with Full HD display. Its 10.1 inch display with resolution 1920 x 1200 which gives you 224 ppi pixel density. This display is IPS+ display same as transformer Prime and it will give good outdoor viewing performance.

display-3336960

Connectivity

The version I was talking here which comes with Nvidia Tragra 3 chipset doesn’t support 3G or LTE connectivity. Yet this comes with all the other standard connectivity features such as Wi-fi, Bluetooth and USB interface. In addition this support wi-fi direct and wi-fi hotspot as well.

Camera

The devices comes with 8MP wide aperture f/2.2 camera with LED flash and auto focus. Secondary camera is 2MP and optimized for video chat. The video capturing capabilities are still not clear yet we can expect 1080p video recording and 30FSP same as with most of the other high end tablets.

Battery Life

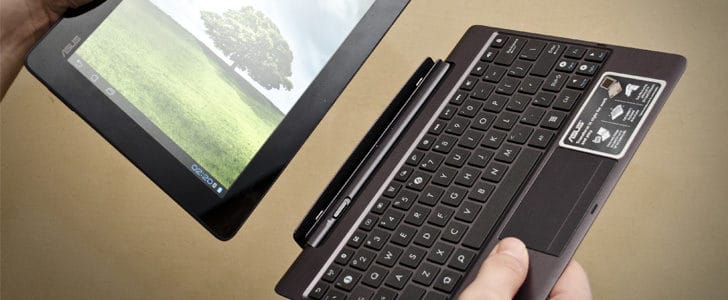
There is a Li-polymer battery which can power this up for 10h under normal usage. The beauty in Asus Tables, they come with physical QUERT keyboard dock. It’s having additional battery power. Transformer Infinity will get extra 6h of battery life with the dock which make all together 16 hours.

keyboard-dock-1770558

Target Users

After reading specification you will figure out that this is way advance device for most of the average users. For most of the average users Transformer 300 would be a good choice. But if you are a heavy mobile gamer or if you are using your tablet for graphic designing work this might be a good choice for you.

Wrapping Up

The android world is getting bigger and bigger day by day with the contribution of lots of hardware manufactures. Asus is one the major contributor to get it up to this level. They came up with first quad core tablet, first quad core LTE tablet and here with Transformer infinity, first quad core Full HD tablet as well.

If you need 3G and LTE connectivity with this device you have to compromise the quad core processor and Nvidia Tegra 3 Chipset. So the best solution is get a Wi-fi tablet with this configuration and use it with Mi-fi router.

Quick Catch-up

  • Make Your iPad Wi Fi an iPad 3G

Personally I believe that this device is too good for average users, most of the time they use the tablet to go to Facebook or Twitter, update status or upload images, check mails and play few games etc. With this amazing hardware muscle this can do much more such as graphic designing and heavy 3D gaming.

Asus offer you two great choices and pick one intelligently.

Tags: #Android #Asus #Tablet #Transformer

How to Use Google Analytics

Google Analytics is another amazing Google product which can be used to analyse the traffic of your web site in with large set of comprehensive tools and techniques. Same as all the other Google Products Google Analytics is also free and unrestricted for all users. Web masters can get detailed information about the web traffic of their web site without having much technical knowledge with this tool. Furthermore it generates professional looking report which can be export as a various formats including XML and PDF. The information gathered from Google Analytics will be important to make strategic decision for you web site and its future development. This article explain how to integrate Google Analytics with you web site and get the maximum advantage out of it.

how-to-use-google-analytics-6841473

Technology

The Technology behind Google Analytics is simple yet powerful. It gives the webmaster to a JavaScript code to place it in the every page of the web site. Once it place it loads with every page. It can gather user information and many other parameters and send them to Google analytics. Then it will generate complete analytical report out of the raw data gathered from your web site. In order to send web page and user data it is using various technologies including UTM tags. However this process will consume some amount of data and processing power of your web server than normal load of web page since it has to do some extra work behind the screen.

Getting Started

Register

The First step of using Google analytics is registering your Google account with it. If you don’t have Google account you have to create one first. Visit Google analytics while you logged in to Google Account. There will be a noticeable blue button with text ‘Access Analytics’. If you are using Google analytics for the first time it will ask you further information about you and your web site including web site URL and Account name. You can proceed after you fill the information in those forms and it will take you to the section ‘tracking code’.

Tracking Code

Tracking code is a JavaScript which is used to send the page and visitor details to Google Analytics. When you proceed after filling your data Google Analytics will give you the tracking code as a part of registration process. It has to be place in every page of your web site. When you are placing it most preferred way it to place just above you close the Body tag. If you place it at the top of body tag it might slow down the loading and rendering of your web page. After you place the code at the end of every page you are done with configuration and your site will be tracked by Google Analytics. You can always access Google Analytics and it will show the list of your web site. You can access a specific report from the drop down menu at the top or by clicking view report in the table displayed in the body of page.

Features

Dashboard

Once you access the report of a registered web site it will take you to the Dashboard. Its giving basic details of your web site including visits, unique visits, countries visitors came from, traffic sources and most visited pages. At the top there is a graph and the content of the graph can be changed by the drop down menu at the top left corner by selecting various details you want to analyse including visits, page views and average time on site. At the right side corner you can choose the time duration for the Graph. In addition there is a important feature which is Grouping. Most of the cases the traffic graphs are full of spikes etc. Using that you won’t be able to get a clear idea about the traffic trends. But if you group them by ‘weekly traffic’ or ‘Monthly traffic’ you might be able to get better idea and for that you can use this ‘Group By’ feature provided. Map overlay displays a heat map of the visiting countries while traffic sources display a pie chart. Each section has a link to ‘View report’ which will take you to the sub section with details information about specific area. Furthermore you can drag and reorganize the sections in the dashboard as you want.

Intelligence

This is relatively new feature introduced to Google Analytics which creates automatic alerts whenever something important happen in your web sites traffic. Due to that you don’t have to do all the analysis by yourself manually. Furthermore you can group Alerts by week or Month as you want. When an automated alert is created it will give you some information about what is special about that incident. By clicking on the alert you can go to the specific traffic details and see it yourself. You can select the alert sensitivity to filter out them according to significance. Other than Automatic alerts you can create your own custom alerts based on your own requirement. In that case you will be able to get an E mail notification once it occurs so you don’t have to visit Google Analytics Frequently. This feature has made the web masters life even easy by doing large part of work by itself, and those alerts could be used to strategic decision making process very effectively.

Visitors

From the left side menu you can access visitors section which will display information about the visitors of your website. This will be important information to measure the quality of your website and take decision for future content. In provides map overlay to identify visitors originating country, new vs. returning visitors and visitor’s languages. Most importantly it give you details about visitor trending and loyalty based on the factors time spent on the website, depth of visit and length of visit. In addition to that it give you details about visitors browser capabilities and network properties which might be able to further optimize your web pages to give the user a better browsing experience.

Traffic Source

Next section in the left menu is Traffic sources which is really important. It gives you details about where the traffic came from including referrals, search engines and direct traffic. In each section it displays a graph for related information. Furthermore you can breakdown the higher-level traffic sources to specific sources. This might be useful to identify the most active traffic sources and stimulate that trend while you improve the less active traffic sources. In addition there is a section to display information about your AdWords campaigns and other traffic generated from promotional campaigns.

Content

The next section is Content which gives you information about each and individual page in your web site and its traffic trends. Using this section you will be able to identify Top content, landing pages and exit pages. Site overlay is one of the interesting features in here which shows you the click on your web site using its own web interface. In navigation summery section you can analyse the patterns of visits and how did they navigate through the site structure. Furthermore it gives you information about top landing pages, top exit pages and entrance keywords. This information can be used to further optimize your web site and its structure. Most importantly you can measure the AdSense performance in here as long as you have connected your AdSense account to Google Analytics. Unlike in Google AdSense report here you can see clicks generated from each page of your web site along with the revenue generated.

Disadvantages

Though Google Analytics provides highly advance set of features to web masters to analyse web traffic there are significant disadvantages too. Most significant factor is accuracy. Sometimes visitor leaves the page before the JavaScript loads. If that be the case that page view won’t be counted. If you compare your server log it will show you greater number of visits than in Google Analytics. And as long as there is a JavaScript loading in every page it can be performance hit at the same time resource consuming. This will resulting in increased page load time and increased server resource consuming including processing power and bandwidth. Due to above reasons you have to use it very carefully. If you feel like the effect is significant you can always use the server log to measure your web traffic, but it won’t be user-friendly as Google Analytics.

Tags: #Google

How to Save Battery Life in Android Like a Boss

Previously I was taking about how to improve battery life in your android Smartphone with the aid of power management application. The application I introduced there was Go power master. If you stumble across Google play, you will find lot more other application which is doing the same or may be better job.

Today, I’m going to talk about how to save battery life in your Android Smartphone like a BOSS. Here we are not going to use any power management application. Instead we are going to have the total control over power consuming activities and control them the way we want, manually.

how-to-save-battery-life-in-android-like-a-boss-8818045

What Are The Major Power Consuming Activities In Android?

If you can clearly understand major power consuming points in your phone, then you can be sensible and manage them like a BOSS. Here is a list of power consuming points. Top power consuming activity is at the top.

  • Display Brightness
  • Background Processes
  • GPS satellite uplink
  • Mobile Data
  • GSM Radio
  • Wi-Fi radio
  • BlueTooth

Priority of this list is subject to change according to your usage style. You get a clear idea about this at Settings -> Battery.

How to Manage Power Manually?

If you are using manufacture themed version of Android, probably you will have power management widget in notification area. If you are on stock android still you have power control widget. Default power control widget may not have mobile data switch. In that case my best recommendation is Powerful control app and it will give you a widget with customizable power control switches.

Finally you should have power control widget with below power controlling switches on your home screen or notification area.

  • Display Brightness – Lower brightness will give you better battery life. Automatic brightness also a good choice.
  • Sync – This will control most of power consuming background processes. Switch sync off for better battery life.
  • GPS – Switch this on only when you are navigating.
  • BlueTooth – Switch this on only when you transfer file using BT
  • Mobile Data – Try to use Wi-fi as far as possible. Use mobile data as the last option.
  • Wi-Fi – If you don’t need WWW switch this off.
  • Air Plane Mode – If you are in highly critical situation switch this off as well. But after that you won’t receive any call of SMS. You may call this Alarm clock mode.

Above are the main power consuming activities and now you can enable/disable them manually the way you want. If you want even better optimization, go to Settings -> Apps and take a look at currently running applications. Try to keep them in minimum level by uninstalling unwanted apps and disable unwanted syncing processes.

This is how we manage power in Android Smartphone and save battery life like a BOSS. Try these tips out and share your experience here with NOG community.

Tags: #Android #Smartphone

Mozilla Prism – Way to Rich Internet Applications

Internet applications are getting developed day by day with lots of innovative technologies. Today they are having unbelievable features as powerful as desktop application. Due to that most of the people are using Rich Internet Applications instead of installed desktop applications. You also must be using those may be without knowing. The best example is Gmail or Yahoo Mail.

But, still we are running those advanced applications in conventional browsers. They are not capable of utilizing the maximum power of rich internet applications since they are developed for “Web Sites”. When I was looking for a solution to run rich internet applications smoothly, I came across with Mozilla Prism platform.

mozilla-prism-way-to-rich-internet-applications-2488415

Mozilla Prism is capable of turning any rich Internet applications in to a desktop like application. After using Prism, you will have an icon for internet application and by double clicking on it you can open it like any other desktop application.

Additionally it will provide you a specialized and optimized platform to run rich internet applications. It won’t be having most of the features in browsers like plug-ins and bookmark tool bars. Instead, Prism is totally focused on HTML, CSS and JS rendering engine which will give you a speedy Rich internet application experience like never before.

History

This project was initially named as WebRunner which was developed by Mozilla Lab. Then it name was changed in to Mozilla Prism which is currently using. Regardless of the success of this project, it went inactive back in 2010 November.

Mozilla Labs stopped developing Prism back in 2011 February. The current version we can download is released back then. However, this product is working just fine with lots of web applications.

Setup And Configuration

Standalone Application

The most recommended version of Mozilla Prism is its standalone version. It’s having cross platform compatibility as well. Click here to download it.

Follow the below steps to convert a Rich internet application to desktop applications after downloading.

  • Unzip downloaded Mozilla Prism folder and move it to a know hard dick location
  • Run “Prism.exe” in that folder
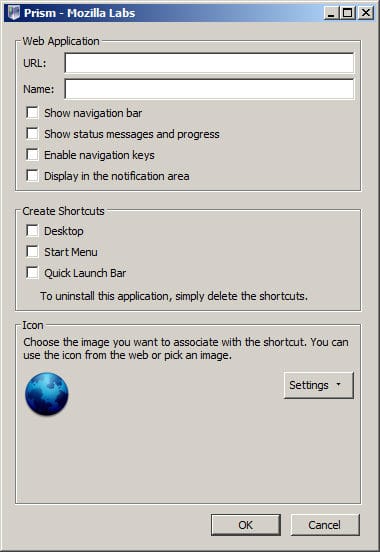
  • It will give you below window

mozilla-prism-configuration-8364468

  • Enter the URL and name of the Rich internet application that you need to run with Mozilla Prism
  • If it’s not a total rich internet application such as YouTube tick show navigation bar. It will help you to travel through different pages. If its total rich internet application such as Gmail you won’t need this.
  • Same as previous point check or un-check “Show status message and progress” and “Enable navigation keys
  • If you want your application to be displayed in notification area, check it. This will be helpful to display pop up notification for the applications such as Gmail.
  • Check what sort of shortcuts you need to create for this application.
  • Select and Icon. If you won’t select Mozilla Prism will use web applications favicon.
  • Then you will be able to open the rich internet application by double clicking the icon you just created in an environment which is totally deducted for subjected application. This is called “Site Specific Browsing

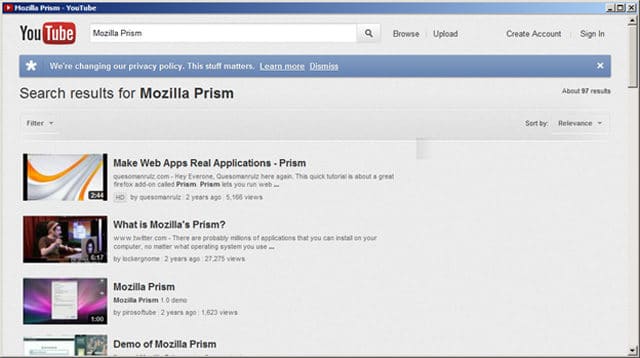
Below screenshot is YouTube which is converted to Prism Application.

mozilla-prism-youtube-2197206

There I have not included navigation bar, status message and progress. Therefore I’m getting this plain window to run YouTube.

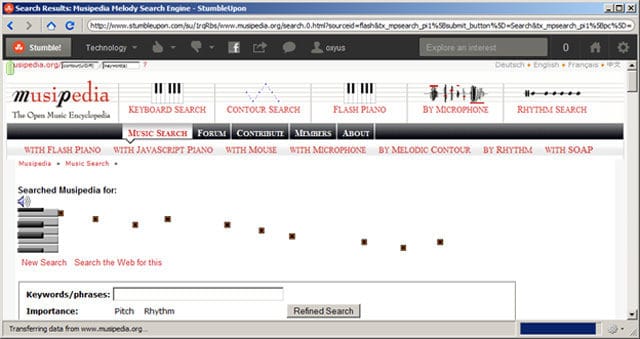
You can apply this in to any internet application. When I was opening StumbleUpon in Prism I included Navigation bar, status messages and progress. Using that I can clearly see whether page is loading and easily go back to previous stumbled page.

mozilla-prism-stumbleupon-1135369

Firefox Plug-in

There is a Firefox plug in for Mozilla Prism. Using that you can convert currently browsing web application to desktop application. However there could be incompatibility issues with latest version of Firefox. If you manage to install the plug in you can follow below steps to create a desktop application for a web application.

  • Go to web application which you want to convert to desktop application
  • Go to Tools-> Convert website to application
  • It will open the window same as standalone application
  • Then follow the same steps as standalone Mozilla Prism

What is Good about Prism

Desktop-Web Experience

The best thing about Mozilla Prism is Site specific Browsing experience. In other words, window opens only one web application. Since you can create desktop icons it’s very easy to launch the application. Other than that you can include this icon in windows start up. Then once you boot up your computer, the application also will be automatically opened.

Simply you can forget that you are using internet applications.

For Non Technical People

Above features will be very useful for non web savvy people, yet who have to use rich internet applications. The system administrator can create icons for frequently used web applications, and then users can simply open them by double clicking with no hassle.

Other than that users won’t be exposed to other features in web browsers. Hence they will be able to get their work done in a less complicated way. This will work well for online email applications.

Performance

Since web application is running in an application specific browser, it will be having dedicated resource allocation. Of course this will improve the speed of application operations. Other than that prism engine doesn’t have default browser features such as tool bars and plug-ins. This also will improve the performance.

Browser Integration

It’s true that you are opening web application outside your default browser. But you will require opening some links in browser. You can do it simply by clicking on the link in Prism window. It will automatically open the content in default browser.

Future Development

Since application development is discontinued by Mozilla Labs, future of this platform is uncertain. However, I could not find a better alternative to this platform. True that you can use Chrome Application, yet it’s not totally running on a sand box model like Mozilla Prism. I hope Mozilla Lab will re open this project or come up with better platform for Rich Internet Application, which is the future of WWW.

Tags: #Mozilla #Rich Internet Applications

Mobile Social Networking

Social networking became the big thing with in last 5 years in internet. Many social networks came up with many different ideas to take human social experience online. Some of them were focused on dating, but many were having the objective of extend the friends network to many continents, to total strangers who may never get a chance to meet in real world. Hi5 offers cool features to interact with online friends like hi5s and wall while MySpace and Friendster gave folks the opportunity to have contact with total new friends replacing the concept ‘Pen pal’ with ‘Online pal’. Then Facebook came with the idea of ‘Exclusivity’ which allows surfers to have contact with the people they know in real world and it rocked the web and stood tall among others. Then Twitter came up with concept ‘Micro blogging’ which allow the people to express themselves easily in a simple text format.

What is the next step of evolution of social networking? As it seems it’s going to be ‘Mobile Social Networking’ or maybe it already is. There are strong signals out there to support this trend with the increased usage of wireless devices including smart phones and tablets. Most of the popular social networks also have taken steps to support this trend from their side using various technological advancements.

mobile-social-networking-9529374

Twitter

According to my research Twitter is the most active social network in mobile world. It gave facility for its users to update tweets using SMS which is very convenient. Folks don’t have to connect to internet, but just have to send a SMS to given number which is very user friendly way to express them and it could be used by anyone with any technical competency. Most of the countries allow the Twitter to use a toll free number which is a serious contributing factor for this trend. With the improvement of wireless mobile devices twitter was having increasing number of mobile internet users as well. Hence they came up with simplified mobile interface which could be easily rendered in small resolution mobile displays. The simple functionality of twitter helped this trend to continue exponentially. Additionally twitter introduced a mobile client which could gather more information from the device automatically including location details and attach them to tweet easily. This mobile client is very popular among iPhone and Android phone users. The result was nearly half of the tweets updated came from mobile devices in past year and twitter leads the trend.

Facebook

It should be somewhat difficult for Facebook to go mobile due to complex functionality and rich media transferring. However they have done a great job with the simplified mobile version of Facebook which is m.facebook.com. It provides only the most wanted functionalities like status update, photo sharing, commenting and profiles. It is light weight and optimized to use bandwidth efficiently. However it couldn’t rock the market like twitter did till the Facebook mobile client comes to the picture. It gained increasing popularity with the iPhone and Android boom. The application could be installed in the smart phone or tablet locally and it is using Facebook API calls to fetch data and populate the interface. With this now Facebook also in the big picture with twitter side by side. Additionally they introduced SMS status update and notification like features as well. It contributed to current success of mobile version of Facebook.

LinkedIn

As everyone knows Linkedin is special kind of social network which took the concept of ‘Exclusivity’ to its next step. It allows you take your professional social experience online. You can add your real life professional contact in there to your friend list. This highly exclusive social network is also going mobile with its mobile friendly version which is m.LinkedIn.com same as Facebook. It also provides most wanted features in a special web interface which is optimized for mobile devices. Further, same as Facebook LinkedIn also have mobile client, yet according to my experience it’s not popular as Facebook or Twitter. The reason may be LinkedIn is a professional exclusive social network and folks just won’t come to hang around in there. As the final result LinkedIn also successfully moving on with mobile social networking trend and having increasing number of mobile users in past few years.

MySpace

MySpace is one of the oldest social networks out there in internet. Before the time of Facebook and Twitter it was rocking the show. However, with the success of Facebook and twitter its popularity seems reducing. It tried to introduce new set of game with Zynga having the objective of attract more users. However, so far none gave good result. When it comes to mobile social networking they also have introduced mobile version of web interface and mobile client as well same as Facebook and Twitter. But according to statistical data same as in standard internet, even in mobile world its popularity is going down. It having continuously dropping number of users and seems losing the competition.

Google Latitude

Google latitude is very special kind of social network which is specially designed to work with mobile devices which are having GPS receiver. It has provided mobile client and it could update your location data online. So your friends will be able to see where you are now. Further, out of your friend’s network you will be able to identify gatherings and meet ups using their location data. This could be very appealing paradigm in social networking. Previously latitude was having a online interface to update location manually and so many people were doing it. But with the improvement of hardware in mobile devices they extend the concept to automate the location data updating which helped them to step ahead in mobile social networking trend.

Why Social Network Goes Mobile?

Increased Internet Speed for Mobile Devices

The main contributing factor for this exponential trend of mobile social networking is increased speed of wireless internet. Sometimes back the speed of mobile internet was 28.8 Kbps which was no good enough speed to do anything other than check mails in text format. But with the generation of mobile evolution keep increasing the connection speed. Today there are mobile internet connections having speeded more than 10 Mbps which is sometimes faster than fixed line broadband internet connection. Hence, mobile devices also could access internet same as PC. This helped people to use social networking sites on the go.

In addition to connection speed, the hardware of mobile devices also was upgraded significantly. Sometimes ago processing power of mobile devices were less than 50 Mhz. But today it’s exceeding 1GHz and that processing power is good enough to use high speed internet connections and render advanced graphics. When it comes to touch screen displays, their response time is significantly improved and they became more usable, especially for internet browsing. These improvements also contributed to the ‘Mobile social networking’ trend.

Mobile Optimization of Social Networks

As you could see in above paragraphs, most of the popular social networking sites have came up with light weight mobile web interfaces having the objective of make it easier to render in a mobile screen and optimize bandwidth usage. For that they have designed basically text based light weight versions with very lesser images. Further, they have optimized the screen width to fit to any mobile device. Most of the advanced features are been removed and frequently used features are organized in the interface in a very streamlined manner. So many mobile internet users are attracted to use social networks in mobile internet browser using wireless connectivity.

Additionally, you could see that most of the social networks are came up with mobile clients for popular mobile device platforms having the objective of improve the performance and optimize the bandwidth usage further. They are using provided web services to communicate with core application functions using very light weight protocols including JSON and SOAP. I could see that most of the iPhone users and Android users are attracted to Facebook and Twitter client give a signal of success of above effort. These technological advancement and development effort of social networks also have contributed to growth of ‘Mobile social networking’ trend.

Social Impact

The social impact of mobile social networking is in front of our eyes today. If you take a look at Facebook status update and tweets, there are so many updates you can tell that they came from mobile devices. They would sound like ‘At Lecture’ or ‘On the way to big apple’. And if you take a look at Facebook photo upload stream, there are so many mobile uploads. These showing that people have become more open to social networks when they are with a mobile device rather than with a PC. And most importantly they have updated location data, sometimes as text or may be automatically with Geo tagging techniques. And when you update a status, the response time of your friends have became very short since most of them are connected to social networks with their smart phones and tables. These are living proof that mobile social networking has taken the real human social experience online way better than previous PC based access. However, I have noted sometimes people don’t care about their privacy when they update status and photos online which might lead to serious problems. Finally, its user’s responsibility to update details wisely.

Future Possibilities

The main reason for the popularity of mobile social networking is very fast access and response time since you have your wireless mobile device most of the time with you. With the future technological development the mobile social network will extend beyond wireless mobile devices. Instead of mobile device, there can be a device you can wear all the time or may be permanently implanted to your body. It could update you biological data to social network. So your friends or relations could see them online as long as they are in your network you also would be able to do the same. So future status update might looks like this.

‘My blood pressure is 100-140’

After seen this, a friend might comment.

‘Dude, why is your blood pressure so high. Are you OK?’

Possibilities are limitless in this kind of social network and real life social experience will be totally represented online and may be more. The above mentioned kind of social network could be used by a hospital to track the patient’s data more effectively and attend to issues in a timely manner.

As long as people are so open in social networks due to mobile trend, leaders could use that as a tool to identify people’s mentality. Once an employee updates a status, it could be a valuable piece of information for a manager or employer. This kind of data might be used to take strategic decision in human resource management. If you think further, collection large amount of social network update could be used to Government strategic decision making procedures. If you could enter those data in to appropriate machine learning algorithm, the government would be able to predict the mental state of civilians with a statistical probability and that will be valuable information to decide the momentum of country’s future growth.

Tags: #Facebook #Mobile #Social Networks #Twitter