Cammster – Video Alarm System with a WebCam

Did you ever have a requirement for a video alarm system, maybe to protect your backyard from intruders? Even if you want such a system definitely you have to spend a lot to setup. You will have to buy a video camera, route it to a separate video recording and monitoring device, a monitor to check the video log, siren etc.

When I was stumbling across WWW I saw this amazing service named “Cammster”. It allows you to set up a video alarm system just with your Webcam which you normally use for video calling. The best part is, basic version of this service comes for free. There you will also be able to find stylish features that normally don’t come with conventional systems such as Email notification with a snapshot and SMS alert.

cammster-e28093-video-alarm-system-with-a-web-cam-8019816

Let’s take a closer look at this service.

Setup an Account

Before you start using Cammster you have to register yourself in the website. For that, follow the below steps.

  • Go to Cammster
  • Click on Register button at top right corner of the page
  • Enter your email address as the username and desired password to log in to account. (Use a Strong password)
  • Then they will send you a confirmation email to the given address
  • Click on the confirmation link in email
  • It will conform your registration and log you in automatically
  • Go back to home

Now you have successfully created your account and logged in. Then you have to set up the webcam.

Start Motion Detecting

Make sure you have correctly plugged in your webcam to your computer and installed it. If there is any other application running which is using the same webcam, such as Skype, better to shut them down. Now you are good to go.

  • Go to Cammster home (you are already logged in)
  • Hit the button with label “Run cammster now”.
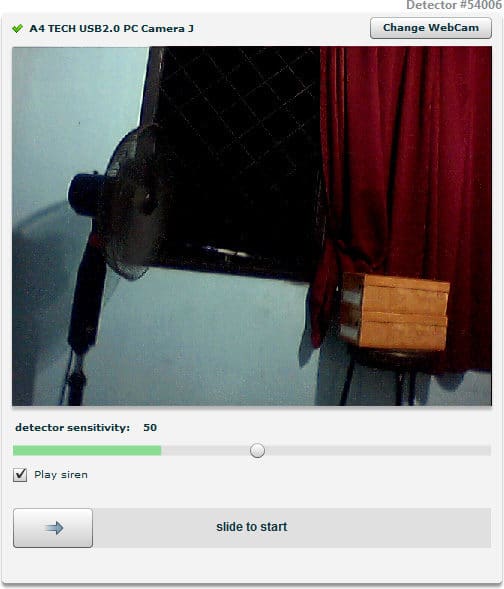
  • It’ll open a page with the motion detector and a webcam video feed will be displayed there.
  • If you can see video feed correctly, you are in good shape.
  • Aim the webcam to the desired area. (This doesn’t work good under low light conditions)
  • If your video feed is not appearing, hit the button “Change webcam“ and select the right one.
motion-detector-4724503

  • Then set the “Detector sensitivity”. This is very important. If there is a motion in video feed which exceed the given value, Cammster will generate an alert. Set it very carefully. Of course this will require lots of experiment.
  • If you already have some motion in the video feed, it will be reflected in the slider. There you can get some idea to set it properly.
  • There is a check box labeled “Play siren”. If you check that Cammster will play a siren when a motion is detected.

detector-sensitivity-5753089

  • Now it’s all ready. Click on the slider if you want to start Cammster within 10 seconds or you can slide it to right to increase the starting lead time.

start-6223310

  • Once a motion is detected in the video feed which exceed the previously given value, Cammster will sound the siren if it’s checked.
  • All the generated alerts will be saved in “Alerts” section which you can find at the top right corner of the page. There you can find entire details of the event including time and snapshot.
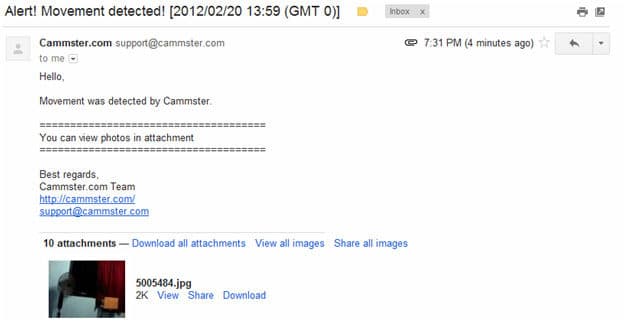
  • If you have enabled email notification, you will get an email with snapshots of the event as shown below.
email-7037216

Special Tips

When you to go Alerts section, there you can see RapidShare and DropBox in addition to email. I tried it out with DropBox. Once you do that it will automatically create a folder named “Cammster” in your Dropbox folder. All the images from alerts will be automatically synchronized to that folder. However I could not check it with RapidShare, guess it work the same way.

If you want to schedule a motion detecting session, go to settings -> Schedules. There you can set different types of scheduled sessions. In order to make this work, you have to keep the computer and aim the web cam to the right place till the scheduled time comes. If you are seriously in to this, have a separate computer and webcam.

If you need SMS alert other than email notification, you have purchase the service from here.

Note to Developers

You have come up with a classy product, but still it’s sort of buggy. Here I have listed down the bugs I found. Hope this will help you with further improvements of this amazing service.

  • When I start using Cammster, alerts were working just fine. But after sometime when I go to alert page even after getting an alert it was empty. Finally they came after an unusually longer time. Faced the same issue with email notifications.
  • I tried setting up DropBox sync. It created the folder “Cammster” in my DropBox, but images in the alert didn’t got synchronized in a timely manner.
  • When I try to delete an alert, it prompts for password. There you have forgotten password mask.
  • Not a bug, but if you can give us some space to record the entire session, it will turn this in to a super class video surveillance system.

All in all, this is a great service that comes for free yet gives a sophisticated solution for video alarm requirements. If you have a small store and you need video alarm system over night, here is the service for you. Most probably you already have the required hardware. Same as that Cammster can provide small scale video alarm solution for any one. Hope you will try out the service and share your experience with us.

Tags: #Online Tools #Webcam

Oppo Ulike 2 with 5 MP Front Facing Camera

Oppo is the first handset manufacture to introduce 1080p Android Smartphone as well as Worlds thinnest Smartphone. It took some time for them to release those amazing phones to the international market. So for years they were limited only to China.

Now they have introduced their product line in USA and many other countries. Today I’m giving you an insight for Oppo Ulike 2, another great handset from Oppo. This is not a high end powerhouse, but well balanced phone with its own unique features. Let’s take a look.

oppo-ulike-2-with-5-mp-front-facing-camera-6222072

Insight for Oppo Ulike 2

Design

Dimensions: 127 x 63.7 x 8.95 mm

Weight: 113 g

The device is not the thinnest or smallest. But it’s not too fat as well. Design is sleek same as all the other Oppo handsets. And this time they have removed capacitive buttons and taken everything on screen like a Nexus device. It’s definitely a good move to utilize the screen space and I hope other manufactures would do the same.

It has all the standard connectors and controllers in proper place. Speaker is in bottom edge and would be great for table top operations. However it might wobble when you use it on a table top due to slightly curved back plate.

Display

Size: 4.5 Inches

Protection: No

Technology: IPS

Resolution: 540 x 960 px

Sharpness: 245 ppi

This display is relatively less powerful compared to other devices in the market. But I believe this is a sweet point for general day-to-day operations. If it was a 4.3 inches display it would have been ideal. Due to lesser resolution it will definitely have smooth operations and better battery life.

oppo-ulike-2-display-9097780

Processor and Storage

Platform: MediaTek MTK 6517

CPU: 1 GHz Dual Core

GPU: Yes

RAM: 1 GB

Internal Storage: 16 GB

Expandable Storage: No

The exact details about chipset are not officially released. What I know is, chipset wrapped in is MediaTek MTK 6517 from Chinese manufacturer. Don’t expect this to be a multimedia and gaming powerhouse. But I’m pretty sure it would be a great fit for day-to-day operations. I’m using a Dual core phone with latest android and I have no complains.

Storage options are pretty much standard, not above the average. Lack of expandable storage is a major drawback here. You have to be happy with built-in 16 GB.

Software

OS: Android ICS 4.0.4

UI: Custom

The original OS is disappointing. It’s time of Android 4.2 and they could have at least included Android 4.1 with project butter. Getting a quick update is also very unlikely due to Oppo UI customization.

Camera

Primary: 8 MP // LED Flash // HDR // 720p@30fps

Front Facing: 5 MP

Primary camera is 8 MP and probably sitting among high end cameras. It has built in HRD capability as well. Front facing camera is the hook here.

So far we had around 2 MP front facing cameras. They were pretty good enough for video calling but not for self portraits. In Oppo Ulike 2 they have exceeded 2 MP barriers and taken it to 5 MP. This will be a great camera for self portrait as well as a digital mirror.

oppo-ulike-2-camera-5401966

Connectivity

Mobile Network: GSM // HSDPA

Wi-Fi: 802.11 a/b/g/n

GPS: A-GPS

NFC: No

Bluetooth: 4.0

USB: microUSB 2.0

Connectivity features are standard and with original configuration. It doesn’t have LTE. But later on once it comes to international market there will be carrier specific LTE versions as well. No NFC is disappointing and a major step back.

Battery Life

Type: Li-Ion

Capacity: 2020 mAh

Battery Life: Not Confirmed

Battery is significantly large compared to smaller display with lesser resolution. So this device is expected to have a longer battery life. There are not enough user comments to get a clear picture about battery life yet. Once they come out I’ll update this section.

Wrapping Up

By looking at spec you can clearly see that this is a mid range phone with balanced features. If you don’t need too much power and massive screen, this would be a great fit for you. 5 MP front facing shooter for self portraits and digital mirror would be a great attraction for ladies.

oppo-ulike-2-self-portrait-6420111

Oppo Ulike 2 is currently released in Chinese market and price tag is approximately $370. It’s a reasonable price point for this level of phone. But no one could beat the $350 price tag of Nexus 4(though it’s still out of stock).

Tell me what you think about Oppo Ulike 2 as a comment below, specially whether you would like to buy one when it comes to international market.

Tags: #Android #Oppo #Smartphone

How to Go Online Shopping With Your Friends in Real Time?

When you go shopping with your friends you go to different shopping malls, browse and shop different goods while having a nice friendly chat. But when you go online shopping, you have no way to do any of those social activities. You have to do it all alone and that’s why lots of people still prefer going to real shopping malls with friends and family. Actually we enjoy the warm social experience rather than shopping.

But if you have the right communication tools, you can go shopping online with your friends and have a similar social experience. In order to get it done you need a screen sharing application, remote controlling app and video chat app like Skype.

Don’t worry! You don’t have to go through all those trouble. There is a piece of software combining a browser, remote controller, screen sharing app, HD video chat and all you need to go online with your friends and family in real time.

how-to-go-online-shopping-with-your-friends-in-real-time-3100664

Getting Started with SameSurf

This application is not developed only for online shopping. It’s a versatile co-browsing platform with many other business and personal applications. This is how you set up the software.

  • Go to SameSurf.com, download the app and install it.
  • Open the app through desktop shortcut.
  • It will open Google Chrome like browser window. (Yeah, this is based on Google Chrome browser and inherit all its greatness)
  • There you can see a popup. Click start new room then proceed as a guest or login with Google or Facebook.
  • You have just started co-browsing session and you are leading it.
  • In the left hand side you can find all the controllers.
  • By clicking on invite you can ask other people to join the room (co-browsing session).
  • Anyone who has URL displayed there can join the room.
  • List of people who are in the room will be displayed in left sidebar. Below that you can find the chat.
  • There you can pass the control to another person who is in the same room.
  • You can turn on screen drawing and that would be a great way to visually communicate your ideas. Here you have a whiteboard too.
  • You can turn on mouse tracking to see the other people’s mouse pointers.
  • By default only the browsing window is getting shared. If you like to share the whole windows you can switch on screen sharing.
  • In the bottom tool bar you can minimize sidebar, log out and access Facebook, Google and Twitter.

SameSurf is a complete solution with all the features for you to go online with your friends and shop as well as have a nice time with each other. If you like to take it beyond online shopping to your work and office there is no limitation and possibilities are endless. I’m pretty sure it will come in handy if you are working at home.

SameSurf is a combination of screen sharing app, online whiteboard, HD video chat, social web connector and many more. So you must have a super speed internet connection to perform all those smoothly. And yeah, SameSurf is bandwidth hungry, so remember to watch your cap.

Tags: #Online Tools

How to Use LinkedIn for B2B Marketing?

LinkedIn, a professional network with over 170 million users across the globe, is one of the best social networking platforms ever. But when it comes to B2B marketing, there are many marketers who are still unaware of how to use LinkedIn – the best marketing tool effectively. Since years, LinkedIn has been a very good opportunity to marketers for generating B2B leads. Well, more than an opportunity, LinkedIn is now a commanding source for generating B2B leads, increasing thought leadership, building awareness and nurturing relationships with customers as well as clients. And now, here I have listed a few tips on how to use LinkedIn platform for B2B marketing.

how-to-use-linkedin-for-b2b-marketing-2580940

Creating a LinkedIn Business Page

Just having a website will never get you potential customers. Do remember, your website is one amongst the millions, billions and trillions of websites available on the World Wide Web. You have to create company pages on social networking sites and be active on these sites to generate leads. So, create a company page on LinkedIn that can help you connect with your clients, customers and also help you increase your exposure and ranking in the search engines. When you create a company page, you can build tabs for sections like products & services, company overview, careers, etc. You can even create a section for company blogs and engage your followers. Concentrate on keyword phrases while creating your company page, so that your company page can be optimized.

Participate in LinkedIn Groups

Over 100 million LinkedIn professionals are actively participating on discussions, every now and then. Try joining groups and get exposed to the millions of members. But keep in mind; you are not selling your product on these discussions. So just give advice and guidance, respond to questions, start discussions and be an active professional on LinkedIn. You can also build your group and invite the other LinkedIn users to join your group. It’s good to have your group, open to all, rather than having it only for your members. For a bit more of SEO, try starting a discussion based on a particular keyword. This will have a great effect on your search engine rankings.

LinkedIn Polls

It’s the best way to have your millions of followers engaged. Try asking thought provoking questions related to your business or products, and learn how your customers and clients react to your business. LinkedIn can be the best for polls as whenever you start a poll, the question spreads across your network connections immediately. Furthermore, you can even have a voting module on your website, to convert your leads into followers and customers. And when your poll is complete, start discussions based on the poll results on your groups. You can also write posts based on the poll results, post it on your company blog and share it on LinkedIn, Facebook and Twitter.

Connect with Twitter and Facebook

Try interconnecting your company pages. You get to drive humongous traffic by connecting your LinkedIn page with Facebook and Twitter. There’s also a high chance for your customer base to increase. After connecting, whenever you update your company blog, ensure that you share it on all the company pages.

Next, you can try incorporating LinkedIn presentation applications, conduct webinars and promote events on your LinkedIn company page as a B2B marketing practice. Well, it’s all about B2B marketing, attracting more and more audience, and turning them into customers to make huge profits.

About The Guest Writer

This is a guest post brought to you by Samantha Kirk, a writer for Verizon Fios Deals. Samantha provides up to date content and information for FIOS bundles, TV, internet, digital voice and other deals.

Tags: #Social Networks

How to Identify Photoshopped Images with PSKiller?

Adobe Photoshop is a magical software that comes as an element of Adobe Creative Suite. It lets you manipulate images and make magic with them. And its user-friendly nature let anyone express themselves with few key strokes and mouse drags.

Most of the professional photographers are using Adobe Photoshop to correct their photographs. Some people are using it for simple color correction while some people are doing re-touching. Beyond re-touching you can add few photographs together, manipulate them and create a new photograph which will looklike a work of a professional.

how-to-identify-photoshopped-images-with-pskiller-4398357

Is there any way to identify Photoshopped images? If you are trying to identify them with naked eyes, in most of the cases you will fail. But there is an online tool, PSKiller which you can use to identify Photoshopped images with few simple steps.

How to use PSKiller?

  • Go to PSKiller home page.
  • There you will be able to see the below interface.

pskiller-main-9305691

  • You can either Upload an image or give a URL of an online image.
  • After you upload or give a URL to PSKiller it will take some time to analyze your image.
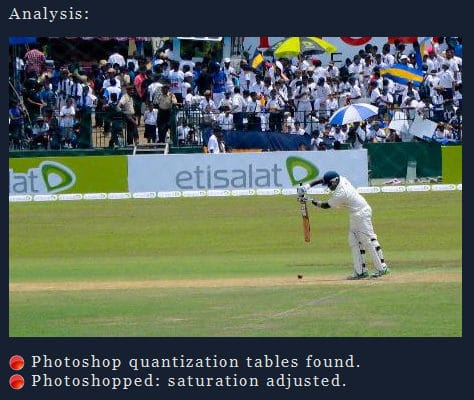
  • Finally it will come up with an analysis like below.

saturation-adjested-1839164

  • Above example indicated that given image is photoshopped and saturation adjusted.
  • Photoshop quantization table found indicates that this image is cropped or manipulated.
  • In addition it can identify some of the other information in an image such as how many times you compressed it. Below result is for an image which I downloaded from Facebook.

facebook-9701941

  • Even after uploading to Facebook and getting compressed few times, still PSKiller can identify that the image is saturation adjusted in Photoshop. You have no escape!

Accuracy Test of PSKiller

In all of the above examples PSKiller could identify saturation adjustment and cropping done by Adobe Photoshop. In order to test the algorithm further I uploaded a RAW image and here is the result.

raw-2796820

Then I tried actually photo-shopped image after removing properties and personal information. Here is the result.

facebook-9701941

Still it can identify that the image is Photo-shopped. This proves that PSKiller is having advanced sophisticated algorithm to detect photo-shopping which we can depend on.

Technology

During the accuracy test I figured out that PSKiller is not using Meta tags and other file properties to identify photpshopping. Then what is the technology it’s using? As it appears it’s using file header information.

File header normally contain details such as file size, image compression etc. Those are used to open and handle the payload or the actual data of the file.

Every time you manipulate an image with Adobe Photoshop, it modifies the header information. Other than it keep the compression details as well. That’s why PSKiller can identify photoshopping and compression details of a file which was downloaded from facebook.

Wrap Up

Of course PSKiller is a very useful tool to identify photo manipulation done with Adobe Photoshop. According to the above accuracy test results as it appears we can trust PSKiller to identify photo-shopping.

According to the traffic ranking of this web site, it seems not much people are using this tool yet. So you are going to be among few of very first uses of PSKiller. And of course, there can be bugs. If you come to know any share those with us.

Tags: #Adobe #Online Tools

Anti Theft Alarm for Android

When you buy a new Smartphone, your friends and family become extremely curious about it. They always want to check out the new features on it. Because of this extreme curiosity you can’t keep your phone on your table top and move away for a second.

Its okay for some of your friends to check your phone out. But what if someone steal it? It could be a worst nightmare for you.

The best way to solve this problem and make your phone safe is come up with some way to notify you when someone moves your phone. Google play is flooded with various different applications for this purpose. I tried out almost all of them, tried their features and flexibility. Finally I selected the best out of it and here I’m sharing it with you.

anti-theft-alarm-for-android-9917044

Getting Started With Anti Theft Alarm

  • Go to Google play and install Anti Theft Alarm on your phone.
  • As usual we are going to take a look at app dashboard and settings.
  • In main app dashboard you can find a button to Activate alarm, settings, alarm disabling options, alarm tone etc.
  • Let’s open settings and see what’s in there.

anti-theft-alarm-settings-9101310

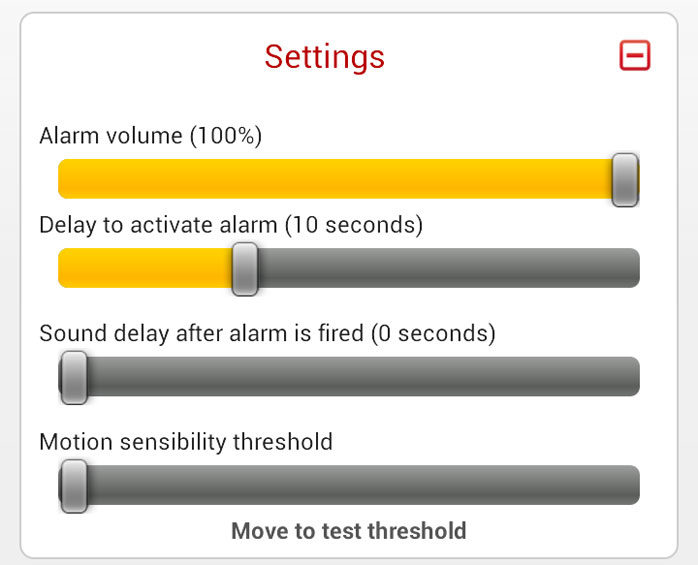
  • I recommend you to set volume to maximum.
  • Delay to activate time is giving you a sometime to keep the phone away. 10 seconds is good.
  • Sound delay after alarm is time it will take to trigger it. I normally set it to 0.
  • Motion sensibility threshold is what degree of motion is needed to trigger the alarm. I like to keep it in left corner.
  • Set appropriate alarm disabling options. Pattern would work for most people.

anti-theft-alarm-pin-5009399

  • Select a tone as you like. Now you are good to go.

anti-theft-alarm-tone-9936762

  • Tap activate alarm and keep the phone away.
  • After 10 seconds it will get activated. It will be displayed in notification bar as well.

anti-theft-alarm-notification-7492041

  • Now once someone tries to move your phone it will make a loud noise to notify you.
  • Only you can deactivate it by entering the pattern or PIN.

This is a perfectly working way to make sure no one is taking your phone when you are away. There are options to get a suggestion to activate the alarm once you plug it to charging as well, try it out.

If you know any other application that does the same thing in a better way, share it with us as a comment below.

Tags: #Android #Security

LG Optimus G2 – Rumors Round Up

We are only 2 days away from CES and I know all you guys are so excited to see lots of cool gadgets there. For the past few days I was talking about several android handsets expected to be released there. They are basically going to break the screen resolution barrier of 5 inch-ish Smartphone.

After HTC M7 and Sony Xperia Z, Today I’m going to talk about another 1080p Smartphone, LG Optimus G2. The original LG Optimus G was one of the most powerful Android handset in 2011 and I believe they are going to do the same again in 2013. Let’s go and take a look.

lg-optimus-g2-rumors-round-up-5944957

Shape of LG Optimus G2

The display of LG Optimus G2 is going to be a 5.5 inch, 1920 x 1080 px, 400ppi IPS panel protected with Corning Gorilla Glass 2. Another WOW display and it’s going to be a huge phone, more a “Phablet”. Some news source says that the display size is going to be 5 inch, the sweet point of 1080p Smartphone. We have to give to few more days to confirm.

About the internals, it’s going to be the first appearance of Qualcomm Snapdragon S4 Prime chipset. It will be configured with 2 GHz Quad Core CPU, Adreno 320 GPU, 2 GB of LPDDR3 RAM and 16/32 GB internal storage options. Most probably it will come with microSD card slot.

As we know the best of SoC is Snapdragon S4 pro. But it supports CPU clock speed only up to 1.7 GHz. Snapdragon S4 Prime could go up to 2.5 GHz and 800 MHz RAM access speed. This is going to break all the speed barriers of mobile devices and crown a new beast of SoC.

This hardware platform supports all the connectivity technologies including LTE. So you will be able to enjoy all the high speed data access with many carriers.

It will come with a primary shooter with 12 MP sensor, latest optics, LED flash, 1080p @ 30fps video recording and all the other android goodness. Front facing shooter will be around 2 MP.

Most probably it will originally come with Android 4.1.2 JB and soon followed with 4.2 update. In most of the previous cases LG Phones could not stand out because of buggy themes they put on top of Android. I believe this time they will make a change.

The capacity of battery will be around 2500 mAh and it won’t be difficult find space inside this huge phone.

Wrapping Up

There are many rumors about many phones with similar spec, but the magic here is it’s power. Seems like it’s going to break all the speed barriers we knew. And I believe 5 inch display would be better than 5.5 inch Phablet form factor.

Anyway it’ll take only few more days for you to get to know the exact picture of LG Optimus G2. In the meantime tell me what you think about this device and it’s expected spec.

Tags: #Android #LG #Qualcomm #Smartphone

How to Get Google Reader Notification in Chrome?

RSS feed is the easiest way to keep in touch with news updates and blogs. I have used many RSS reading software. But the installed software is only available in your computer. When you are away you have no way to access updates. Finally I settled with Google reader, an online RSS reader. I’m using its web interface as well as Android application.

The main problem I faced with the Google reader web is, I have no way to get notifications when there are new updates. Only option is to access the web and see whether there are any. But the solution to this problem is just few clicks away, in Chrome Web Store. Let’s see how it’s working.

how-to-get-google-reader-notification-in-chrome-8794710

Getting Started with Google Reader Notifier

google-reader-notification-5811311

  • In the icon you will be able to see number of new updates. One problem solved!
  • Then go ahead and click on the icon.
  • There you will have options to open Google reader, refresh, fiter items and make all of them as read.

google-reader-notification-dropdown-7739637

  • Below that you will see the list of news items.
  • By clicking on them you can access the original page and it will open in a new tab.
  • If you like something there, you can add a star too.
  • This will auto refresh every 5 minutes. If you like to change the time duration, right click on extension icon and go to options.
  • Hardware: Intel Core i5 2nd Gen // 4GB DDR2
  • OS: Windows 7 Home Premium // 64 Bit
  • Browser: Google Chrome Version 23.0.1271.91 m

Now you don’t have to always go to Google reader web to see new updates from your subscriptions. While you are browsing all over the WWW this extension is keeping a closer eye on updates for you. In every 5 min you will get a notification right there in Chrome toolbar. Problema resuelto!

This extension is developed by Google itself, so you don’t have to worry about its compatibility and security. Try this and tell me what you think about this as a comment below.

Tags: #Chrome #Google

How To Enhance Playback And Embed For YouTube Videos With EmbedPlus?

In a previous post I was talking about how to embed a selected part of YouTube video in a web page of a blog post. Today taking it to a next level I’m going to introduce you a Chrome extension to enhance YouTube playback, user interaction and enable edited embedding. Let’s go and take a closer look.

how-to-enhance-playback-and-embed-for-youtube-videos-with-embedplus-7140664

EmbedPlus for Enhanced Playback

  • As the first thing go to Chrome web store and add EmbedPlus to Chrome.
  • It will add a new icon to tool bar.
  • Right click on icon and go to options before start using it.
  • There you can check in several options such as search sweet spots, auto HD, disable annotations and enable extension for playlists.
  • Now go to YouTube and start playing any video. You will see new enhanced controllers there.
  • You can play video in slow motion, loop it and switch between scenes.
  • When you are reaching a most buzzed point of a video called a “Sweet Spot” you are getting a visual cue.
  •  In the reaction section you can share the videos in social media and see how other people have shared it.
  • Video zoom is there as an added accessibility feature.

EmbedPlus for Edited Embedding

  • By clicking on get icon you can go to video embedding and customization page.
  • There you can find webpage embed code, wordpress embed code and short link.
  • If you like to customize embed go ahead and click on make edits.
  • There you can set size of video, start stop time, add chapter markers, show real time reactions and add your own annotations.
  • After editing click on get code to go back to previous page.
  • If you are embedding this on a wordpress blog post make sure you install EmbedPlus plug-in before that.

What Is A Sweet Spot and How EmbedPlus Identify Them?

Sweet spot is the most interesting features in Embed Plus. Its notifying most buzzed moments in videos while it’s playing. Beginning of each sweet spot would automatically make a new chapter, so you can switch between them using next and previous buttons. This will come in handy when you are watching a lengthy video.

They are using Sweet Stop Marking Algorithm to identify and mark them in every video. The information source they are using is publicly accessible web discussions. However this must be a very difficult task. They must be using human verification to keep the accuracy level high for sweet spot marking.

Definitely this would be a great addition to your Chrome extensions and have a great YouTube experience. If you are a blogger this is a must try extension to embed video in your posts.

Try this and let me know what you think about this in the comment section below.

If you like to stay tuned to Notes Of Genius, get notified about the next post, subscribe to our email list.

Tags: #Chrome #YouTube

Closer Look at Samsung Exynos 5 Octa

It’s time for quad core mobile processes and it’s becoming a standard configuration in high end mobile devices. Samsung always take a leap ahead and they did it here as well. In CES 2013 they introduced Exynos 5 Octa, yes, a 8 core mobile computing platform. Let’s go and take a closer look.

closer-look-at-samsung-exynos-5-octa-7739904

Technical Specification

CPU

It uses 28 mm semiconductor architecture which is a major improvement compared to previous 32 mm architecture. CPU array is a heterogeneous system that utilizes 4 Cortex A15 cores (up to 1.8 GHz) and another 4 Cortex A9 cores (Up to 1.2 GHz). The idea is to process background tasks in the slower and less power consuming cortex A9 cores and let A15 cores to handle the hard work.

This architecture will definitely be much more energy efficient and according to the spec it’s going to dwarf  Nvidia’s 4-PLUS-1 technology.

GPU

The GPU is IT PowerVR SGX544MP3 which has 3 cores and clocked at 533 MHz. This is the same type of GPU used in iPhone and iPad. So you can get an idea of its capabilities.

Memory

Samsung used blazing fast LPDDR3 12.8 GB/s memory access technology in Exynos 5 Dual and same continues here as well.

Application and Possibilities

So far there is no device utilizing the power of Samsung Exynos 5 Octa. But soon we will be able to witness its power with Samsung Galaxy S IV which is expected to be introduced around April 2013.

Samsung is famous for huge phones such as Galaxy Note II. They have huge batteries inside and have great battery life. With Exynos 5 Octa I’m pretty sure they will go to the next level of performance as well as battery life.

In real life applications Samsung has to pay attention to heating problems and radiation issues. It’s not only about hardware. One mistake in an application could cause a battery to completely drain out in no time. So there has to be a tight controlling in software platform as well. I hope Samsung developers take these things in to consideration when they are developing next version of TouchWiz.

Wrapping Up

Samsung Exynos 5 Octa based in latest semiconductor architecture, has a heterogeneous CPU array to give maximum power and energy efficiency with one of the best GPUs and blazing fast memory access. It made all the other mobile commuter platforms look like antique. If Samsung engineers manage to solve practical issues in applications such as heating, radiation limits and highly optimized software this could be THE mobile computing platform in year 2013.  Competition is going to be tight for Nvidia Tegra 4 and Snapdragon 800.

Tags: #Samsung #Smartphone #Tablet