Edit Photos Online with SplashUp

For most of the day to day image editing activities you must be using various image manipulation tools. If you need to edit photographs you might use Adobe LightRoom or Google Picasa. If it’s a serious image editing tools which require various layers, then you will use Adobe PhotoShop.

What is you are away from your computer. Now you might be able to get access to a computer but it won’t be having same software configuration as your home computer. There you will face a big trouble to get a small image manipulation done.

The most common solution for this kind of problem is rich internet application. if you have such all you need is a computer with active internet connection.

Quick Catch-up

  • Rich Internet Applications – Redefining Web Experience

But the next big question is there a rich internet application to manipulate images. The answer is YES and there are many. Today I’m going to present you a totally free online tool, SplashUp which can effectively cater your general image manipulation requirements.
edit-photos-online-with-splashup-3982077

How to Use SplashUp?

  • Visit SplashUp home page.
  • There you can see some introductory details about the tool.
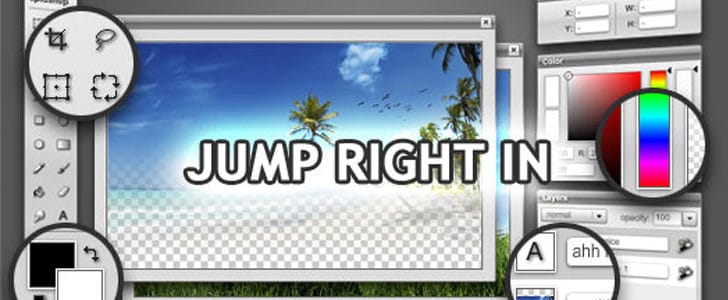
  • Click on Jump right in.
  • It will create a separate browser window and progress bar will start counting.
  • Within few seconds it will take you to the image editor.
  • There you have very familiar UI almost same as Adobe Photoshop.
  • In the left panel it’s providing all the common image manipulation tools.
  • Right hand side you have color picker and Layers navigator.
  • Go to file -> open Image to start editing.
  • There you can browse local hard drive or get an image from social networks after authentication.
  • There is another option for you get capture image from webcam.
  • After opening the image you will be able to most of the commonly used manipulations using Tools and menu bar.
  • It’s amazing that this tool support layered image editing as well.
  • After finish editing your image you can save it on local computer by file -> save image.
  • There you have option to publish the edited image directly to various social networks as well.

Best Way to Use SplashUp

As I mention above SpalshUp is a rich internet application. Your web browser is designed to display web pages not to run applications. Therefore, you need SSB (site specific browser) to get the maximum experience of SplashUp. Following one of below link you can figure out how to use SplashUp in SSB.

Quick Catch-up

Wrapping Up

SplashUp is another living example that proves internet applications can replace desktop applications. However, still it’s not polish up enough to replace high end image manipulation tools such as Adobe Photoshop.

However, you can use this as your secondary image editing tools for quick fixes. It’s providing you most of the common tools and you won’t even feel it’s a web site. The level of performance is amazing there.

Now you won’t have to worry about the portability of your image editing tool. It’s everywhere as long we you have a computer and active internet connection.

Tags: #Photography #Rich Internet Applications

Shape of Forthcoming Samsung Galaxy Note II

Samsung Galaxy Note is a trend setting Smartphone. It was actually and hybrid approach, combination of phone and tablet. The Samsung’s braveness to break the display size frame became a blast in market and they sold millions of devices within a short time.

Now they are trying to take this success to the next step with Samsung Galaxy Note II. This is going to be a solid competition to forthcoming iPhone 5 and many other devices. There are lots of rumors spreading about Galaxy Note II and here I’m trying to sort out features which could be there according to my personal point of view.

Quick Catch-up

shape-of-forthcoming-samsung-galaxy-note-ii-9287769

Expected Device Configuration

Design

I’m not expecting major design alterations in Galaxy Note II. It will be a candy bar design with large display. However there is a possibility for them to remove physical capacitive buttons and take them on screen aligning with new versions of android.

Recent release of Samsung devices were inspired by designed of nature. One good example is Galaxy S III. They might extend this concept to Galaxy Note II.

galaxy-note-ii-design-7278756

Processor and Storage

Most probable configuration for processor is 1.6 GHz Quad Core Cortex A9 running on Exynos chipset. There will be dedicated GPU as well to handle high resolution display.

RAM will be 1 GB and internal storage will be 16 / 32 / 64 GB. In addition there will be microSD card to expand the storage probably up to another 64 GB.

Operating System

Google recently released new version of Android which is 4.1 Jelly Bean. It has removed one last drawback of Android when competing with iOS by improving performance.

Quick Catch-up

  • What’s New in Android Jelly Bean?

Galaxy Note II will definitely come with Android Jelly bean, but it will be customized with Samsung TouchWiz UX.

Display

In previous Galaxy Note, Samsung break the display size barrier for Smartphone. I have a strong feeling that they will do it again. The display in Galaxy Note Ii will be 5.5 inch Super AMOLED display with resolution 1680 x 1050 which will give you pixel density 360 ppi.

Previously we discussed that no point of having big screen with lower resolution and pixel density. The concept Note needs lots of screen space to do drawing and use stylus. Therefore above configuration is highly anticipated and once it come to the market it will be the best Smartphone display for sure.

There was a rumor that they are going to take the Gorilla glass to next step named as Unbreakable Panel. However official source stated that it will come with next major handset release not with Galaxy Note II. Therefore Galaxy Note II will have Gorilla Glass II.

galaxy-note-ii-display-4730255

Connectivity and Interfaces

There won’t be much different stuff than any other Smartphone today such as LTE, HSDPA, 3G, 2G etc. In addition there will be Wi-Fi, Bluetooth, USB and NFC as well. Of course there will be a built in GPS device same as previous version.

Camera

I don’t expect much improvement for front facing camera. It will be 2 MP one capable of shooting snaps and record 720p video. Primary camera will be improved and it will be 12 MP and capable of record 1080p video at 30 FPS. In addition there will be standard stuff such as LED flash, auto focus and geo tagging.

Battery Life

Previously Galaxy Note had 2500 mAh battery and it worked pretty good even with its large display. If they are planning to upgrade the processor to Quad core definitely they must improve the capacity of battery as well.

Maximum possible improvement is 2750 mAh and any further will make the handset unusable due to excessive weight. However they will try to optimize the power consumption using technologies such as eye tracking which came out with Galaxy S III.

galaxy-note-ii-battery-3130731

Wrapping Up

Galaxy Note probably will be the one of very first Smartphone which is taking display resolution beyond 720p. And it will give you more actual screen space and due to large display you will get more physical screen space as well.

My only concern is will this massive device fit in your pants pocket. Even Galaxy Note didn’t fit good with me though many people somehow manage to use to good. Most of the cases this will target very specific market who don’t want to use tablets and need huge display at the same time.

Tags: #Android #Smartphone #Tablet

Nikon D800 with Record Breaking 36.3 Mega Pixels

Even before the heat of new DSLR giant Nikon D4 fades away, Nikon has come up with yet another unbelievable record breaking camera by the name Nikon D800. It came as an improvement for previous Nikon D700. The major hook in this gadget is it’s having 36.3 mega pixel image sensor that makes Nikon D800 the DSLR with largest number of pixels on earth.

nikon-d800-4741743

Other than the improved image sensor it comes with latest technological advancement of Nikon such as Expeed 3 chip. There are improved cinematography features as well. Lest take a closer look in to this.

Special Feature

Image Sensor

Nikon D800 is coming with full frame FX format CMOS sensor like any other professional DSLR. And it’s having record breaking 36.3 Mega pixels which will produce amazingly high resolution images. The sensor is not yet tested by DxoMark.com. So there are no much details available about the noise performance etc. Its operational ISO range is 100-6400 and extended range is 50-25600.

Expeed 3

Same as in Nikon D4 this also comes with latest Expeed 3 image processor. Of course this will give the camera a great performance in image processing and video processing. However, regardless of the power of Expeed 3 image processor this camera can shoot only 4 frames per second continuously in full resolution mode.

Auto Focus System

This is also equipped with the 51 point auto focusing system as same as in many other Nikon professional DSLRs. The main importance here is AF sensor is having 15 cross type focal points. This should make this camera’s auto focusing system super fast.

Connectivity and Storage

The camera is coming with USB 3.0 connectivity which will be really helpful for you to transfer massive image files to a computer in a short time. Other than that it support Wi-Fi adapter as well.

When it comes to storage it support an array of storage types. Same as in most of the latest Nikon DSLRs this too is using Compact flash as the primary storage medium. Apart from that it also supports SD cards.

Video Recording

There is an exponential trend to optimize DSLR to shoot great quality videos. We saw that in Nikon D4 and we are noticing again here in Nikon D800. This is the main reason they include high speed storage medium in these gadgets such as Compact flash.

Nikon D800 can record 1080p video at 30 frames per sec. If you switch to 720p mode you can increase the frame rate up to 60 frames per sec. Same as in many other Nikon DSLRs this also having Manual Movie Mode. But most of the cameras let the cinematographer to control shutter speed and ISO while he is in the live view, not the aperture. This device let you control the aperture as well during the live view which is really a useful feature.

One of the major features in Nikon D4 was you can export uncompressed video from the camera through HDMI output and record them in an external device. This camera is also coming with the same functionality which turns this in to a professional cinematographic gear.

Usage of Nikon D800

High Resolution Printing

If you are going to print your image in a massive hoarding, that’s where image resolution comes in to picture. In such a case Nikon D800 will be your savior. It can produce images with 7360 x 4912 px resolutions like no other camera. These images could be enlarged to greater sizes with minimum loss of sharpness.

Professional Cinematography

Same as in Nikon D4 this camera is also can be used for professional quality video recording. Its 1080p, 30fps video format, uncompressed HDMI video out and 3.2 inch display will support this.

Final Wrap Up

Of course Nikon D800 is a record breaking camera. But as a professional photographer, 16 mega pixel DSLR would be more than enough for me. And when you have such high mega pixel you will run in to serious storage problem when you shoot RAW.

Other than having the highest mega pixel level, there is no much improvement in image sensor like ISO performance and noise performance.

However this would be a great camera if you are looking for serious cinematography. The camera comes for $2999.95. No other Nikon camera in this price range will give you this amazing video quality that Nikon D800 will give you. If you are a professional cinematographer and keeping your eye on the budget, here is your gear.

Tags: #Camera #DSLR #Nikon

Simulate Your DSLR with CameraSim

When you start doing photography with a DSLR camera, the main problem you will face is how to expose the photo correctly under different conditions. There are various parameters in the DSLR for you to control to capture a nice frame.

What most of the beginners would do is switch to total automatic mode and let the camera decide the optimum configuration for the available environmental factors. But in that case you won’t be able to add your creativity to the picture and DSLR will become a conventional Point and Shoot camera.

simulate-your-dslr-with-camerasim-6762980

If you need to click WOW frames with a DSLR, only option is to learn how to adjust ISO, Aperture and Shutter Speed manually according to the available lighting conditions. It’s not so easy to learn but now you have a way. It comes with the name CameraSim where you can simulate a behavior of a DSLR camera on various different lighting conditions.

How it Works?

Click Here to go to original site of CameraSim or you can see the same application embedded below.

It simulates the viewfinder of a DSLR. There you can see information display as well including shutter speed, aperture and light meter.

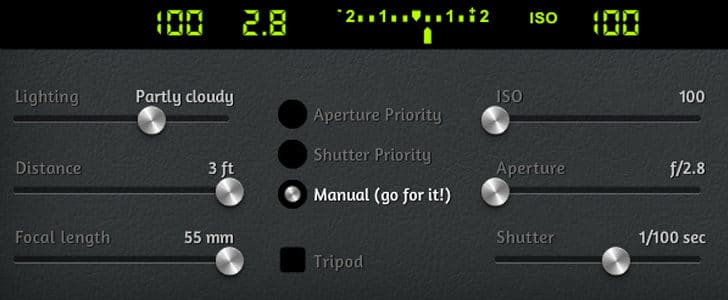
Below the view finder you can see various controls which allow you to adjust the environment and camera configuration.

  • Lighting: simulate behavior of environment lighting
  • Distance: Distance to the camera from the object.
  • Focal length: Using this you can make the view wider of narrower. In other words zoom in and out.
  • Camera Mode: There you have 3 options, Aperture priority, Shutter priority and Manual. In Aperture priority mode you can set the desired aperture and camera will choose the optimum shutter speed. In shutter priority mood you set the shutter speed and camera decides the aperture. In manual mode you have to set both the aperture and shutter speed. The CameraSim says Go for Manual!
  • Tripod: This will simulate whether camera is mounted to a tripod or not.
  • ISO: Determines the sensitivity of the image sensor. In higher ISO ranges you will get a significant noise. Better to go with lowest possible ISO.
  • Aperture: This represents the iris of human eye. It controls the amount of light coming in to the camera. In addition it controls the Depth of Field as well.
  • Shutter Speed: It controls the duration which the sensor will be exposed to light. Higher Shutter speed lowers the exposure you get. And you can user higher shutter speed to freeze fast moving objects.

Finally click in the shutter button to snap photo!

All you have to do is practice photography in CameraSim in different light conditions with different configuration. You can master the entire camera configuration without even touching a DSLR.

Ex:

  • Lighting: Partially Cloudy
  • Distance: 3 ft (I need shallow depth of field)
  • Focal Length: 55mm (Again I need shallow depth of field)
  • Mode: Manual (I don’t want camera to decide the configuration at all)
  • ISO: 100 (There is decent sun light)
  • Aperture: f/2.8 (Yeah, I need shallow depth of field)
  • Sutter Speed: Under these conditions the best shutter speed would be 1/125 sec. but I decided to go for little lower shutter speed which is 1/100 sec. With that I will get more exposure time and Image will be little over exposed, comes like a soft glow. And this will give a blur effect to the moving object as well.

Finally I will get an image with shallow depth of field (blurred background) and soft glow.

ex-camerasim-9378712

Same way you can do various different experiments with CameraSim.

More about CameraSim

The application is carefully engineered to simulate the exact depth of field, Motion freeze and exposure under given lighting conditions and camera configuration. Therefore you can trust the application to practice photography without going to field.

There is a blue circle with letter “i” at the top right corner of view finder. By clicking on that you can enable help tips for each controller.

There is an iPhone application coming for $1.99 where you can practice photography on the go.

Enjoy CameraSim and don’t forget to share your experience with us.

Tags: #Camera #DSLR #Photography

Schedule Facebook and Twitter Sharing With Buffer

When you are doing social media marketing, you must be preparing content throughout the day. In early half of day you may come up with short blog post, then after lunch a catch tag line may come up to your mind which goes with your product.

However, share those in social media once you produce them is not a good idea. You have to wait till the peak time comes. Then only you can expose them to targeted maximum about of people. Prepare all the blog posts, tweets and facebook shares, and then wait till the peak time comes is way not practical for a busy person.

What you really need is a container which is connected with all your social media account. There you can store your sharable content and it will automatically share them in a given time. This kind of set up will definitely save lots of time for you. The solution you are looking for is Buffer.

schedule-facebook-and-twitter-sharing-with-buffer-1586687

How to Start Using Buffer?

  • Go to Buffer web app and register yourself.
  • You can sign in with Facebook, twitter or LinkedIn.
  • It will take you to Buffer Dashboard.
  • There you can connect other social media accounts as well. Proceed with that the way you want.
  • Before you start buffering, better take a look as stetting. Go to settings from top navigation bar.
  • There you can connect accounts, set URL shortening service, and time zone. Set them as appropriate.
  • Tweeting schedule is very important. There you have to select identified peak days and peak times to share content. If you need to access advanced scheduling features you have to purchase the pro service.
  • Now you have to explore sharing options in Buffer. For that go to Apps and extras.
  • There you have wide range of options including browser plug-in and Smartphone applications. Choose and setup them the way you want. I setup chrome browser extension.
  • Now it’s all good to go!

When you see a interesting web content press buffer button in your browser toolbar. You can do the same in your Smartphone sharing options as well. Then it will give you a pop up. There you can edit your message, add photos, post now or buffer. If you choose buffer it will be scheduled to your first possible time slot you configured before. One time slot holds only one tweet. So next tweet will automatically goes to next time slot. They will be tweeted automatically when the given time comes.

Once you install buffer browser plug-in, it’s getting seamlessly integrated to web interfaces of social networks. So when you go to update status or share something in Facebook or tweet or re-tweet in Twitter you will be able to see the green buffer button integrated in to web interface.

In the dashboard you can see your sharing buffer. You can edit them, delete them re arrange them. There you can see the analytics for your previous sharing as well. If you take a look at Apps and Extras sections you will find lot more buffer integrations for many other web applications.

Wrapping Up

Buffer is a great app and great concept. Browser plug-ins and web integration is working great, no glitches. I tried buffer Android application. It was not a great job crashed few times and operations were not so smooth. Didn’t get to try iPhone application, you may fill that part for me.

This will be very useful for Social media marketers and it’s letting you to work with your team as well. And of course this is a great tool for anyone to schedule your social sharing. Try Buffer and tell us more interesting things you get to know.

Tags: #Blog #Facebook #Share #Social Networks #Twitter

10 Minute Mail – Disposable Email Address Generator

Within few decades email has become the primary communication medium of the human civilization. Today almost all the people are using some sort of online email service and receiving hundreds of emails every day.

Email has dominated the place that had for snail mail for official communication. Today every online and even offline services ask you to provide email address instead of home address as the primary communication method.

When you are providing your email address to unknown third part you are making yourself vulnerable for email spam. They can always sell your email address to some marketing company and you might be receiving lots of spam marketing content everyday which is really annoying.

10minute-mail-5778345

But to register with most of the online service you have no option but to provide your email address even to try it out. Most of the time they are using verification link to check whether you have provided a real email address. Because of this you must be really reluctant to register with different services and try them out.

Self Destructing Email Address?

But here after you won’t have to worry about that and you can easily register with any online service without providing your primary email address. With 10 Minute Mail you can create temporary email addresses which will self destruct within 10 minutes.

Using this you can register with any online service without making you vulnerable to spam. You can always provide your official email address later if the service is a good one you want to use in long run.

How to Use 10 Minute Mail?

  • Go to 10 Minute Mail home page
  • Once you go there you will be able to see that an destruction email is already generated.
  • There is a link to copy the generated email address, then you can paste it anywhere you need.
  • Down the email address you can see how many minutes remaining till email address expires.
  • If you need more time you can click on the link ‘give me 10 more minutes’.
  • Down there you can see the email you have received to this email address. If the service you provide this email address gives you a verification link, this is where you can access it.
  • After given period of time email will be self destructed.

Now you can generate any number of self destruction email addresses and register with any online service you need. Even if they send a verification link to confirm the email address, still you have no problem there.

After everything happened the email will be self destructed. If you decided to use the service you register continuously, go to settings there you update it with your primary email address.

Tags: #Email #Security #Spam

How to Create Temporary Email Address?

Email spamming has become a major problem in WWW. There are some solutions such as spam filters and user reports, but none could solve the problem completely so far. So the best solution you can come up with is protecting your email address by yourself. In other words, don’t give your email address to untrusted people.

But again, most of the online services are asking you to enter your email address to register with them. Without providing it you can’t even try it out. OK, you can give a fake email. It might work for some cases, but what if they have email verification?

Previously I was talking about how to create a disposable email address with 10 minutes mail which would be a perfect fit for this kind of situation. But what if you have to receive email from the website you registered for a longer period of time? For that you need longer than 10 minutes mail and here we go with the solution.

how-to-create-temporary-email-address-8762008

Getting Started With TempInbox

The uniqueness in TempInbox is you don’t have to create an email address before sending email. So you can send email which ever email ID comes to your mind under provided domain names. Then you can go to TempInbox and check received emails. To further clarify its operations, let’s follow below steps.

  • Go to your mail application and compose new mail and send it to “[email protected]” with some subject and body text.
  • Now go to TempInbox.com.
  • Type “Whatever” in textbox there, read terms and conditions and click on check mails.
  • You will be able to see the email you just send there.
  • There you will be able to see many other emails sent by other people.

Now you must have figured out how TempInbox work. If you want to monitor the email comes to a specific email address you can subscribe to its RSS feed. Hereafter you are registering with different websites you can use TempInbox to receive their email confirmation link.

Always remember there is no security in TempInbox. Anyone can view emails in any email address. So make sure you are not using this for security critical applications. At the same time you have no way to send an email from any of those email addresses, it’s receive only.

Try this great online tool which will probably save you from hundreds of spam emails every day. If you come up with creative application of TempInbox, never forget to share it here with us as a comment below.

Tags: #Email #Spam

Complete Guide to Pinterest

If you are reading news probably you must have noticed updates about this new website Pinterest. According to the Alexa, its traffic rank is 73. It seems like Pinterest has come a long way in a very short period of time.

In order to find more about Pinterest I created an account for myself and stumbled through that. Same as any other social network, Pinterest also taking one of your real life’s experiences online.

complete-guide-to-pinterest-1543404

If you are the person who’s usually maintaining a pin board in your room, you will know what Pinterest is about. It’s an online Pin-board where you can pin images and videos of your interest. There you can maintain several pin boards with different topics. And it goes social. Your followers get updates about your latest pins and you also can follow interesting users or specific pin boards of them.

How to Use Pinterest?

Getting Started

  • Go to Pinterest.
  • First you have to create an account. However it’s not totally open to public yet. So you have to Request for an invitation.

request-3216362

  • If you know a friend already on Pinterest, you can ask him/her to send an invitation.
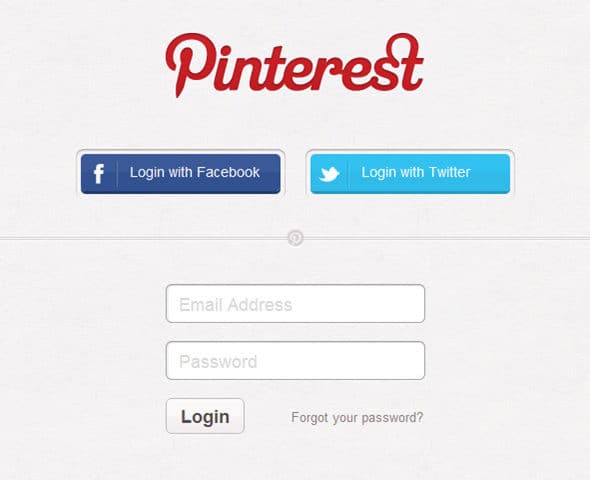
  • Once you get the invitation the easiest way to login is by using your existing Twitter of Facebook account. In the login screen you will be able to see buttons for both.

login-8325579

  • Once you login, it will take you to your profile page. You will see there are several default Pin boards on your account already.
  • Below every pin board you can see Edit Button. Using that you can change the basic properties of Pin board such as title, description, who can pin, category etc. If you don’t want this Pin board anymore, you can delete it as well.
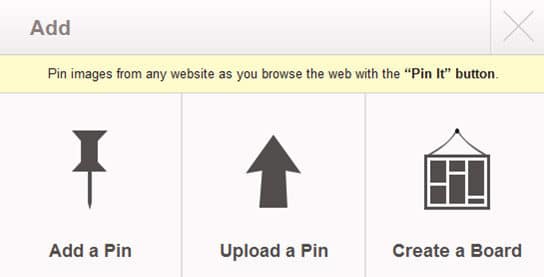
  • By clicking on Add button in main menu bar at the top, you can create a new Board.

pinterest-add-7258288

  • After pressing the button “Rearrange Board” you can drag and drop to organize the order of board the way you want.
  • Create few Pin boards with nice titles and organize them as you want.

Edit Profile

  • Go to Edit profile. You can find this right under your profile image in profile page.
  • There you can change your details such as Email, Password, Name, Username, About, Location, Website etc.
  • You can upload a Profile photo or get it from Facebook or Twitter.
  • In the section Notification, change email notification settings the way you want.
  • There you have option to Delete the account as well.

Social Integration

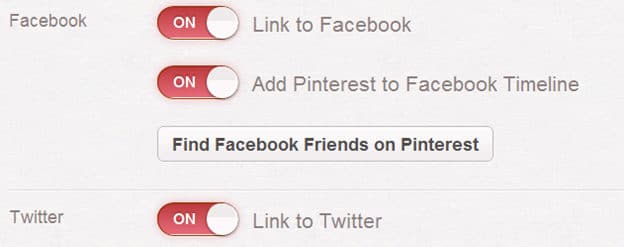
Pinterest is having social integration with Facebook and twitter. Once you enable it all your pins will go to Facebook and Twitter timelines as updates. Follow the below steps to enable integration.

  • Go to Edit profile.
  • In section Facebook, switch on Link to Facebook and Add Pinterest to Facebook timeline.
  • In section twitter switch on Link to twitter.

social-integration-3179595

  • Now all your pins in Pinterest will go on Facebook and Twitter as updates.
  • You can switch this off anytime.

Connect

  • In building connections Pinterest work same as Twitter.
  • Anyone can follow your or one of your Pin Boards.
  • Once you follow someone his updates will be reflected in your home page.
  • Once someone follows you an Email notification will be generated. (By default)
  • Then you can follow him back as well.
  • If you need to build likeminded friends’ network all you have to do is follow them. Then probably they will follow you back as well. Exactly same as Twitter.

Pinning Content

  • You can directly upload an image to Pinterest by pressing Add Button.
  • In the same window you can add a URL as well. Pinterest will automatically find images in the page for you. Then you can select which image to be pinned.
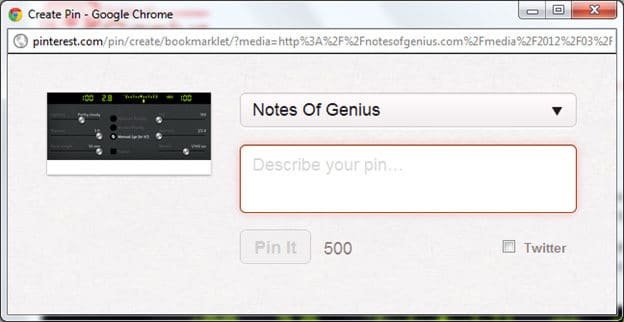
  • Once you select the image you will get the below pop up.

add-pin-9778185

  • There you can select the pin board, description (this is mandatory), whether you need to publish this on Twitter, then click Pin it.
  • There is a Pinterest Bookmarklet which allows you to pin images easily. Drag and Drop This to your bookmark toolbar. Once you come across with a good image which you need to pin, all you have to do is click on the bookmarklet. It will filter out all the images in the page for you to pin.
  • If you come to know interesting Pins on your home page you can Re-pin them on your board, Like them or Comment on them.
  • Once you open a Pin and click on the image it will take you to Original source. This is a good way to generate Referral traffic from Pinterest.
  • If you have lots of interesting Pins you will get more followers.

Android/iPad Application

If you want to use Pinterest on your android tablet or Smartphone There are various applications in Android market. Pin to Pinterest is the one with most number of positive reviews.

If you have a iPad 2 you also can install Pinterest application Here. They all come for free.

Enjoy Pinterest, develop your network and share your experience with us. The next part of this article will come soon as “How to get referral traffic from Pinterest”.

Tags: #Pinterest #Social Networks

How to Upload Videos Longer Than 15 Minutes to Youtube?

No doubt that YouTube is your most favorite video social network. It always gives the most versatile features such as HD video support, embeddable player, HTML 5 support and recently added color correction and video stabilization facility as well.

However, when you try to upload a video to YouTube, the video length must be less than 15 minutes. This is a real pain when you try to upload lengthy video tutorials or presentations.

how-to-upload-videos-to-youtube-longer-than-15-minutes-8772832

Is there any way to increase the limit of video length in YouTube? The answer is next to warning message.

Steps to Follow

  • Sign in to YouTube. For this you can use your same Google login credentials.
  • In the top navigation bar, click on Upload.
  • It will take you to video upload pag.
  • There you can see below message.

message-6338155

  • Click on increase your limit.
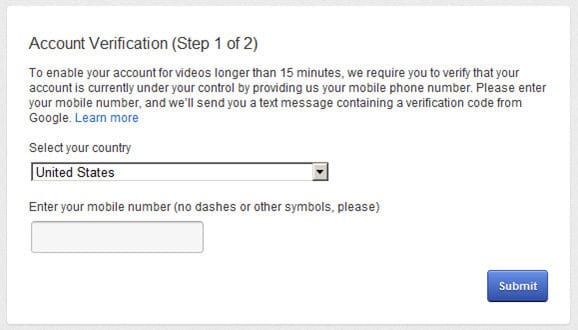
  • Then you will have to enter your mobile phone number. Enter it with proper country code.

verification-step1-8142049

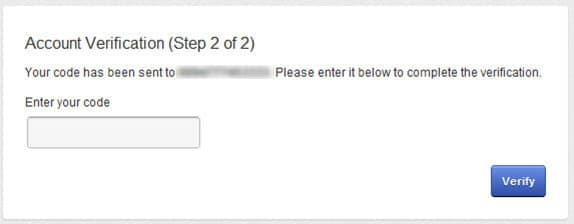
  • Then YouTube will give you a verification code. You have to enter it for the verification.

verification-step2-2976077

  • Then your account will be verified. You will get the below message.

account-verified-4034914

  • Now go to up load page and take look at the previous message which said about 15 minutes limit.  It has changed to below message.

new-message-3922539

  • Now you can upload videos having duration more than 15 minutes.

However I could now check the maximum length that YouTube accepts with this account verification.  But I believe still there has to be some limit and of course it will be couple of hours which can practically consider as unlimited.

No matter what you are still not allowed to upload videos without your own copyrights or required permission.

Tags: #Social Networks #Video #YouTube

How to Get Referral Traffic from Pinterest?

Pinterest is attracting lots of surfers in an exponential way. Few weeks ago I wrote a Complete Guide to Pinterest. By then its Alexa ranking was 73. But today it has grown up to 64.

At the same time Silicon Filter reports that in last February, Pinterest drove more referral traffic than twitter. They have analyzed a large amount of collected data from online sharing tool Shareaholic over a period of time to figure this out.

how-to-get-referral-traffic-from-pinterest-7537659

You too can be a part of this growing trend. This is a great opportunity for webmasters, especially for bloggers. You can utilize Pinterest as a great traffic source with likeminded surfers.

Steps to Follow

Have a Good Network

Basic principle in any social network, you must have an influential user profile. In other words you must have good friends’ network. In the context of Pinterest you must have significant number of Followers. It works pretty much same as Twitter.

  • Read Complete Guide to Pinterest.
  • Create few interesting Pin boards and pin relevant Content.
  • Go to Pinterest Search box.
  • Search for similar content as you publish in your web site and pin boards.
  • Follow the people who pinned them. They could be considered as likeminded users.
  • They will be notified once you follow them. After seeing your profile and content in your pin board, there is a probability that the person will follow you back.

referral-traffic-5866461

  • Yes, it will take a long time. But you have to keep doing this.
  • While you are doing this, be an active participant in Pinterest activities. Like and re-pin others content, comment on them yet you have to do those relevantly.
  • When you have huge followers base, your pins will reach many number of people and drive lots of traffic to your web site.

Dress Up Your Content with Images

  • You can pin only images and videos.
  • Therefore, you web content must include them. If you are a blogger, dress up your posts with interesting images.

Pin Images in your Content

  • After dressing up your content with images and videos, the next step is pinning them.
  • You can pin them yourself using your account. Since you continue to gather likeminded followers, lots of people will see your content and visit your website.
  • At the same time let the visitors of the web site to pin the images and videos in the content. You can easily add a “Pin it” button from Here.

Of course Pinterest will drive lots of traffic to your web site, but this is a continuous process same as in any referral program. You have to continue your work to increase your follower’s base, keep creating content with interesting images and videos and keep sharing them.

It’s always easy to take the advantage of growing trends rather than establish a trend. So don’t waste a second, hit the gas right now!

Tags: #Pinterest #Social Networks