Easy File Sharing with Filedropper

If you are sending email with lots of file attachment, especially BIG file attachment, you know how difficult it is. Most of the online mail services don’t let you attach files more than 20MB. Even if you get a paid email service it doesn’t solve the problem completely.

As a solution you can use a cloud storage service such as DropBox. It will work fine and you can easily upload the file, and then send the public link via email. But the main problem in such a service would be its limited storage.

Quick Catch-up

  • Dropbox – Backup and Share Files
  • Get 16GB Storage Space in DropBox

When I was stumbling across the WWW I landed on Fliedropper.com. It’s a free file sharing website which is having very VERY easy operation and the best part maximum file size you can upload here is 5GB. This might give a solid solution for your file sharing problems, mainly email attachment problems, so I thought of talk about this.

easy-file-sharing-with-filedropper-5386972

FileDropper offer its basic service for free and if you need advanced file management facilities you have to go for a pied plan.

How to Use FileDropper?

In order to use FileDroper and share a file online you have to follow few simple steps as mentioned below.

  • Go to FileDroper.com
  • If you are a Paid member, you can sign in.
  • If not forget about Sign in and proceed to file uploading.
  • In the home page you can see a big green Upload File button. Click on that.

upload-button-6201737

  • It will open the native file browsing window.
  • Locate your file which needs to be uploaded and click open.
  • Then FileDropper will automatically start the uploading process.
  • A progress bar will be updated real-time in the web page.
  • Once the file uploading process complete, it will take you to another page where you can see the sharing options.
  • There you have two options. You can directly get the file downloading link or get the embedding link to publish your file on a forum.

share-link-2585906

embed-1632790

  • In the file download page you can find the link to download the file.

download-4315005

Wrapping Up

This is user-friendly file sharing solution which will be a good fit for any type of internet users. Upload process is highly performance optimized well streamlined. However bulk file uploading feature is missing here.

When it comes to file downloading again it’s very easy, you are just one click away. But there is no way for you get a direct link to the file. Only way you have to download the file is go to download page.

Regardless of the drawback I mentioned above, it will be a simple and well suited simple solution for day to day file sharing, socially for large email attachments. Finally, I’m raising this warning whenever I’m talking about cloud storage “Upload File responsible! You files are on someone else hand”.

Tags: #Files #Share

Edit Photos Online with Pixlr

With the advancement of web technologies most of the task we used to do using installed desktop application has taken over by web application. You already know they called as Rich internet applications.

Quick Catch-up

  • Rich Internet Applications – Redefining Web Experience

For the last few weeks I was introducing you many internet application which can perform many task commonly performed by desktop applications. Previously I introduced you a application which can manipulate images online almost same as famous image editing application Adobe Photoshop.

Quick Catch-up

  • Edit Photos Online with SplashUp

Today I’m going to introduce you another rich internet application which work same as SplashUp and even more. It comes with the name Pixlr and according to the Alexa traffic ranking more people are using Pixlr than SplashUp.

edit-photos-online-with-pixlr-2042845

How to Use Pixlr?

  • Go to Pixlr home page.
  • There you can see a link to open Photo editor. Click on that.
  • It will take you to the image editor.
  • There you have several options to open an image.
  • You can open an empty page, upload image or open an online image.
  • Once you pass that step it will take you to in interface which is similar to most of image manipulation software.
  • Within few minutes you will figure out that the organization of tools is pretty much similar to Adobe Photoshop.
  • Left had side you have tool box, at the top menu bar and right hand side navigator, layers and history.
  • If you take a closer look in to menu bar you will be able to find it’s having keyboard shortcuts to many of the operations.
  • Further, Pixlr is having almost all of the advanced operations which are there in adobe Photoshop under Layers, Adjustment and Filter menus.
  • Once all the editing is completed you can save this image in local computer, save it in Pixlr library (For this you must register with the service) or publish them in social media.

Compared to other online image editors Pixlr is more complete tool. It’s providing wide range of tools from varies basic to advanced filtering and color manipulation. If you need a quick fix for your image, there are many in built filters which work like magic.

If you consider the performance, Pixlr is working way faster than most of the other online tools. If you want to make it even faster use a SSB (Site specific browser) to use it.

Quick Catch-up

Considering the capabilities of Pixlr, it might be able to replace the installed image manipulation tool for simple day to day work. However it has to go a long way to compete with other commercial software applications.

Try this tool and share what to experienced with Notes of Genius community.

Tags: #Photography #Rich Internet Applications

How to Create Circular Shapes with CSS 3?

When you are surfing WWW you must have noticed that most of the latest web designs are having round corners in rectangular shapes. Sometime ago you had no option but use an image to get such shapes. But now with CSS 3 you have border-radius attribute which let you to design round corners with much less effort at the same time in a performance optimized way.

how-to-create-circular-shapes-with-css-3-4218875

However, using border-radius you can do much more than creating round corners. Here we are trying to create few circular shapes with border-radius which will definitely add new creative possibilities to your future web designs.

Circle

  • Create new HTML File.
  • Create a div tag with id “circle”.
  • In order to write internal CSS create a tag in . (You may use an external CSS too)
  • Write the below CSS in tag.
#circle{
        border:solid 1px #c00; /* To make the border visible*/
        width:100px;
        height:100px; /*Now you have a square*/
        border-radius:50%; /*Here we go with circle*/
        }
  • If you face any browser compatibility issues with percentage you can use below code.
border-radius: 50px;
  • Outcome would look like this.

css-cricle-4099488

Oval

  • You only have to change the width of rectangle to 200px.
  • The CSS code will looks like this.
#circle{
        border:solid 1px #c00; /* To make the border visible*/
        width:200px;
        height:100px; /*Now you have a rectangle*/
        border-radius:50%; /*Here we go with circle*/
        }
  • Same as before if there is an issue in using percentage you can use below code.
border-radius:100px/50px;
  • Here we are separately controlling horizontal radius and vertical radius to get the oval.
  • Outcome would looks like this.

css-oval-4310278

Other Shapes

  • You can change the border radius on every corner individually.
  • For that you can use the below code
border-radius:100px 0px 100px 100px
  • First value is top left corner and then it goes clock wise.
  • Then you can use transform attribute to rotate the shape using below code.
transform:rotate(45deg);

other-shapes-1204967

  • Click here to download the example.
  • Hardware: Intel Core i5 2nd Gen // 4GB DDR2
  • OS: Windows 7 Home Premium // 64 Bit
  • Browser: Google Chrome Version 23.0.1271.91 m

Browser Compatibility

As a result of browser battle there are various browser specific CSS 3 attributes. They never like to wait till the global standard comes. Instead they came up with their own CSS attributes. And it became the worst nightmare for web developers.

When you are using border-radius, yes you will run in to serious browser compatibility issues. The best way to solve the problem is be prepared for every browser. That means write rules for every browser.

See the below example.

border-radius:50px;
-moz- border-radius:50px;
-webkit-border-radius:50px;

Now you have the guarantee that this CSS code will get interpreted by most of the modern browsers. There are many other browser specific prefixes such as –o and –ms.  You will have to duplicate the same code using those prefixes in case you need expanded browser compatibility.

Tags: #CSS #Web

How to Develop a Custom Google +1 Button?

Google+, the new social network by internet giant is getting popular at an exponential rate. And of course they already have a huge customer base and all they have to do is to promote this new product among them. However no one can deny the fact that Google+ is very special kind of social network with very unique features.

how-to-develop-a-custom-google-plus-one-button-8809478

In parallel to Google+ they introduced +1 buttons for web masters. However the design of +1 button is non alterable and doesn’t go with most of the common web templates. And there is no official Google+ share button. If you already have +1 button, when you take your mouse over, it will pop up sharing window which is very user unfriendly.

If you can design your own Google +1 and share button with your own icon, it will be good news for most webmasters.

Steps to Develop

  • As the first step you need a suitable icon for Google+ share button. Find it and edit it the way you want.
  • Then you have to prepare Google+ share URL. Take a look at the below code.
https://plus.google.com/share?url=YOUR URL
  • Replace ‘YOUR URL’ with actual page URL.
  • If you are using wordpress blog, you can use below code.
https://plus.google.com/share?url=
  • Then the current page URL will be dynamically generated.
  • Finally you have to take your user to another tab or pop up on click.
  • If you want to take your user to another tab use below code.

How to Find Your Way with New Facebook Privacy Settings?

Privacy is one of the major concerns in any social network. Many people upload their personal details, images videos etc to share with friends. If those details goes to some unknown third party, situation would get really worse.

If you take a closer look at most of the popular social networks they have state of the art privacy settings. The problem is users don’t know how to use them properly and share their content only with relevant parties. Most of the social networks are in a mission to make privacy settings simple and user-friendly as much as possible.

Recently Facebook also updated their privacy settings. They actually didn’t add any new features, yet organized existing features in a much better way. Here I’m trying to show you how to find your way with these new settings and secure your social data.

how-to-find-your-way-with-new-facebook-privacy-settings-7980715

Getting started with New Facebook privacy Settings

  • If facebook has activated new privacy setting for you, you will find below icon in top navigation bar next to home button.

facebook-privacy-shortcut-icon-2499893

  • By clicking on that you can access privacy shortcuts. There you have to provide answers to questions “Who can see my stuff?”, “Who can contact me?”, “How do I stop someone from bothering me?

facebook-privacy-shortcut-dropdown-5596503

  • You can further expand each section and provide answers to those questions.
  • Making things visible only to friends would be a great idea.
  • Click on ‘see more settings’ to go to detailed privacy settings page.
  • There you can set tag reviews to prevent tag spamming, limit past post visibility, search engine appearance etc.

As I said before there are no new features, only a UI revamp. Now it’s much easier to set privacy settings and need only few clicks. Try this new way to set privacy in Facebook and tell me how you think about this new change as a comment below.

Tags: #Facebook #Security #Social Networks

How to Email a File to Dropbox?

For the past few days I was talking about several creative application of the best cloud storage service, Dropbox. There I discussed several things you can do to expand storage for free and use Dropbox to auto start downloading torrents. Today I’m going to solve another problem you might face with Dropbox operations.

When you are trying to access Dropbox from your office computer or college computer, you might not be able to access it. The reason is some of the content filtering systems block Dropbox under category “Personal storage”. In such a case if you want to upload a file to Dropbox folder and it’s really urgent, what’s the solution? Here we go with the answer.

how-to-email-a-file-to-dropbox-8948322

Getting Started With Sendtodropbox.Com

In that kind of a difficult situation where you cannot access Dropbox, your savior is Email service. I remember in such a situation I have saved a file in Gmail draft to access later. But it’s not a complete solution. What if you can send an email with attachment to be saved on Dropbox. Yes, now you can do that and SendToDropbox.com made it possible.

  • Go to sendtodropbox.com and click on “Connect to Dropbox”.
  • You have to provide required access permissions and then it will show you an Email address.
  • That’s the email address which you should send files to.
  • At the same time it will create new folder in your Dropbox named “Attachments”.
  • If you are not happy with given email address you can create another as well. Finally save it on your address book.
  • Drag and Drop given attributes to customize folder structure in Attachments folder.
  • Under other settings you have few options for ZIP file handing and email text/html content storing.
  • Now all you have to do is compose a new email, attach the file you need to send to Dropbox and send the email to above given address.
  • File will appear in Attachments folder in Dropbox within few seconds and they will be organized as you have specified.

I have tested all the basic functionality here, they worked just fine and quick. This works great with multiple attachments as well. This would be a great solution for you to upload files to Dropbox in an environment where you can’t directly access Dropbox.

Tags: #Dropbox #Email

Samsung Galaxy S IV – Going Beyond Android

On March 14th 2013 Samsung finally released their next Galaxy in New York City. As expected it was named as Galaxy S IV. It was one of the most leaked, rumored and hyped in 2013. The presentation was different and they spent lots of time demonstrating what Galaxy S IV can do rather than focusing on hardware spec.

Actually this device is not about hardware muscle, it’s all about software. Samsung has tweaked Android to embed lots of new features rather than just putting a fancy face. The Samsung Galaxy S IV is definitely a historical change in Samsung mobile device line up.  Let’s go and see what this device has to offer us.

samsung-galaxy-s-iv-going-beyond-android-1725037

Insight for Samsung Galaxy S IV

Design

Dimensions: 136.6 x 69.8 x 7.9 mm

Weight: 130 g

In the first look there is no much difference from Galaxy S III. But it’s thinner, lighter, built with polycarbonate and has a surrounding aluminum band. All the connectors and buttons are in usual places. Back cover is removable, so you can change the battery easily.

Display

Size: 4.99 Inches

Protection: Corning Gorilla Glass 3

Technology: Super AMOLED

Resolution: 1080×1920 px

Sharpness: 441 ppi

We have seen many 1080p displays, but for the first time we are seeing a 1080p AMOLED display. Samsung made a good name for awesome quality AMOLED displays for years with many devices. Now they have taken it to next level. This Display with much better color saturation, contrast, wider viewing angle and lesser power consumption will be a major challenge for all the other 1080p displays for sure.

Normally you really have to touch the screen to control it. But here it works even if you are wearing gloves thanks for an IR sensor that comes built in.

samsung-galaxy-s-iv-display-7159192

Processor and Storage

Platform: Samsung Exynos 5 Octa (5410)

CPU: 1.6 GHz // Quad Core // Cortex A15 + 1.2 GHz // Quad Core // Cortex A7

GPU: PowerVR SGX 544MP3

RAM: 2 GB LPDDR3

Internal Storage: 16/32/64 GB

Expandable Storage: microSD up to 64 GB

I said Samsung Galaxy S IV is all about Software. But it doesn’t mean that there is nothing about hardware. It packs up latest, greatest and most powerful hardware inside. As expected it has Exynos 5 Octa with 8 Core CPU and very powerful GPU and plenty of storage. This stronger hardware made possible all those Software magic I’m going to talk in the next section.

samsung-galaxy-s-iv-processor-9950640

Software

OS: Android 4.2.2 Jelly Bean

UI: TouchWiz UI

This comes with latest Android version themed with TouchWiz same as any other Galaxy. But here we have a long list of software to take it beyond capabilities of pure Android.

  • Smart scroll/pause: You can use your eye and face gestures to scroll a page down or pause a movie. When you look away a movie will stop till you look at the screen again.
  • Air view/Air gestures: Utilizing built in IR sensor it can identify gestures in front of display. Now you can use Air view without S Pen, just with your fingers.
  • S Translator: State of the art voice to text and other way around translator.
  • Group Play / Games: You can connect few Galaxy S IVs to set up a surround sound system and even play games.
  • S Health: Samsung has introduced dedicated hardware to measure your blood pressure, heart rate etc. S Health is logging those data to generate reports later on.
  • Knox: You can have separate secured partition for work and another for personal work. So you don’t have to use two phones.
  • Optical Reader: It’s OCR system that comes with camera.
  • Story Album: This application uses geo tags of images and notifies you to take a picture once you visit the same place again.
  • Samsung Smart switch: This is an application which you can use to transfer all your data from another phone may be with another platform to new Samsung Galaxy S IV
  • S Voice Drive: Dedicated voice command enabled navigation system.

samsung-galaxy-s-iv-software-9084465

Camera

Primary: 13 MP // 1080p@30fps // HDR // Dual Shot and Video

Front Facing: 2 MP // 1080p@30fps // Dual video call

In the hardware aspect this camera is pretty standard. But its software capabilities make it unique.

  • Dual Camera: you can take snapshots and videos with both the cameras at the same time.
  • Sound and Shot: You can record audio clip along with snapshot.
  • Drama shot: The camera is taking up to 100 pictures in few seconds and organizes them to create a drama shot.
  • Eraser: Through the camera app you can remove unwanted objects from an image.

samsung-galaxy-s-iv-camera-1897771

Connectivity

Mobile Network: 2G // HSDPA // LTE

Wi-Fi: Wi-Fi 802.11 a/b/g/n/ac // Dual Band

GPS: A-GPS // GLONASS

NFC: Yes

Bluetooth: 4.0

USB: microUSB 2.0

IR: Yes

Yeah! It has all sorts of connectivity technologies and they have taken IR sensor back to phones. I remember many years ago my Nokia 7650 had an IR sensor and I used it as TV remote. With Galaxy S IV you can do it again.

Battery

Type: Li-Ion

Capacity: 2600 mAh

Battery Life: n/a

The battery is pretty big and certainly it will be enough to survive a whole day with active usage. After all AMOLED display and heterogeneous CPU is also a power saver.

Wrapping Up

This is one of the most powerful mobile devices released recently with perfect combination of Software and hardware. It has a long list of built in software, many Android tweaks, 1080p AMOLED display, 8 core CPU and many other greatness. Once this comes to the market I have a gut feeling that it will do the same that Galaxy S III did or may be more.

The major drawback in Galaxy S IV would be it’s cheap plastic built. Many people made the same complaint for Galaxy S III as well. This will be a major disadvantage to compete with devices like HTC One and Sony Xperia Z.

This will come to the market around 2013 April with a high price tag. Will discuss more about Samsung Galaxy S IV, it’s real life performance and battery life once it come out.

Tags: #Android #Samsung #Smartphone

Online-Convert.com – One Stop File Conversion Solution

Every day you will have to convert files into many formats. If you are submitting a resume it has to be on PDF format. But you created it on Microsoft word. Or suppose your friend needs a photo of moon that you captured to create a graphic. You shoot NEF and converted to JPEG on camera. But you friend needs a BMP.

You can continue endless list of file conversion requirements.  If you are in front of your computer you won’t run in to a trouble since you have all the software in it. But you are away from your beloved companion. Now What? How to convert a file? All you have around is some strange computer which doesn’t have any good software but good broadband connection. It’s cool if you have an online file conversion application in such a case.

online-convert-com-e28093-one-stop-file-conversion-solution-6646026

And yes, there are lots of online file converters, but none work with all the common file types. When I was stumbling across the WWW I came to know the web site named Online-Convert.com. Domain name didn’t look so nice but what it does is amazing.

What Type of File Conversion it Support?

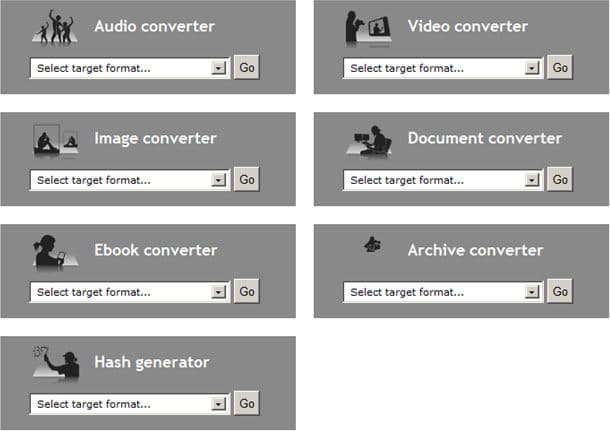
Online-Convert.com supports almost all of the common file formats. Once you visit its home page you will be able to see 9 categories.

  • Audio Converter
  • Video Converter
  • Image Converter
  • Document Converter
  • Ebook Converter
  • Archive Converter
  • Hash Generator

categories-6884733

In each category you can see a drop down menu. There you can find related file formats you can get as output. This accepts large variety of formats as inputs. In case it can’t identify the input file format, you will get an error message.

In addition to converting files between formats, it can enhance the file as well using various effects and filters, especially when it comes to video, audio and images. In the section of eBook you will be able to see that this application is capable of converting files for different eBook readers as well.

The last two sections are very special. Archive section let you convert files between different compressed formats. This comes in handy when you don’t have winRAR installed in your computer.

Hash generator is generally used to compare files before they transfer through networks. Using this you can easily generate hash code for your files. I have never seen these facilities in any other online file convertor.

How to Convert a File using Online-Convert.com?

  • Go to Online-Convert.com.
  • Identify the section and select the target file format from the drop down menu.
  • There you can see a button to upload file from your computer.
  • If your file is available online you can give the URL to the next text box.

upload-2494590

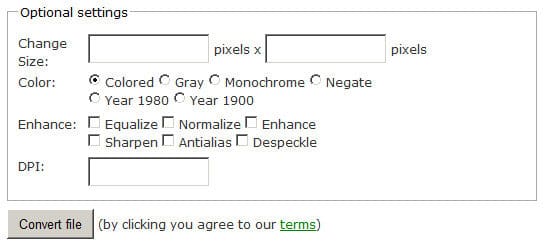
  • If selected file type supports enhancement, they will appear as Optional settings. Set them as appropriate.

optional-settings-7744304

  • Finally click on Convert File.
  • It will take some time depending on the size and nature of the uploaded file to get it converted.
  • Once the conversion completed, converted file get downloaded automatically.
  • It will prompt you to save the file. Give a desired location and complete the download process.

Is Your Files Safe With Online-Convert.com?

When you converting your files online with Online-Convert.com you have to upload the original file which may contain your sensitive information to their servers. Is this safe? According to their privacy policy they never look in to your files without permission. And their system automatically deletes the file after 10 download or 24 hours whichever comes first.

However it always better not to upload your very sensitive data to any online service as an extra safety measure.

Final Wrap Up

Online-Convert.com is a smart online file conversion tool which comes for totally free. For any quick conversion this will work perfectly. However if you are dealing with huge files this is not the tool for you. It accepts only up to 100 MB and even if it accepts it will take long time for you to upload and after conversion download the file.

I tried different file formats and they worked just fine. Especially I tried to convert .rar file to a .zip file, then open it with windows explorer. That also worked perfectly. Further I tried few image enhancements and got decent outcome as well. With all my experiments I recommend Online-Convert.com as a reliable dependable online file converter.

Tags: #Converter

Oppo Finder X907 – World’s Thinnest Android Smartphone

For the past few years shape of Smartphone changed drastically. I remember the time of flap phones, then we had direction pad, true QWERTY keyboard design of Blackberry. Once Apple introduced their iPhone back in 2007 most of the manufactures got inspired to come up with candy bar design with full touch controls.

After that there was no significant change in form factor in Smartphone. But they were getting bigger and thinner. Samsung is the initiator of very thin Smartphone with huge display. You may remember Galaxy Note and it became a blast. Now they have Galaxy Note II as well.

Following this trend many manufactures came up with thinner and bigger Smartphone. Motorola is very famous for manufacturing thinner Smartphone and Apple’s latest iPhone 5 is also has a bigger screen and ultra thin profile.

In the mean time Oppo, an unnoticed Chinese Smartphone manufacture came up with the world’s thinnest Android Smartphone. Yes, they manufactured world’s very first 1080p Full HD android Smartphone as well. Oppo Finder is under NOG spotlight today.

oppo-finder-x907-worlds-thinnest-android-smartphone-2981051

Specification Spotlight

Design

Design is the hook here. Its a candy bar type phone that weights 125g and thickness is only 6.65mm which makes it the world’s thinnest Smartphone. Front panel holds a 4.3 display and capacitive buttons. Micro SIM card slot and wireless docking port is on the left edge. Right edge is populated with volume rocker. Back panel design is clean and has only the camera, LED flash and loudspeaker.

oppo-finder-x907-design-3290068

Display

The display is 4.3 inch Super AMOLED Plus with 480 x 800 px resolution which will give it 216ppi of pixel density. Its same spec as Samsung Galaxy S II, not so impressive compared to latest devices. Protection is provided by gorilla glass panel which passed the “Hammer test” as well.

oppo-finder-x907-display-3701644

Processor and Storage

It packed with Snapdragon S3 platform configured with 1.5 GHz Dual Core ARMv7 CPU, Adreno 220 GPU with Qualcomm MSM8260 chipset. Not a high end configuration but a good platform to run latest Android and other applications.

RAM is 1GB DDR2 and Internal storage is 16GB non expandable. Amount of RAM is pretty much standard. Non expandable storage could be a drawback for a movie junkie.

Camera

Primary shooter is 8MP with CMOS sensor capable of recording snaps as well as 1080p video. It has LED flash, autofocus and other standard options. Secondary camera is 1.3 MP which you can use for video calling.

oppo-finder-x907-camera-5122713

Operating System

The device originally comes with Android 4.0 ICS. The UI is heavily customized. In other words you have to wait long till Oppo releases Android updates.

Connectivity

It has all the standard connectivity technologies such as 2G, 3G, HSDPA, Wi-Fi, USB 2.0, Bluetooth 2.0 and GPS. Snapdragon S3 platform doesn’t support LTE and no signs of NFC as well.

Battery Life

According to the specification, capacity of the battery is 1500 mAh. Phone has a relatively low resolution display and Snapdragon platform. Both factors would contribute to longer battery life. So even with this relatively less powerful battery this would have a decent battery life.

Warping Up

The phone’s design is awesome. It’s ultra thin and very light as well. I wouldn’t call it a powerhouse. It has very average configuration. But still it’s better than last Google reference model device for Android 4.0 ICS, Samsung Galaxy Nexus. Apart from the lesser resolution display, you would be able to have a great android experience on this device.

I have seen few Chinese tech reviews about Oppo Finder. One major point I noticed there is UI heavily themed. I’m not fond of manufacturer specific themes. They reduce performance and delay updates as well.

Finally, Oppo Finder is a good device with good form factor as well as decent software and hardware configuration. It would be an ideal choice for an average user who uses Smartphone for email, web browsing and audio/video playback.

As it seems this device is available only in China so far. I hope Oppo will come to international market and show their colors really soon.

Tags: #Android #Oppo #Qualcomm #Smartphone

Private File Sharing With SenduIt

Recently I was talking a lot about the cloud storage war between DropBox, Google Drive and SkyDrive. Yes they are providing amazing service and having a good competition in the market.

Quick Catch-up

Though you have those advanced file storing, syncing and sharing services, sometime you need simple file sharing solutions as well. In that case you need light weight tool which can be handled without much advanced functionalists.

Most importantly when you are sharing files, sometimes you need a link with expiry date. All of the above cloud storage services are giving public and private file sharing service, but in the case you forget to deactivate the link after using it, it will be there forever.

private-file-sharing-with-senduit-4398433

There is a simple file sharing service named SenduIt, which is allowing you to upload a file and share a private link with the unique feature expiration time for the link.

How to Use SenduIt?

  • Visit SenduIt home page.
  • There you will be able to see the file uploading component.
  • Click on choose file and locate it on your computer.
  • Here comes the magic, in the next drop down menu you can select the expiration time. Select it as you need.
  • Finally click upload.
  • It will show you a progress bar during the file upload process.
  • Once the upload process complete it will give you file sharing link.
  • Along with the upload link it will tell you the expiration date and file size.
  • Further, it provides facility for you to email the link.

Maximum file size allowed with SenduIt is 100MB. This allowance is more than enough for this kind of private file sharing. The beauty of this service, it all comes for free and you won’t even have to sing in to use the full functional version of the tool.

Try this tool, share few files with friends, check whether expiration features I working properly for all the give time ranges and share your finding with Notes Of Genius community.

Tags: #Files #Security #Share